Official visual manual

Luma R1 Manual & Support

Instructions for educators, assistive-technology practitioners, school staff, and students using Luma R1.

Applies to LumaRead2 1.10.0 Reviewed July 23, 2026

Start here · 1 of 10

Choose the task you need to complete

Home shows Read and Write. It also shows Math and Plan when those tools are enabled in Settings.

Choose from Home

Select the task you need to complete.

Steps

  1. 1Choose Read to capture printed text and listen to recognized text.
  2. 2Choose Write to type, dictate, edit, and listen to text.
  3. 3Choose Math for Calculator, Math Paper, 10-Frame, Money, Time, and Geometry tools.
  4. 4Choose Plan for tasks, timers, focus anchors, and alarms.
  5. 5Choose the Settings gear to configure the device.

What success looks like

The selected workspace opens. The Home icon returns to the starting screen when it is available.

If it does not work

  • If Math or Plan is missing, ask the staff member who manages Settings to check its Tools switches.
Student-facing guidancePick the picture that matches your task: book for Read, pencil for Write, calculator for Math, or checklist for Plan.
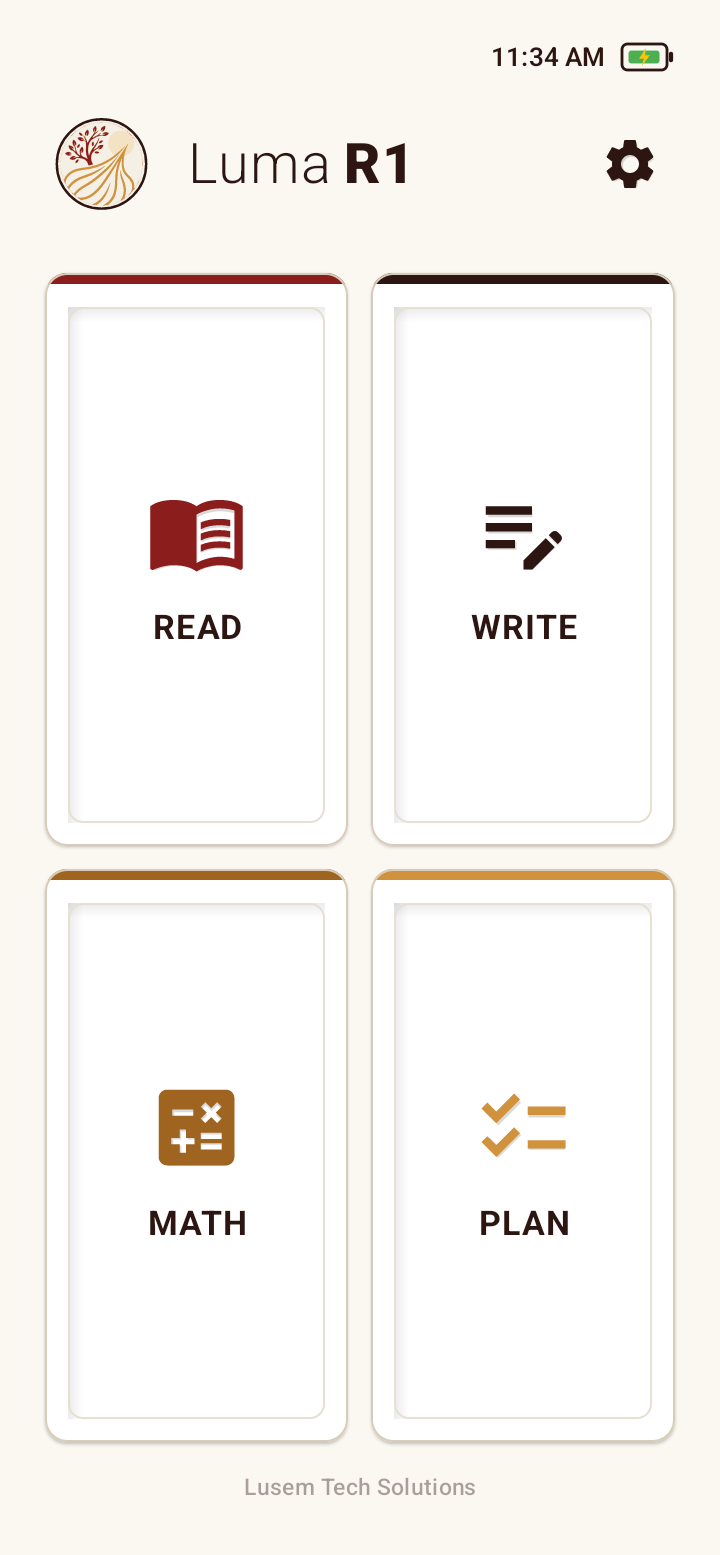
Luma R1 Home screen with Read, Write, Math, and Plan tiles and a Settings gear.
Home is the starting point. Math and Plan availability depends on their Tools settings.
Open full-size screenshot

Device setup · 2 of 10

Set up the device

Prepare the device, then choose whether Settings will remain available to the student or be configured and locked.

Charge, power on, and confirm status

Check the device, connect power, and start a session.

An adult or staff member should complete initial setup. Do not use damaged charging equipment.

Steps

  1. 1Before charging or powering on Luma R1, inspect the device, charger, and cable. Stop setup if a connector, cable, case, or screen is damaged.
  2. 2Charge Luma R1 with the charger and cable supplied with the device. If either needs replacement, follow the charging specifications in the package materials or contact Support before using a replacement.
  3. 3Hold the power button on the side of the device to turn it on.
  4. 4Wait for Home, then check the battery and charging symbol in the status area.
  5. 5Open System settings later if the displayed time needs adjustment.

What success looks like

Home appears and the status area reports time, battery level, and charging state.

If it does not work

  • If the screen stays dark, connect the supplied charger, wait several minutes, and try the power-on step again. If the screen remains dark, contact Support.
  • If the device becomes unusually hot, smells unusual, is exposed to liquid, or is visibly damaged, stop using it. Disconnect the charging cable only if this can be done safely.
  • Do not open or attempt to repair the device.

Decide whether to leave Settings open or lock them

Consider two common approaches to Settings access during device setup.

Steps

  1. 1Leave Settings open if the student will adjust options and determine which configuration works for them.
  2. 2Or, configure Settings for the student’s needs and then turn on Settings Lock.
  3. 3Settings Lock hides Settings and keeps the current configuration in place. It does not choose or reset the options, so finish configuring the device before turning on the lock.
  4. 4See the full Settings section of this manual for descriptions of each option and the Settings Lock.

What success looks like

Settings are either available for the student to adjust or hidden with the configured options still in effect.

If it does not work

  • To change a locked configuration later, unlock Settings, make the changes, and then lock Settings again.

Clean, store, and protect Luma R1

Clean and store the device without opening or repairing it.

Steps

  1. 1Power off before cleaning.
  2. 2Use a soft, dry microfiber cloth on the display and camera area. Do not spray liquid directly on the device.
  3. 3Keep ports clean, dry, and free of debris. Do not insert objects or use compressed air to clean them.
  4. 4Store the device dry, away from direct heat, and positioned so the screen and controls are not under pressure.
  5. 5Charge as needed. Before each charging session, inspect the charger and cable. Do not use damaged charging equipment.

What success looks like

The device and charging equipment are stored clean and dry, with no visible damage.

Read · 3 of 10

Capture printed text and listen to it

Read uses the camera to capture an image and recognize any text in the image. Recognition may be incomplete or incorrect, so compare important information with the printed page. Manual capture requires the user to press a button to initiate the capture; Auto mode provides a countdown, attempts to stabilize the image, and then proceeds with capture automatically.

Capture a page in Manual or Auto mode

Capture a clear image to improve text recognition.

Before you begin

  • Flash, autofocus, capture delay, and progressive haptics are controlled in Settings > Tools Tab > Camera Features Section.

Steps

  1. 1From Home, choose Read. Entering Camera starts a new capture session.
  2. 2Place the printed page flat in even light. Keep the camera parallel to the page and avoid glare or heavy shadow.
  3. 3Use – or + to zoom until the image fills the useful preview without cutting off lines. You can also zoom to capture specific parts of a page.
  4. 4In Manual, hold steady and tap the shutter button. If Flash is enabled, use the flash control only when it improves contrast without glare.
  5. 5In Auto, hold the page steady while Luma R1 provides a countdown and then proceeds through the image capture process.
  6. 6Keep the device still throughout the capture process.

What success looks like

After image capture and text recognition succeed, either the Photo Screen or Edit Screen will open. Both screens can read back the recognized text. The main screen after capture can be configured in Settings > General Tab > Navigation Section.

If it does not work

  • For No Text Detected, improve light, flatten the page, reduce glare or shadow, move closer, and retry.
  • If the wrong area is captured, return to Camera and begin a fresh session.
Student-facing guidanceHold still, keep all the words on the screen, and wait until Luma R1 moves to the next screen.
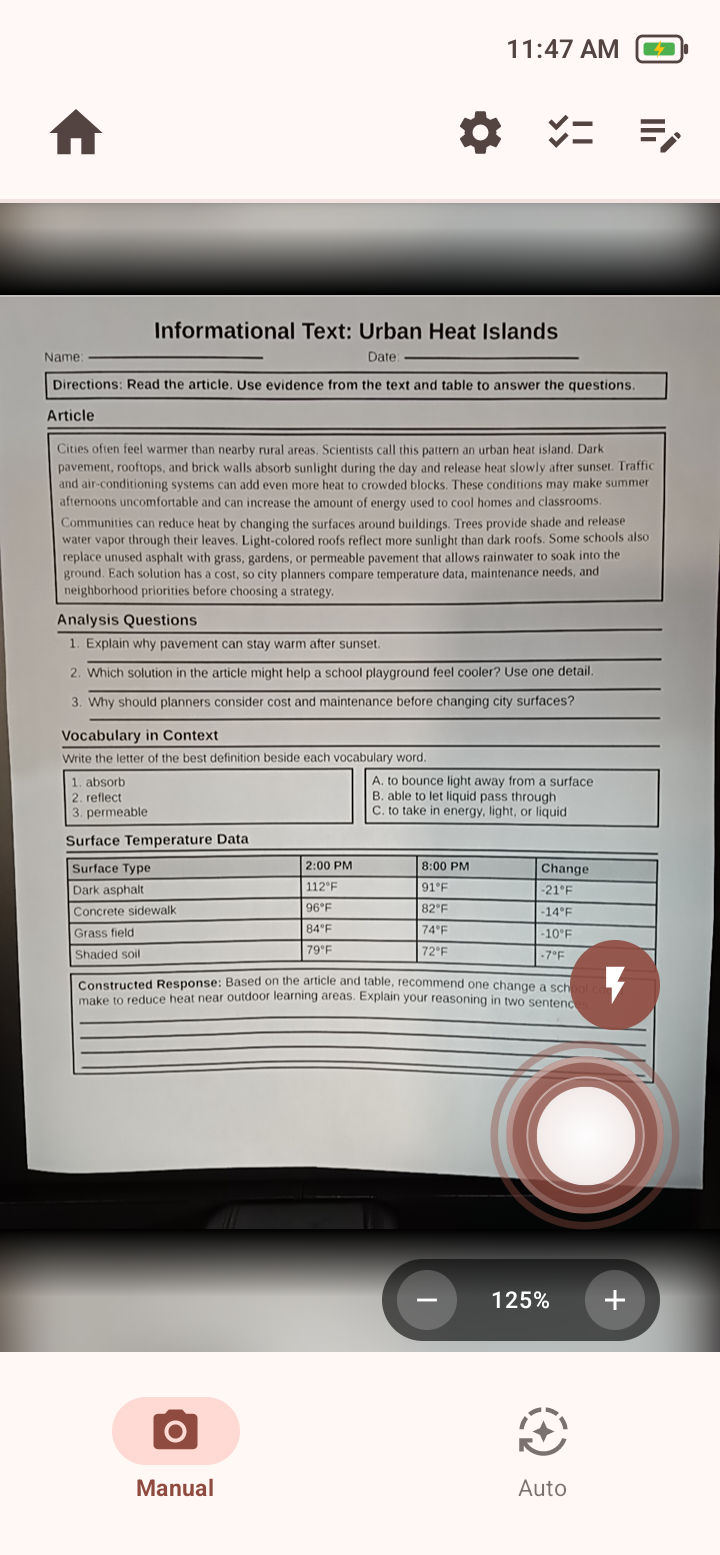
Read camera screen showing a page in the preview, shutter, zoom, flash, Manual, and Auto controls.
Read camera in Manual mode. Keep the page flat inside the preview and use the shutter when the text is clear.
Open full-size screenshot

Review recognized text and listen

Listen by word or sentence while viewing the captured page.

Steps

  1. 1Use Play, Pause, Stop, Previous, and Forward to control speech. Sentence and word highlight controls can be configured in Settings > TTS & STT Tab > Highlighting Section.
  2. 2Alternatively, choose Sentence or Word for the playback unit, then tap a recognized word or sentence to hear it from that point.
  3. 3On the Photo Screen, you can us pinch gestures to zoom in or out.
  4. 4From the Photo Screen, you can tap the Edit icon in the top right to navigate to the Edit Screen. The text is preserved.
  5. 5From the Edit Screen, you can tap the Photo icon in the top right to navigate to the Photo Screen. The text and image are preserved.

What success looks like

The selected text is spoken and visual highlights (if applicable) follow the configured playback mode.

If it does not work

  • If speech is silent, stop and retry, check volume or paired headphones, and preview the selected voice in TTS & STT.
  • If highlighting is unexpected, check sentence and word highlighting plus segmentation settings.

Screen sequence

These screens follow the procedure above in order. Open any screenshot at full size when you need to inspect a control.

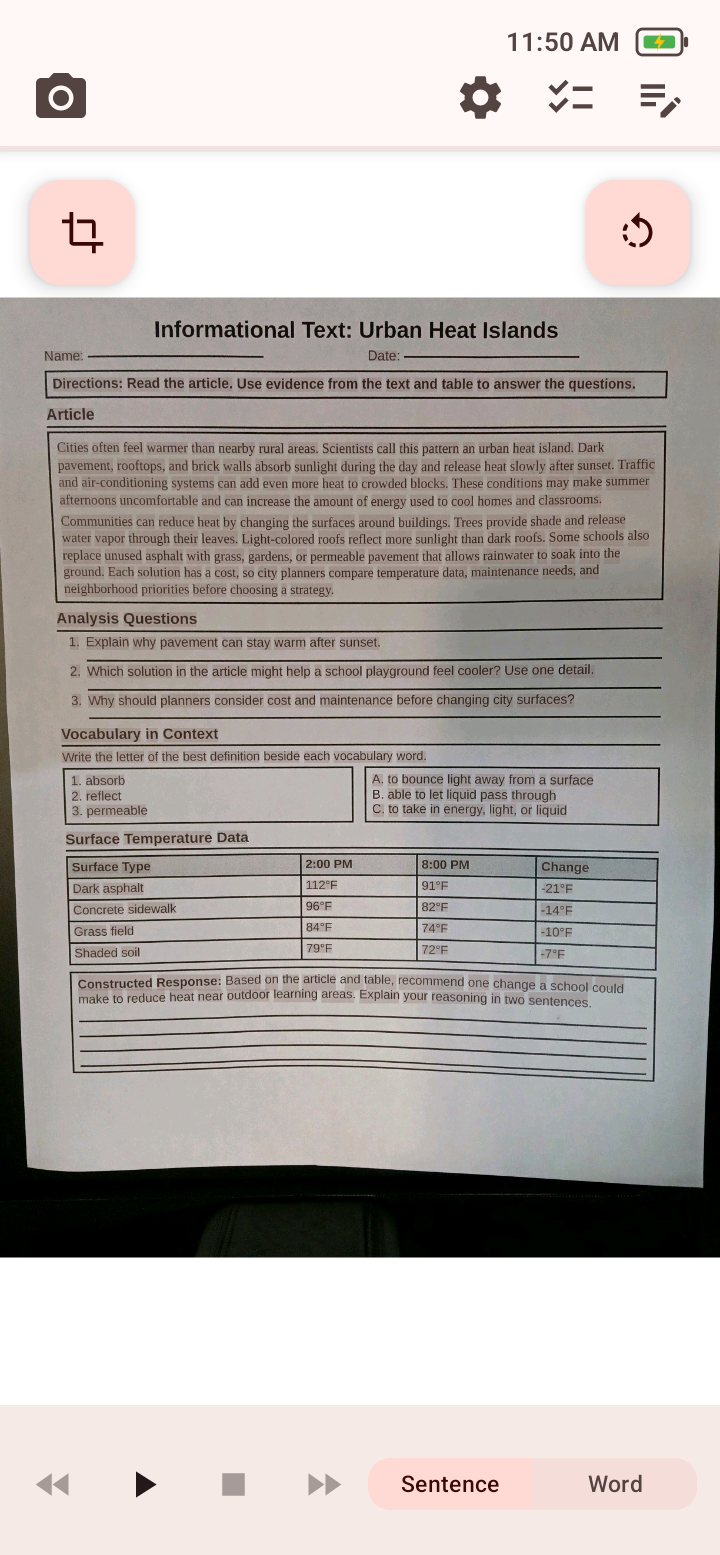
  1. Recognized page in the Photo Screen with crop, rotate, playback, Sentence and Word controls.
    Photo Screen after recognition. Tap text or use playback; crop and optional rotation controls are above the image.
    Open full-size screenshot
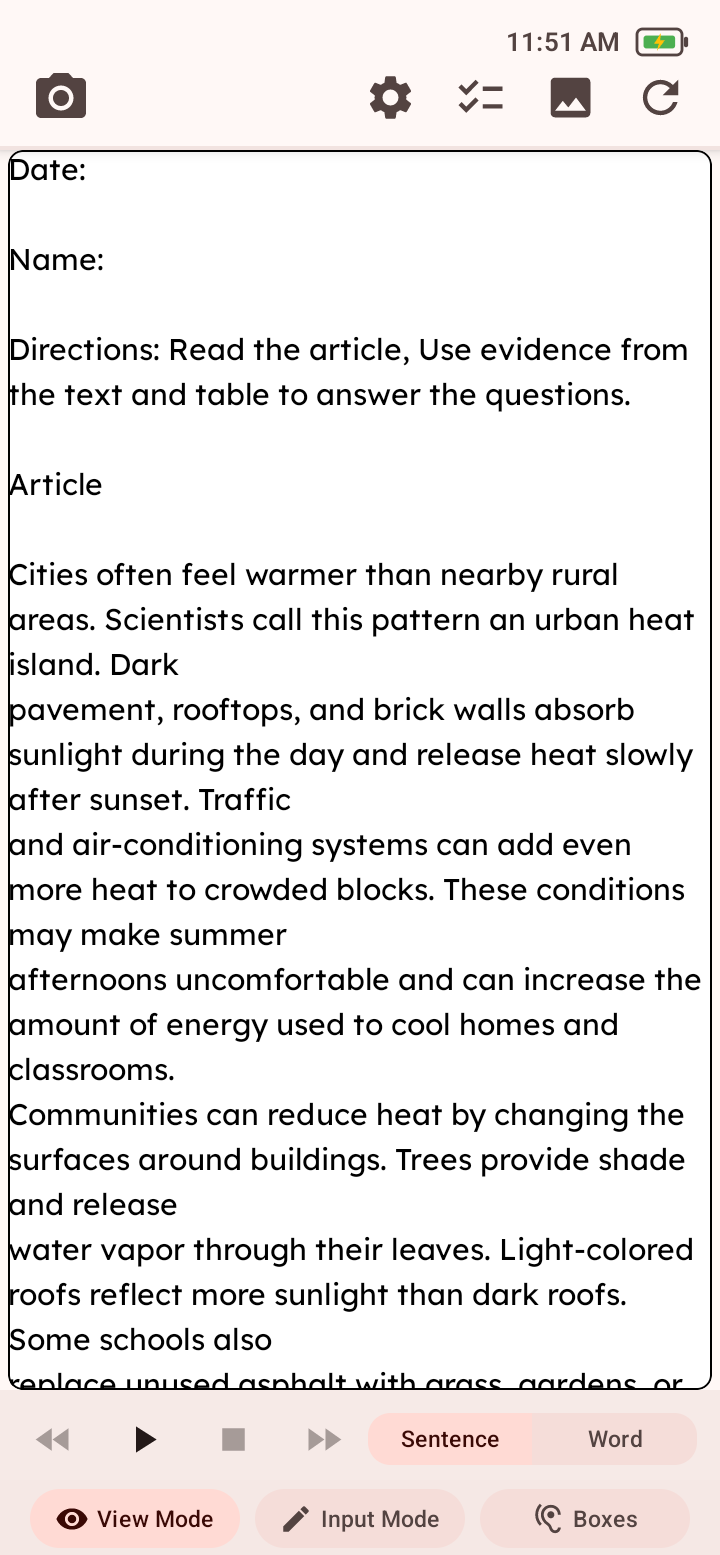
  2. Edit View Mode showing recognized text and playback controls.
    View Mode is for listening and reviewing without opening the keyboard.
    Open full-size screenshot

Crop, rotate, restore, or start over

Focus recognition on part of a page or correct the page orientation.

Steps

  1. 1In the Photo Screen, tap the Crop icon at the top left of the image.
  2. 2Drag the crop boundary or use the left, up, down, right, shrink, and expand controls for precise changes.
  3. 3Choose Apply to run recognition on the selected area, or Cancel to leave the image unchanged.
  4. 4Use Restore to return to the original image after a crop.
  5. 5If Show Manual Rotation Button is enabled, choose rotate counterclockwise until the page is upright.
  6. 6Choose Back to Camera when you are ready to clear the current session and capture the page again.

What success looks like

The selected crop or rotation is applied, the original image is restored, or Camera opens for a new capture.

If it does not work

  • If crop removes needed text, restore the original and try again.
  • If recognition remains poor after crop and rotation, recapture with better alignment and light.
Student-facing guidanceLuma R1 attempts to recognize text in columns and charts, but complex layouts may produce uneven results. Cropping lets you focus on one section of the page at a time. Applying a crop processes that area again, which may improve text recognition. Choose Restore to return to the original image and try a different crop.
Recognized page in the Photo Screen with crop, rotate, playback, Sentence and Word controls.
Photo Screen after recognition. Tap text or use playback; crop and optional rotation controls are above the image.
Open full-size screenshot

Write · 4 of 10

Write, edit, dictate, and listen to text

Write opens as a blank workspace. You can also open recognized text from Read in Write. View Mode emphasizes listening; Input Mode adds editing tools.

Move between View Mode and Input Mode

Choose a playback-focused view or an editable writing view.

Steps

  1. 1Choose Write from Home for a blank workspace. If a captured image is still active, tap the Write icon in the top right of the Photo Screen to see the recognized text in the Write screen.
  2. 2Choose View Mode to hide the keyboard and use word or sentence playback.
  3. 3Choose Input Mode to open the on-screen QWERTY keyboard, predictions, microphone, and clipboard tools.
  4. 4In View Mode, use Play, Pause, Stop, Previous, and Forward. Highlights follow the configured playback unit (based on the settings configured in Settings > TTS & STT Tab > Highlighting Section).
  5. 5Tap the circular Restore icon in the top right only when you want to replace your edits with the original recognized text. If there is no active, recognized text, tap the trashcan icon in the top right to clear all user-entered text.

What success looks like

Text remains in the workspace while the available controls change for reviewing or editing.

If it does not work

  • If Write opens in a different mode than expected, switch modes or change Default Write Tool in Settings > General Tab > Navigation Section.

Screen sequence

These screens follow the procedure above in order. Open any screenshot at full size when you need to inspect a control.

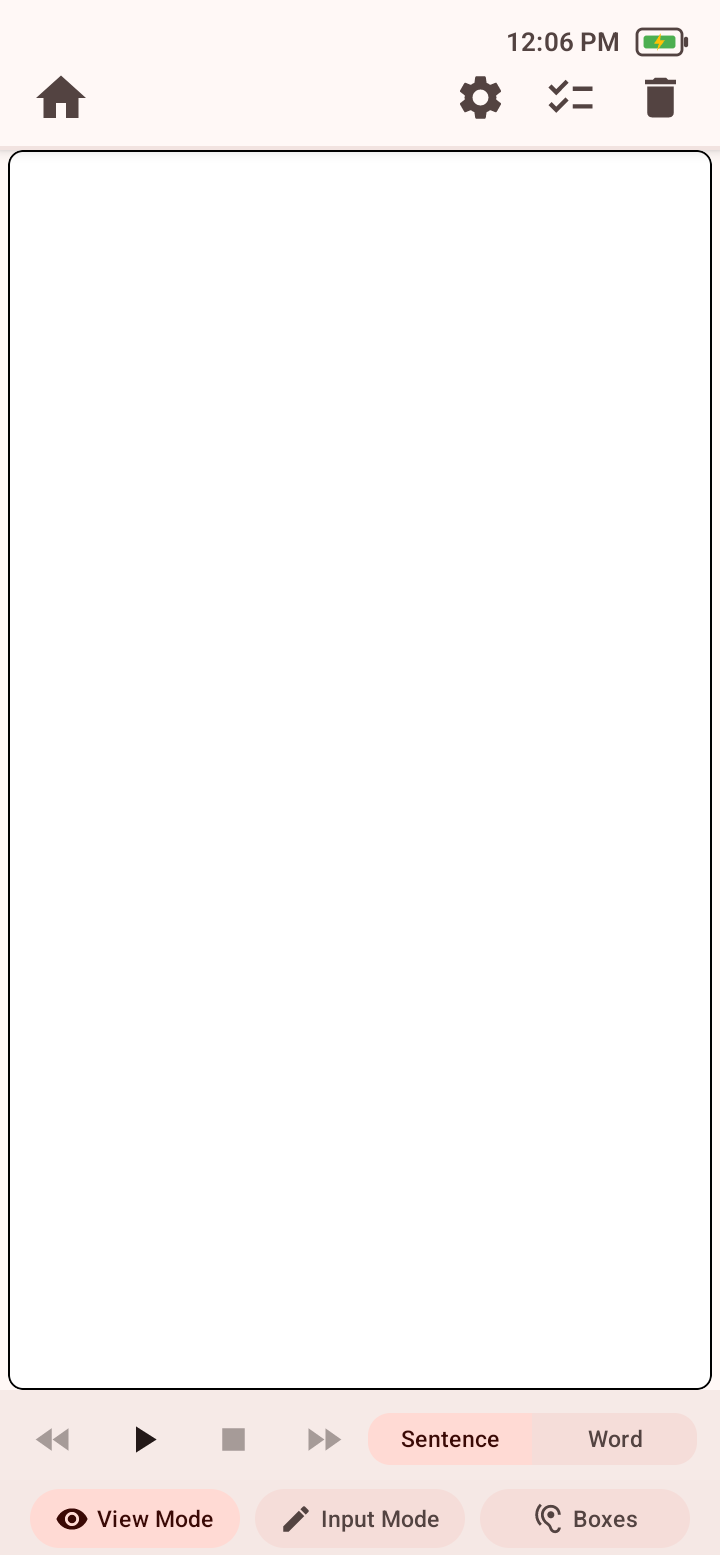
  1. Blank Write workspace in View Mode with playback controls.
    Write opens a blank workspace. Switch to Input Mode to type or dictate.
    Open full-size screenshot
  2. Edit View Mode showing recognized text and playback controls.
    View Mode is for listening and reviewing without opening the keyboard.
    Open full-size screenshot
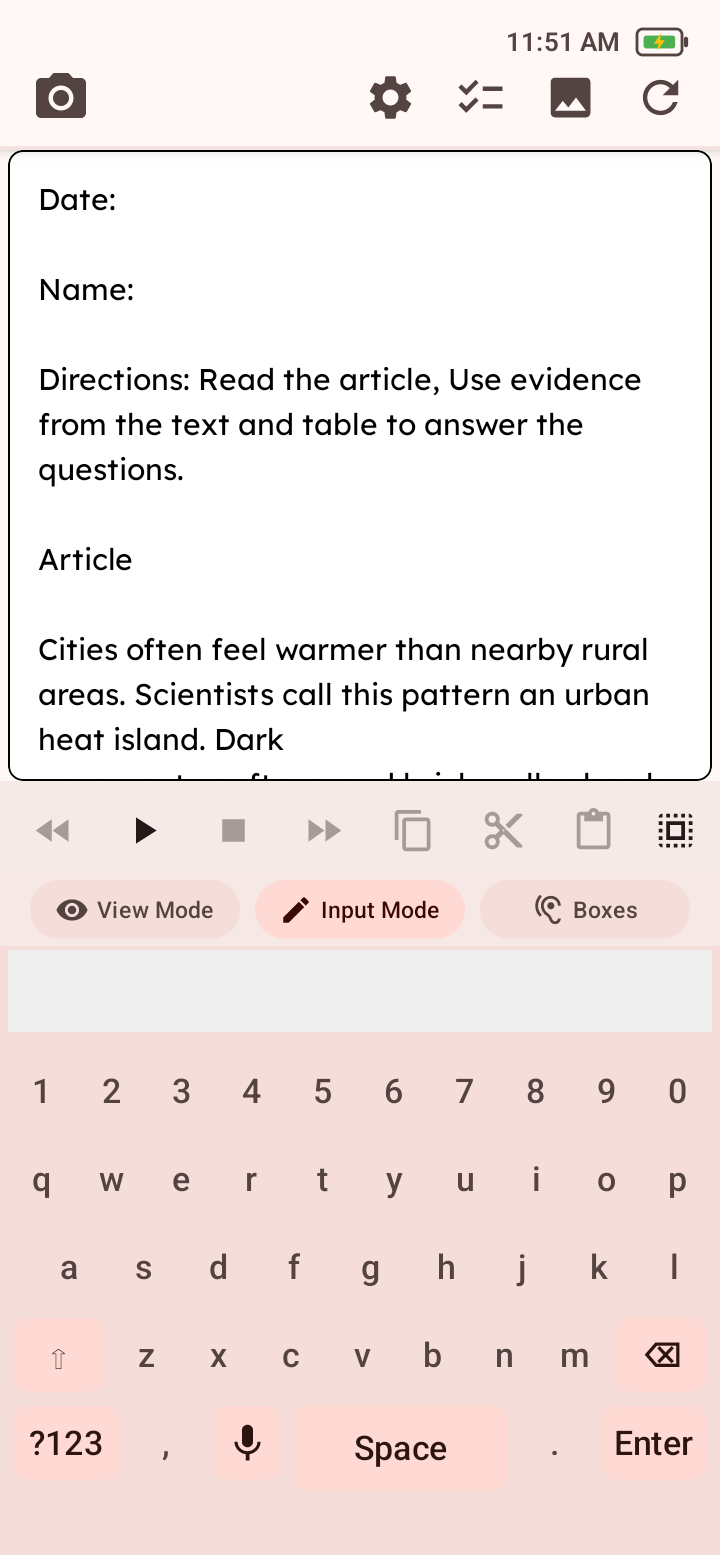
  3. Edit Input Mode showing recognized text, prediction row, microphone, and on-screen keyboard.
    Input Mode adds the keyboard, microphone, word predictions, and text editing.
    Open full-size screenshot

Type, use predictions, and edit a selection

Compose or correct text with the on-screen keyboard.

Steps

  1. 1In Input Mode, tap where text should be inserted.
  2. 2Use letters, Shift, punctuation, Space, and Enter. Hold Backspace to remove more than one character.
  3. 3Choose a prediction to complete the current word; long-press a prediction to hear it.
  4. 4Press and drag the text handles to select text, then use Copy, Cut, Paste, or Select All.
  5. 5If Play each word or Play each sentence is enabled, pause after typing to hear the auditory feedback (configurable in Settings > TTS & STT Tab > Write Playback Section.
  6. 6Switch to View Mode and play the result for a final review.

What success looks like

The revised text is visible and can be read aloud from the chosen position.

If it does not work

  • If a prediction is wrong, continue typing or remove the inserted letters with Backspace.
  • If a clipboard action changes more text than expected, use Restore when the original recognized text is available. Restore replaces your edits.
Student-facing guidanceIf it is difficult to read the word predictions that appear, press and hold to listen to them.
Edit Input Mode showing recognized text, prediction row, microphone, and on-screen keyboard.
Input Mode adds the keyboard, microphone, word predictions, and text editing.
Open full-size screenshot

Dictate text

Enter text by speaking instead of typing.

Steps

  1. 1Place the cursor where new text belongs and choose the microphone.
  2. 2When the interface reports Listening, speak clearly in short phrases.
  3. 3Stop or wait for silence detection. Keep the workspace open while it reports Processing.
  4. 4Carefully review the inserted text.
  5. 5For a speech error, reduce background noise, move closer, and retry a shorter phrase.

What success looks like

Recognized speech is inserted at the cursor and remains editable.

If it does not work

  • Speech recognition can omit, change, or insert words. Review dictated text before relying on it.
  • If repeated attempts fail, carefully review the configured settings in Settings > TTS & STT Tab > Speech-to-Text Engine Section.
Edit Input Mode showing recognized text, prediction row, microphone, and on-screen keyboard.
Input Mode adds the keyboard, microphone, word predictions, and text editing.
Open full-size screenshot

Use Sound Boxes (Elkonin Boxes)

Represent sounds or parts of a word with movable tokens in an Elkonin-box activity.

Before you begin

  • Enable or Disable Sound Boxes in Settings > Tools Tab > Write Tools.

Steps

  1. 1Open Write and choose Boxes from the mode bar.
  2. 2Choose Boxes, then select 2, 3, 4, 5, or 6 boxes to match the activity. Turn Number labels on when the activity needs them.
  3. 3Choose Color, then use a single color or multiple colors.
  4. 4Tap or drag an available token to add each identified sound. The counter reports how many sounds have been placed.
  5. 5Tap or drag a placed token back to the available-token area to correct the response.
  6. 6Choose Reset to clear the boxes, or leave Boxes when the activity is complete.

What success looks like

Placed tokens remain visible and movable between the boxes and the available-token area.

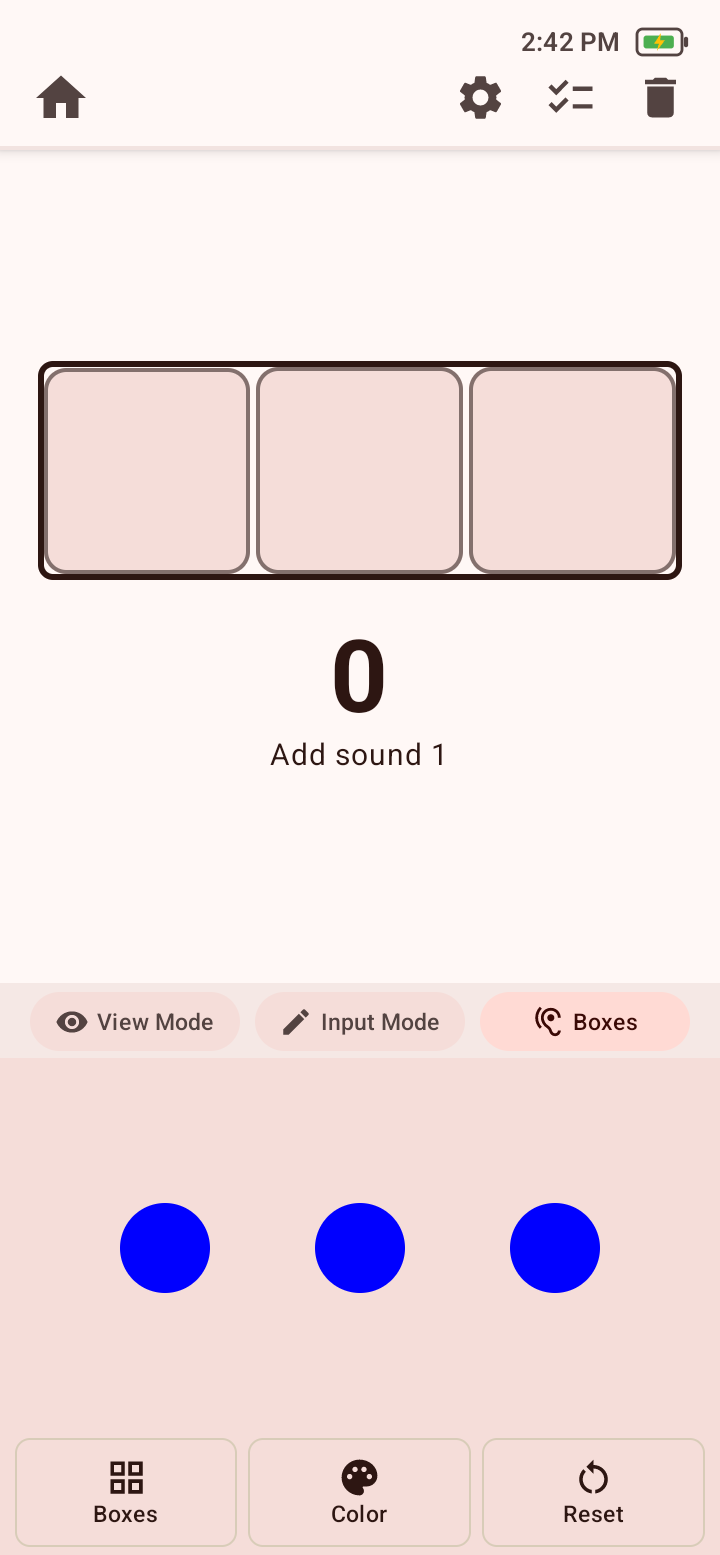
Sound Boxes or Elkonin Boxes workspace with three empty boxes, a sound counter, three available tokens, and Boxes, Color, and Reset controls.
Sound Boxes (Elkonin Boxes) is an optional Write tool. Use Boxes to choose 2–6 boxes and optional number labels, Color to style the tokens, and Reset to start over.
Open full-size screenshot

Math · 5 of 10

Use the Math tools

Math appears on Home when Math Mode and at least one Math tool are enabled. The bottom selector shows only enabled tools.

Math tool

Calculators

Use Basic Calculator

Enter and evaluate arithmetic with a large keypad.

Steps

  1. 1Open Math, choose Calculator, then choose Basic.
  2. 2Enter digits, decimals, +, −, ×, ÷, parentheses, percent, or sign change; choose = for the result.
  3. 3Use Backspace to remove the last entry and C to clear the current expression.
  4. 4Check the expression and result areas above the keypad. Choose Read to hear the current calculation.

What success looks like

After you enter a valid expression and choose =, its result appears above the keypad.

If it does not work

  • For an invalid expression, correct the last entry or clear and re-enter it.
  • If Calculator is absent, check Math Mode and the Calculator switch in Tools.
Student-facing guidanceEnter one part of the calculation at a time. Before choosing =, check the expression at the top, and use Read if you want to hear it.
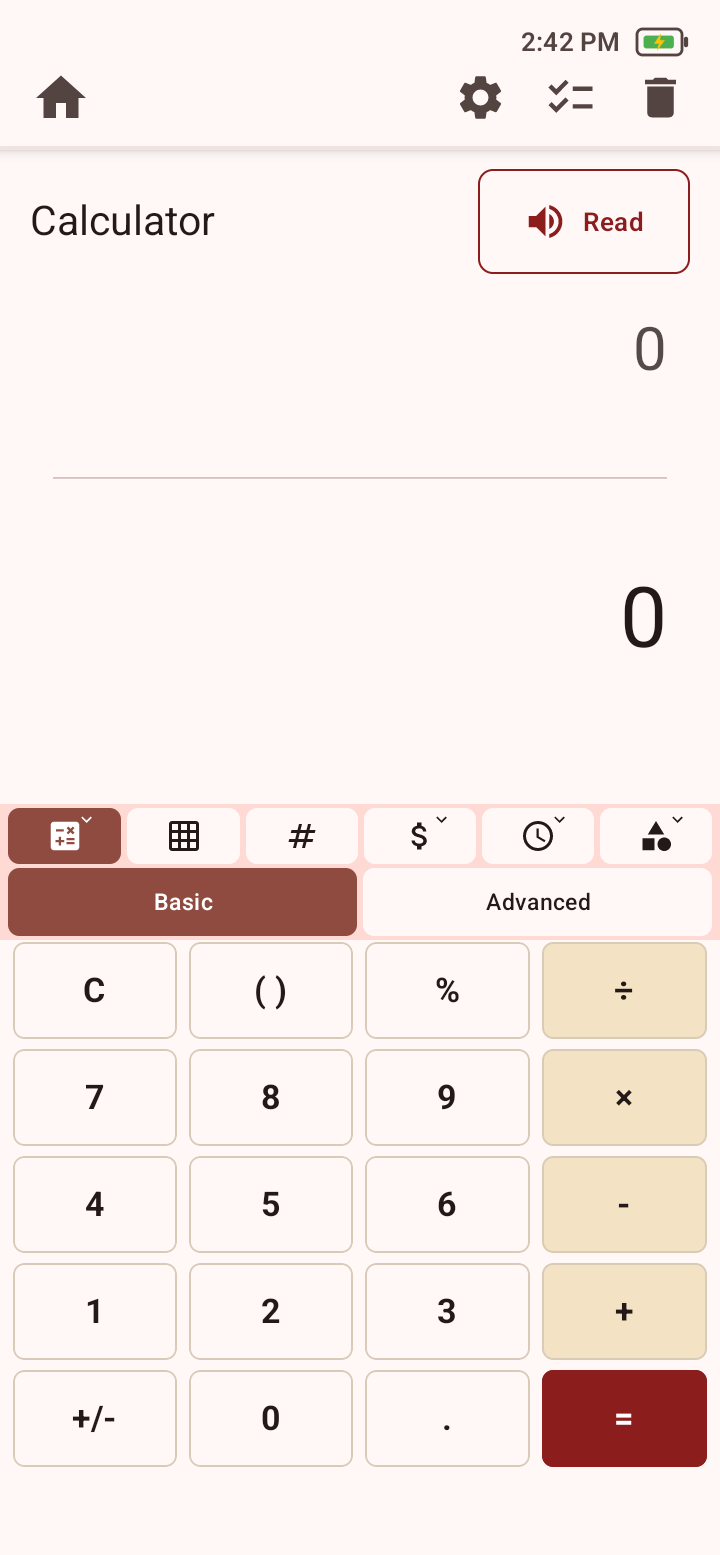
Basic Calculator with expression and result areas, Read control, Basic and Advanced choices, and arithmetic keypad.
Basic Calculator keeps the expression and result above a large arithmetic keypad.
Open full-size screenshot

Use Advanced Calculator

Evaluate scientific functions with grouped key panels.

Steps

  1. 1Choose Calculator from the Math selector, then choose Advanced.
  2. 2Choose Numbers for digit and arithmetic keys, Functions for powers, roots, trigonometry, and logarithms, or More for constants, factorial, reciprocal, hyperbolic functions, inverse trigonometric functions, 10ˣ, and eˣ.
  3. 3Choose DEG or RAD before trigonometric work.
  4. 4Build the expression by moving between the three key panels as needed.
  5. 5Choose =, then check the expression and result row. Use Backspace to remove the last entry or Clear to remove the current expression.
  6. 6Choose Read to hear the current calculation.

What success looks like

The selected scientific expression is evaluated in the chosen angle mode.

If it does not work

  • Check Degrees/Radians first when a trigonometric answer is unexpected.
  • Clear unmatched parentheses or incomplete functions and enter the expression again.
Student-facing guidanceCheck DEG or RAD before using a trigonometry key. Move between Numbers, Functions, and More to find the key you need, then review the full expression before choosing =.
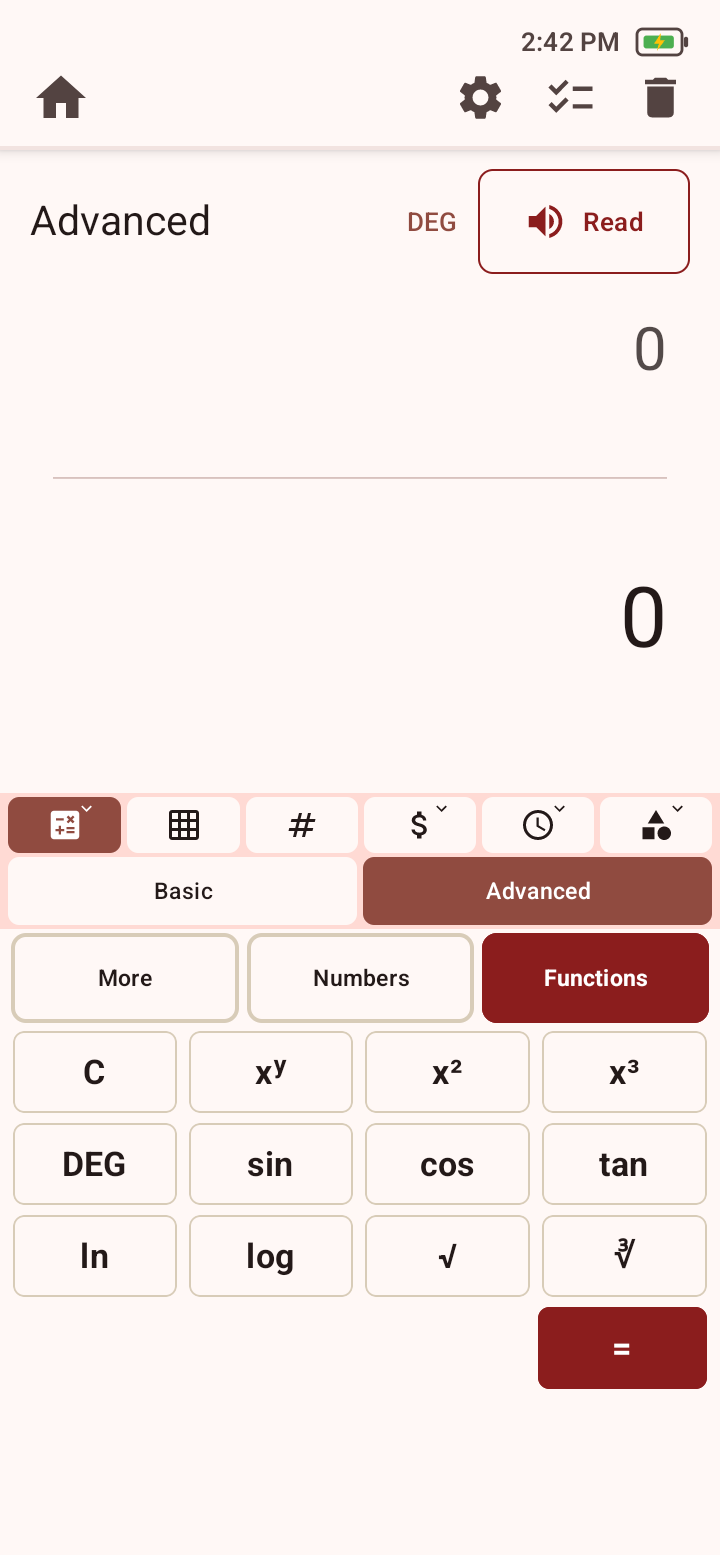
Advanced Calculator with Degrees mode, Read control, More, Numbers, and Functions choices, and a scientific-functions keypad.
Advanced Calculator groups its keys under More, Numbers, and Functions.
Open full-size screenshot

Math tool

Math Paper

Use the Math Paper workspace

Keep arithmetic work on a scrollable grid or coordinate plane.

Steps

  1. 1Choose Math Paper from the Math selector.
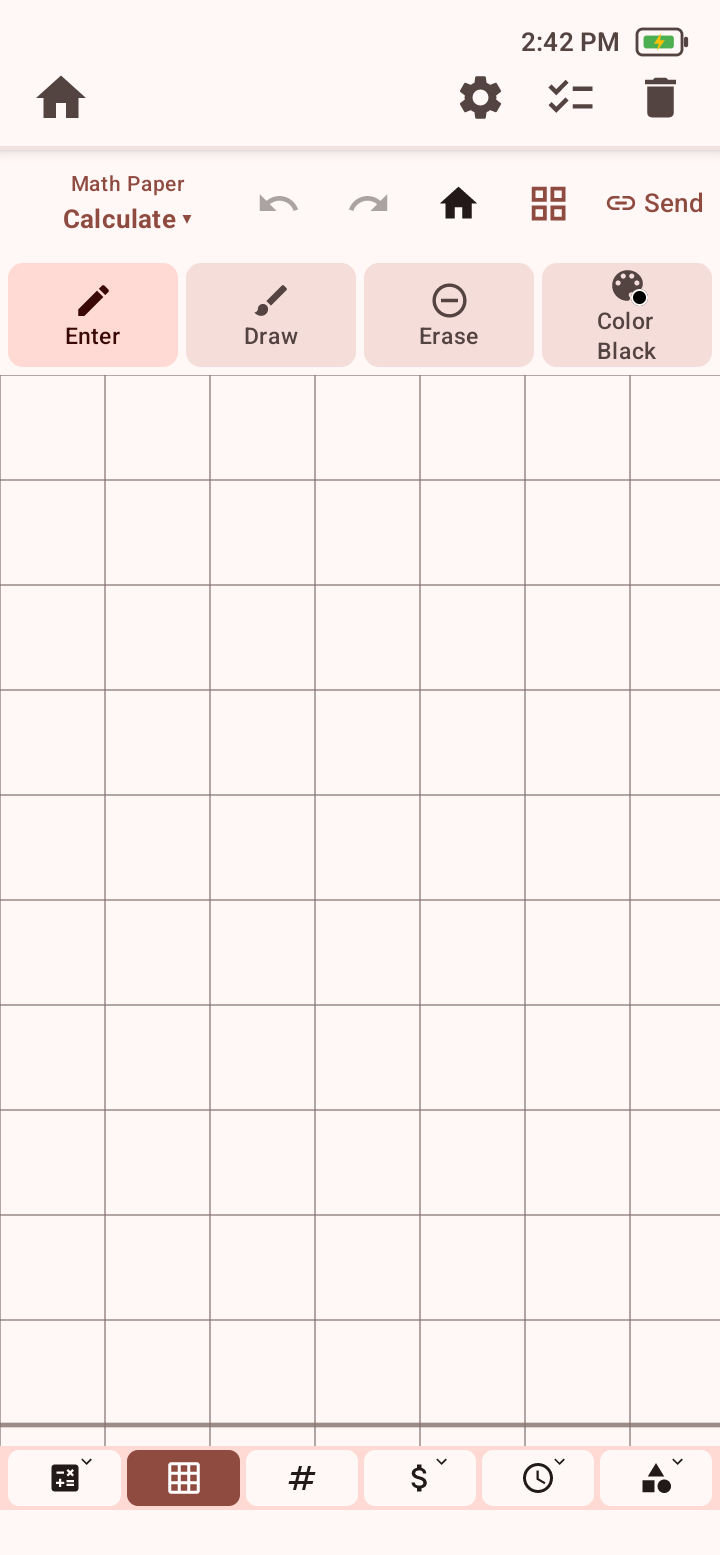
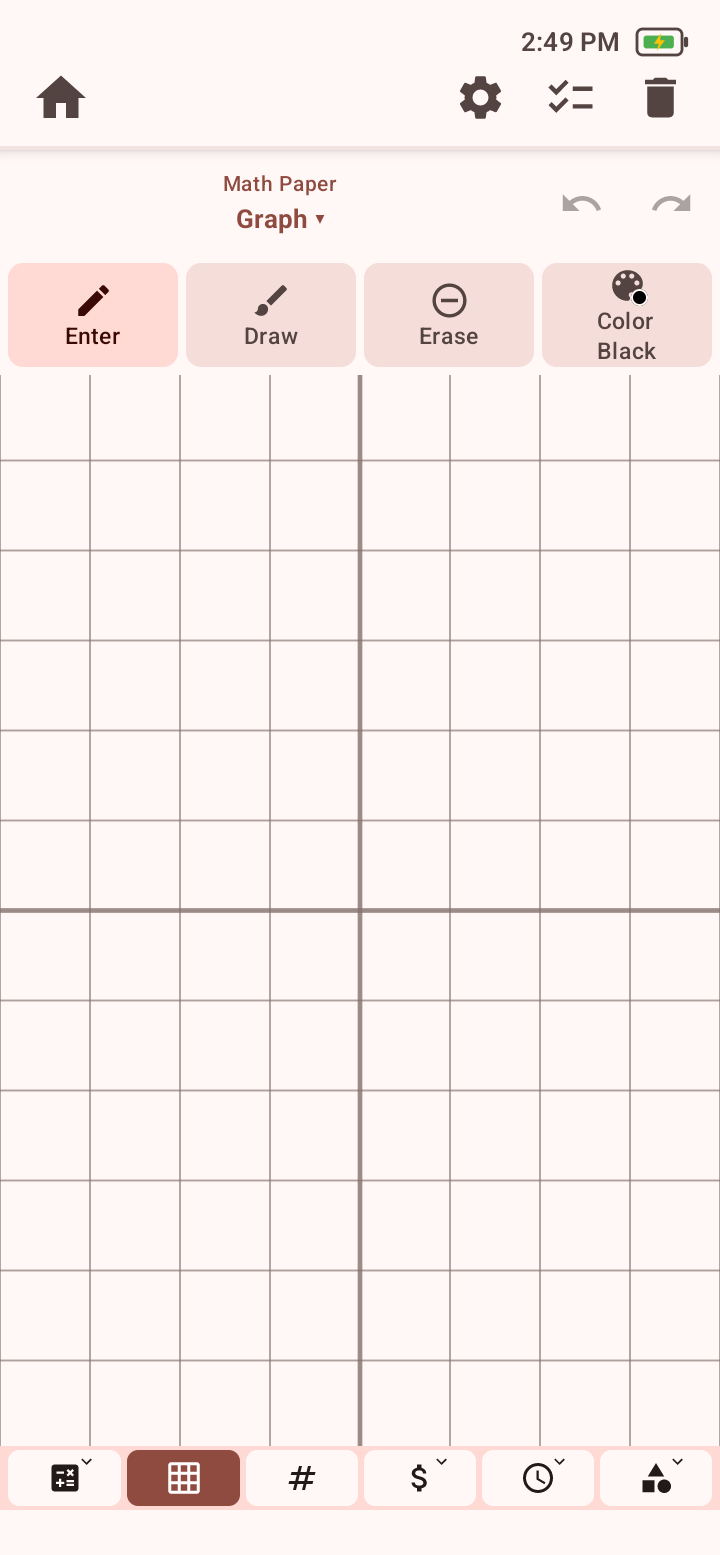
  2. 2Choose Calculate for a standard grid with calculation controls, or Graph for a centered coordinate plane.
  3. 3Choose Enter, tap a cell, and use the number and symbol panels. Use the arrows to move between cells and the checkmark to close the entry panel.
  4. 4Choose Draw for freehand work or Erase to remove marks. Choose Color to change the active entry or drawing color.
  5. 5Use Undo and Redo as needed. Return paper to top left or show or hide the axis lines when those controls are useful.
  6. 6In Calculate, choose Send when you want to move the entered calculation to Calculator.

What success looks like

The grid keeps the entered or drawn work in the selected Calculate or Graph layout.

If it does not work

  • If the keypad covers the tool selector, choose the checkmark to close cell entry.
  • If the paper is off position, use Return paper to top left.
  • Switching between Calculate and Graph paper clears the current work after confirmation; cancel the prompt when you need to preserve it.
Student-facing guidanceUse one cell for each number or symbol when entering work. Choose Undo if you make a mistake, and do not switch between Calculate and Graph unless you are ready to clear the paper.
Screen sequence

These screens follow the procedure above in order. Open any screenshot at full size when you need to inspect a control.

  1. Math Paper in Calculate mode with Enter, Draw, Erase, Color, undo, redo, axis, positioning, and Send controls.
    Math Paper Calculate mode supports cell entry, drawing, erasing, color, axes, and sending work to Calculator.
    Open full-size screenshot
  2. Math Paper in Graph mode with a coordinate grid, Enter, Draw, Erase, Color, undo, and redo controls.
    Switch Math Paper to Graph for a centered coordinate plane.
    Open full-size screenshot
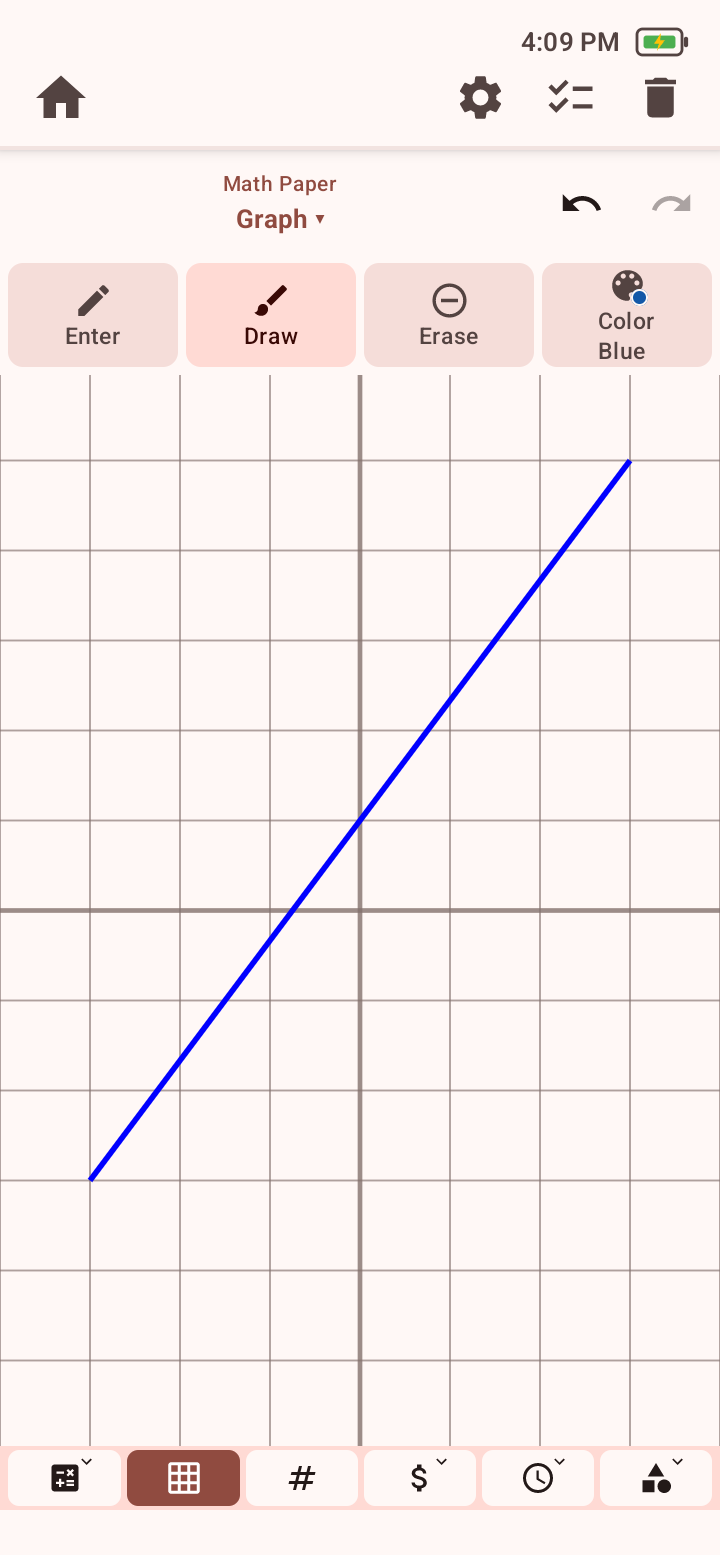
  3. Math Paper Graph mode with Draw selected, Blue selected under Color, and a blue diagonal line drawn across the coordinate plane.
    Choose Draw and a color, then drag across the Graph paper to add freehand lines or working marks.
    Open full-size screenshot

Move results between Calculator and Math Paper

Move a Calculator result to Math Paper or send a selected Math Paper expression to Calculator without discarding either workspace.

Steps

  1. 1In Basic or Advanced Calculator, complete the calculation so the result you want to transfer appears.
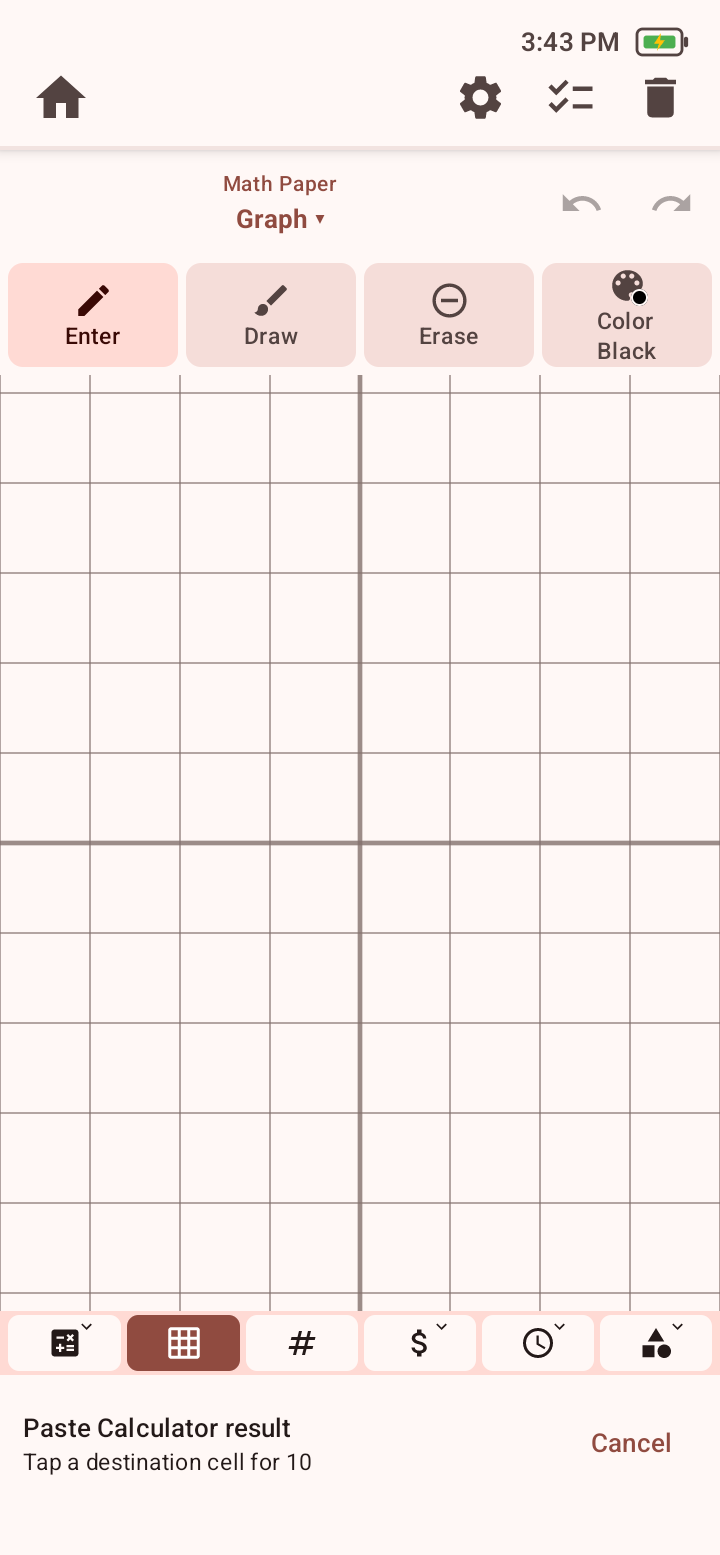
  2. 2Choose To Paper. Math Paper opens in its current Calculate or Graph view and shows Paste Calculator result with the value waiting to be placed.
  3. 3Tap a destination cell to paste the result, or choose Cancel to return without placing it.
  4. 4Use Enter, Draw, Erase, Color, Undo, and Redo to add or revise work around the pasted result.
  5. 5Choose Calculator in the bottom Math selector to return. The calculator expression and result remain available.
  6. 6Continue calculating and choose To Paper again to place another result. Existing Math Paper work remains in place.
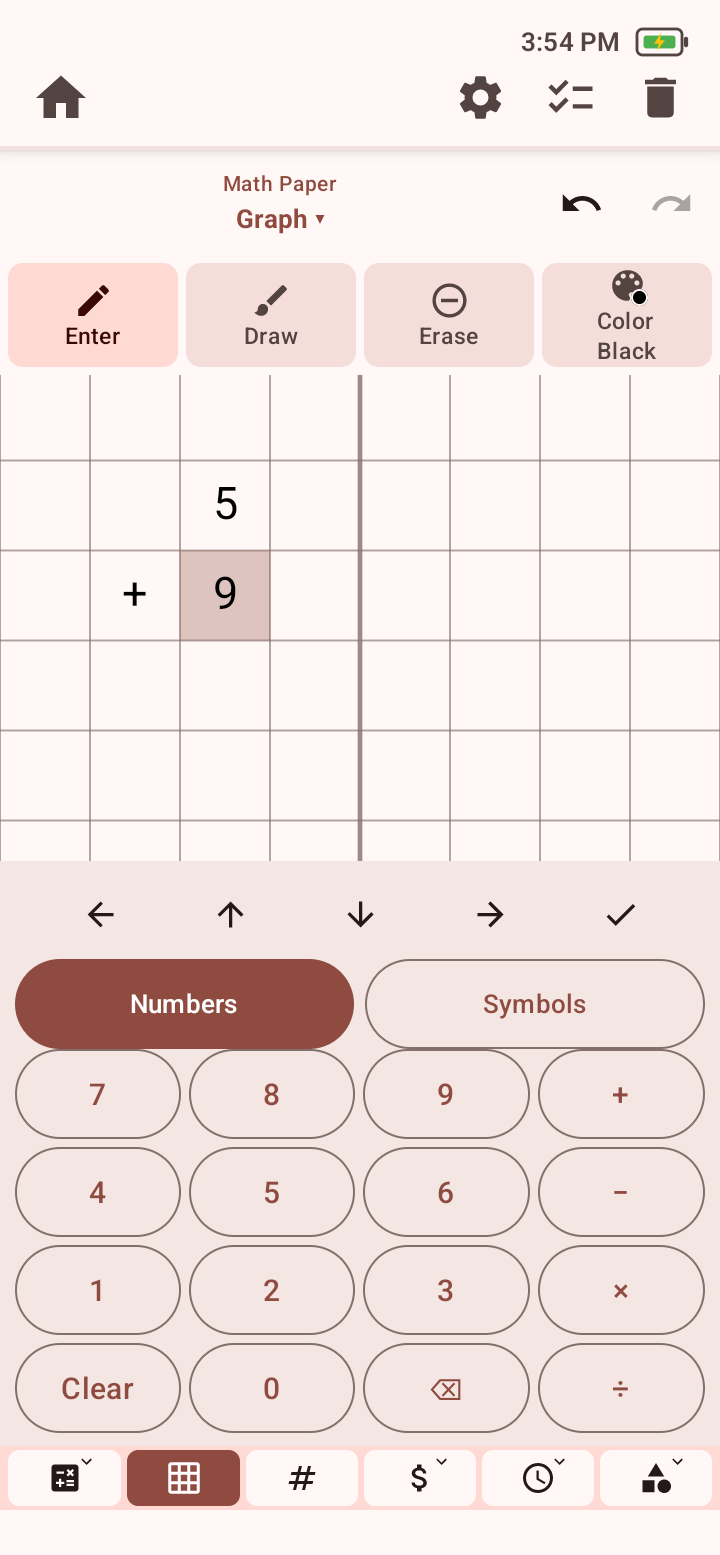
  7. 7To build an expression on Math Paper, choose Enter, tap a starting cell, and use the Numbers or Symbols panel. Move with the arrows and choose the checkmark when entry is complete.
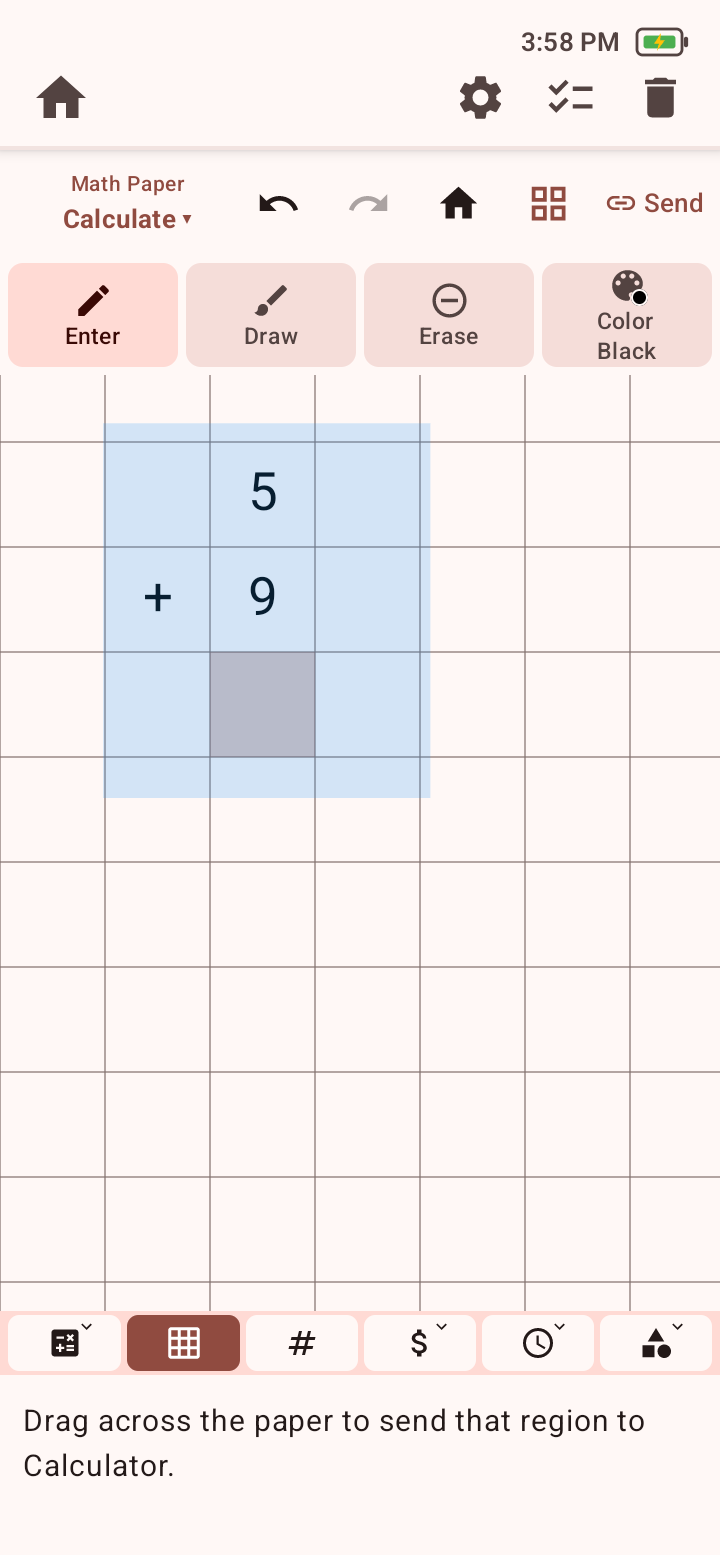
  8. 8To send that paper work in the other direction, use Math Paper in Calculate mode and choose Send.
  9. 9Drag across the complete rectangular region containing the expression. The selected cells are highlighted before Calculator opens.
  10. 10Review the transferred grid preview and calculated result in Calculator. Continue calculating or choose To Paper to place the result back on the paper.

What success looks like

You can alternate between calculation and visual working space while preserving the Calculator result, Math Paper entries, and the selected region used for evaluation.

If it does not work

  • If To Paper is absent, complete a valid calculation first.
  • If the result is not placed yet, choose Cancel. After placement, use Undo to correct the destination.
  • If Calculator receives the wrong cells, return to Math Paper and repeat Send with the complete expression inside the selection.
  • Switching between Calculate and Graph paper prompts to clear the current paper; cancel that prompt when the existing work must be kept.
Student-facing guidanceTo Paper moves a finished answer onto the grid. Send moves a selected grid calculation into Calculator. Check the highlighted cells before Calculator opens.
Screen sequence

These screens follow the procedure above in order. Open any screenshot at full size when you need to inspect a control.

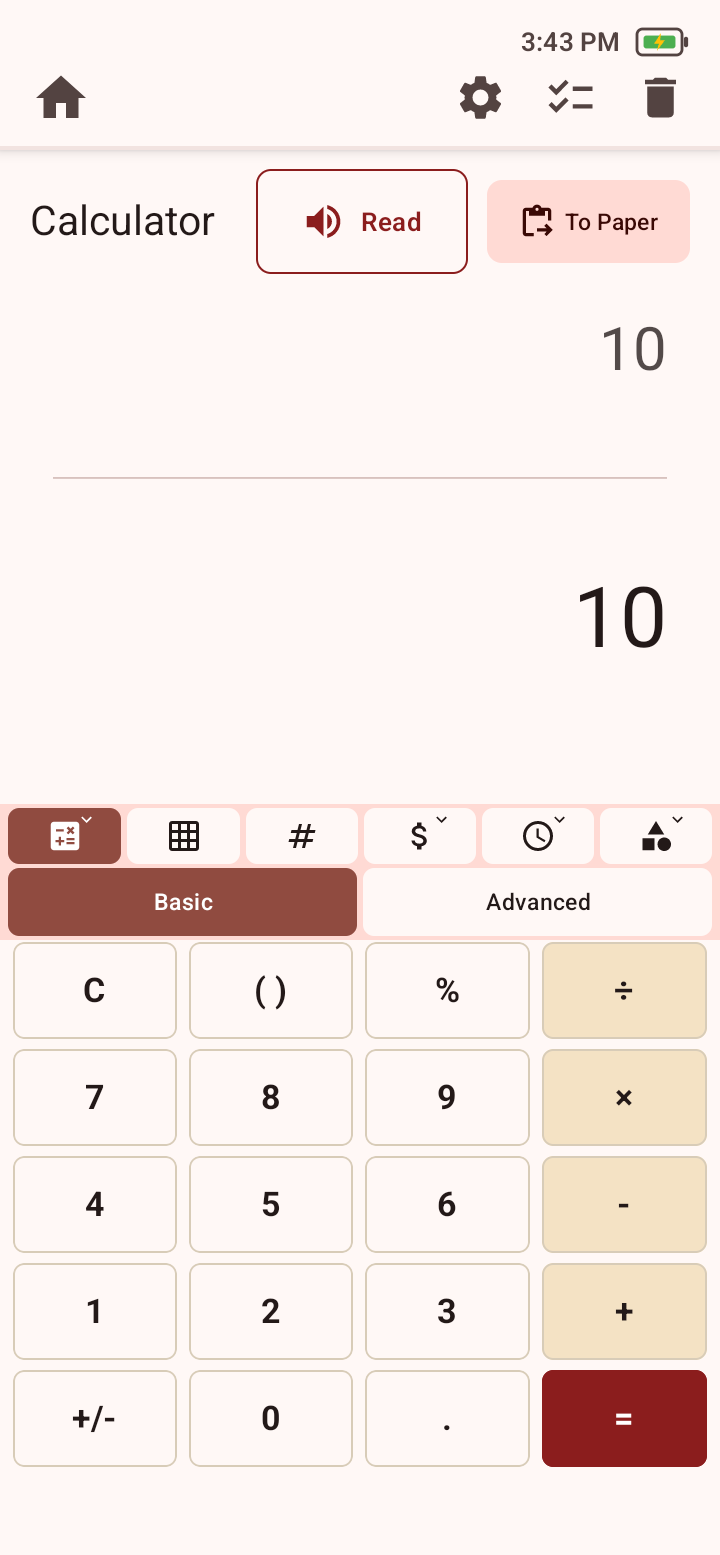
  1. Basic Calculator showing a completed result of 10 and the To Paper button beside Read.
    To Paper is available from Basic and Advanced Calculator when a result is ready to place on Math Paper.
    Open full-size screenshot
  2. Math Paper Graph view showing Paste Calculator result, Tap a destination cell for 10, and Cancel.
    After To Paper, tap the destination cell for the calculator result or choose Cancel.
    Open full-size screenshot
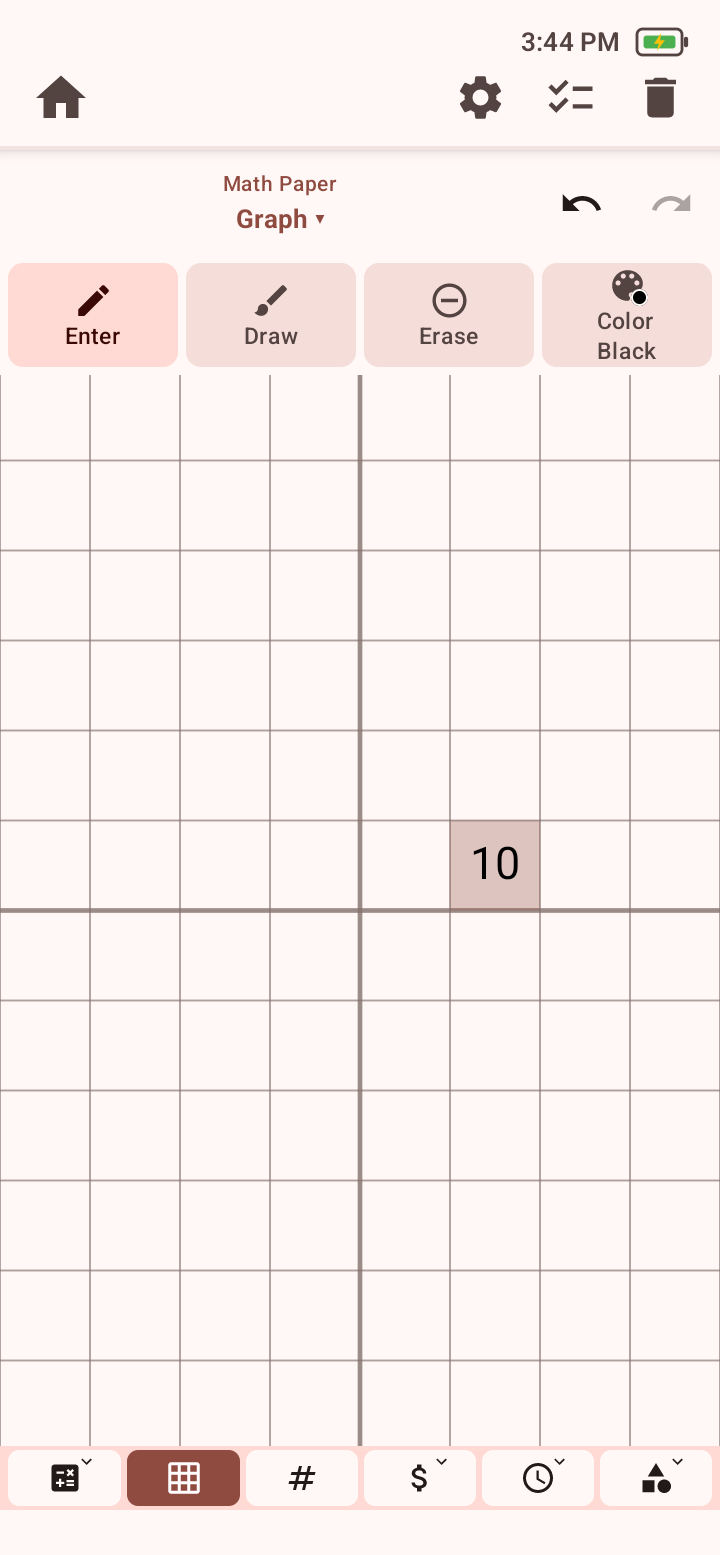
  3. Math Paper Graph view with the calculator result 10 placed in a selected grid cell.
    The calculator result becomes a Math Paper cell entry, ready for additional entered or drawn work.
    Open full-size screenshot
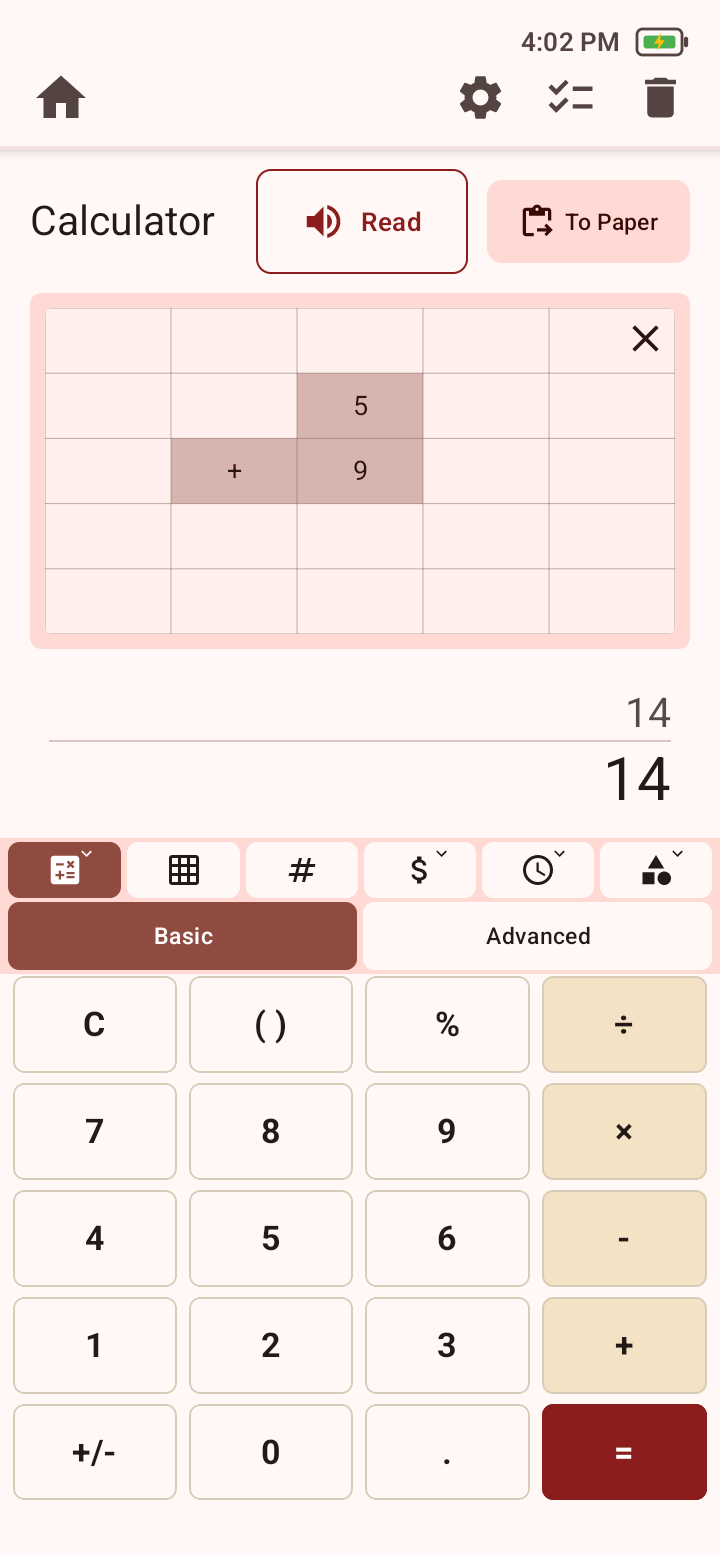
  4. Math Paper Graph view in Enter mode with 5, plus, and 9 entered into grid cells, an active cell, navigation arrows, Numbers and Symbols tabs, and a keypad.
    Enter one number or symbol per cell, use the arrows to move between cells, and choose the checkmark when entry is complete.
    Open full-size screenshot
  5. Math Paper Calculate view with 5 plus 9 highlighted in a rectangular selection and an instruction to drag across the paper to send that region to Calculator.
    Choose Send, then drag across every cell in the expression you want Calculator to evaluate.
    Open full-size screenshot
  6. Calculator showing a transferred Math Paper region containing 5 plus 9, the calculated result 14, and the To Paper control.
    Calculator previews the selected Math Paper region and evaluates its expression while keeping the source cells visible.
    Open full-size screenshot

10-Frame

Represent quantities up to ten in a fixed two-row frame.

Steps

  1. 1Choose 10-Frame.
  2. 2Choose Mode, then Count in order to fill from the first open box or Free build to choose spaces yourself.
  3. 3Tap or drag a counter into the frame. In Count in order, the tool fills the top row from left to right, then the bottom row.
  4. 4Tap or drag a counter back to the counter area to correct the quantity.
  5. 5Choose Color to use a single counter color or multiple colors.
  6. 6Choose Reset to clear the frame.

What success looks like

The filled boxes show a quantity from zero to ten.

If it does not work

  • If you cannot choose a specific box, change Mode from Count in order to Free build.
Student-facing guidanceSay the number you are building, then move one counter at a time. Use Count in order for the usual ten-frame pattern or Free build when you need to choose each box.
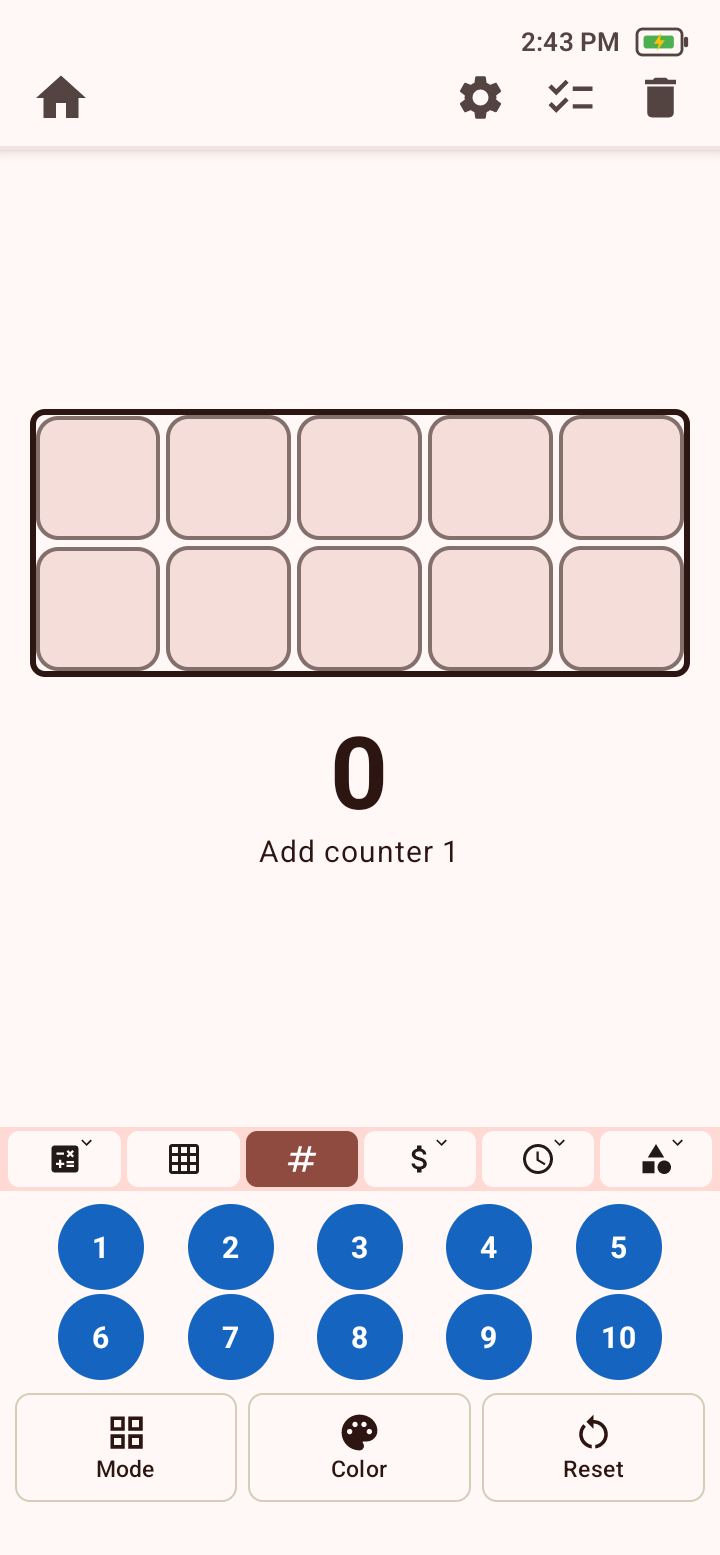
Ten-frame with two rows of five boxes, a counter total, ten numbered counters, and Mode, Color, and Reset controls.
Use Count in order to fill left to right or Free build to choose spaces yourself.
Open full-size screenshot

Math tool

Money

Count coins and bills

Build, group, and total a set of U.S. currency.

Steps

  1. 1Choose Money, then Count.
  2. 2Choose Add, then add pennies, nickels, dimes, quarters, or $1, $5, $10, $20, $50, and $100 bills.
  3. 3Tap or drag money into the workspace. Use Arrange after adding items when you want the tool to organize them.
  4. 4Check Total Amount as you add or remove items. Choose Count, then Count coins, Count bills, or Count all.
  5. 5Use Undo for the last action and Reset to empty the workspace.

What success looks like

The tool reports the total for coins, bills, or all money included in the selected count.

If it does not work

  • If the total differs from what you expect, check which items are included, remove any unintended item, and count again.
Student-facing guidanceArrange similar coins or bills together before counting. Predict the total first, then use Count to check your work.
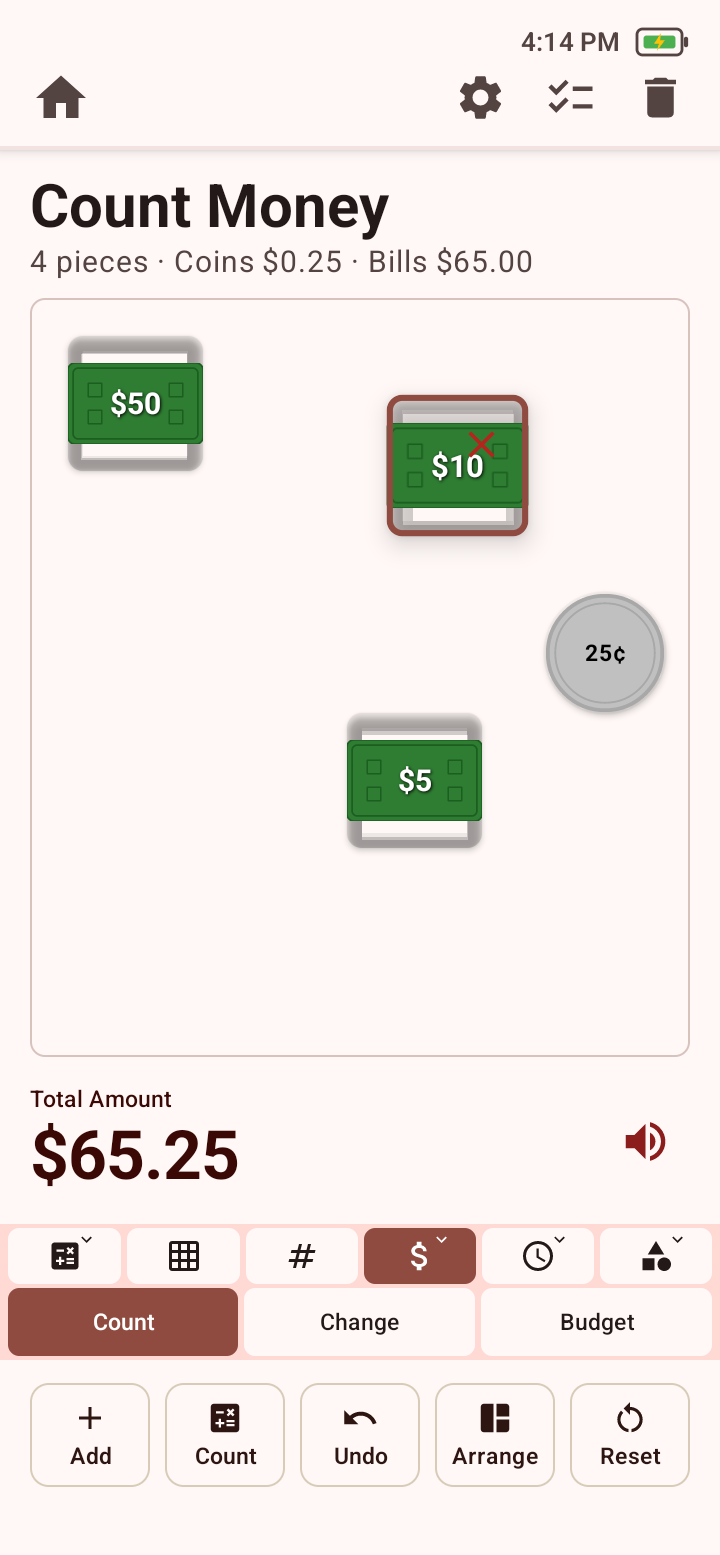
Count Money workspace showing a fifty-dollar bill, ten-dollar bill, five-dollar bill, and quarter totaling sixty-five dollars and twenty-five cents, with Add, Count, Undo, Arrange, and Reset controls.
Example Count Money activity: four pieces are arranged in the workspace for a total of $65.25.
Open full-size screenshot

Make change

Find change due after a purchase.

Steps

  1. 1Choose Money, then Change.
  2. 2Enter the purchase amount and the payment amount.
  3. 3Choose Calculate Change.
  4. 4Read the change total and denomination breakdown.
  5. 5Correct an amount or clear both fields before a new problem.

What success looks like

The tool displays the difference between the entered Payment Received and Purchase Amount, plus a denomination breakdown.

If it does not work

  • If payment is less than purchase or a value is invalid, correct the highlighted amount and calculate again.
Student-facing guidanceCheck which amount is the purchase and which is the payment before calculating. Compare the change total with the coins and bills shown.
Screen sequence

These screens follow the procedure above in order. Open any screenshot at full size when you need to inspect a control.

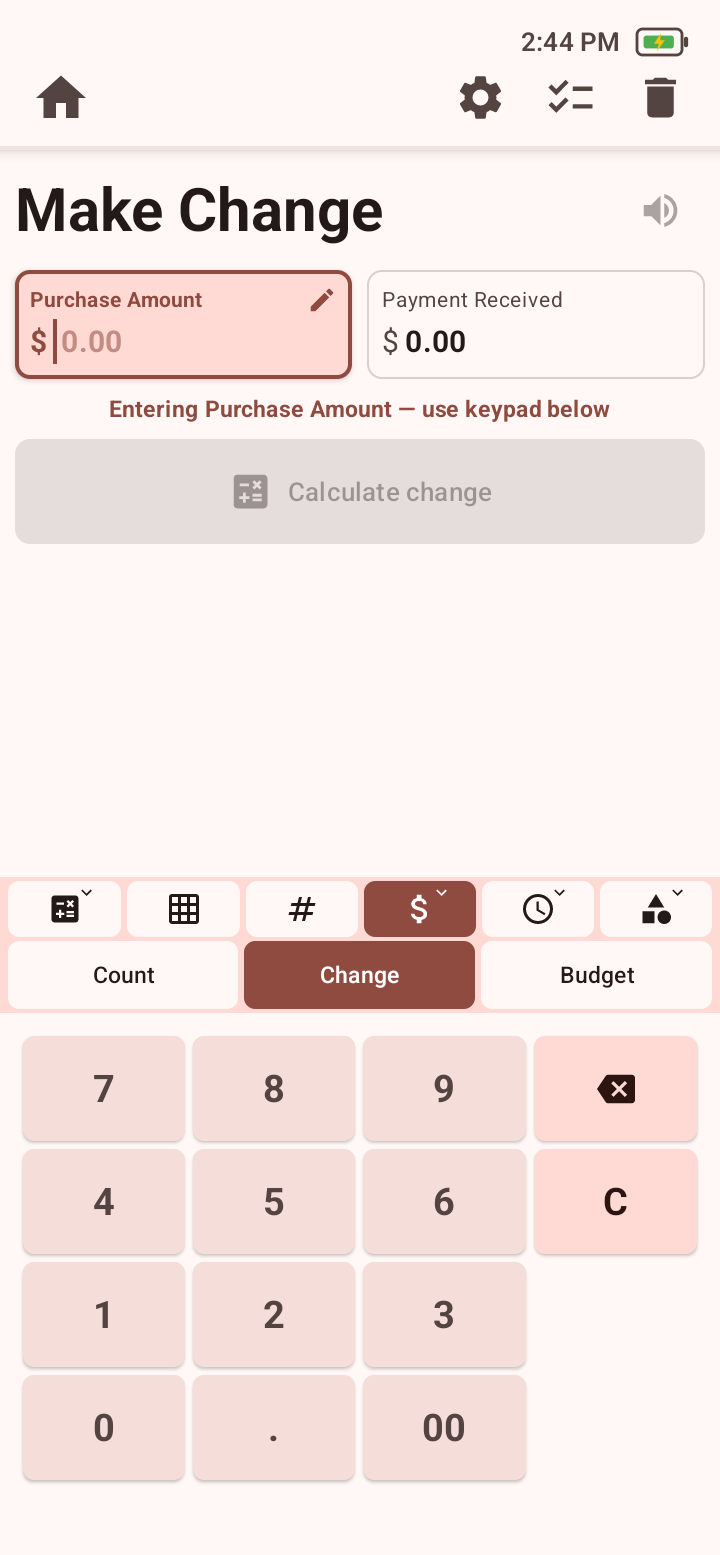
  1. Money Change workspace with purchase amount, payment amount, keypad, and change action.
    Enter purchase and payment amounts, then calculate change and its denomination breakdown.
    Open full-size screenshot
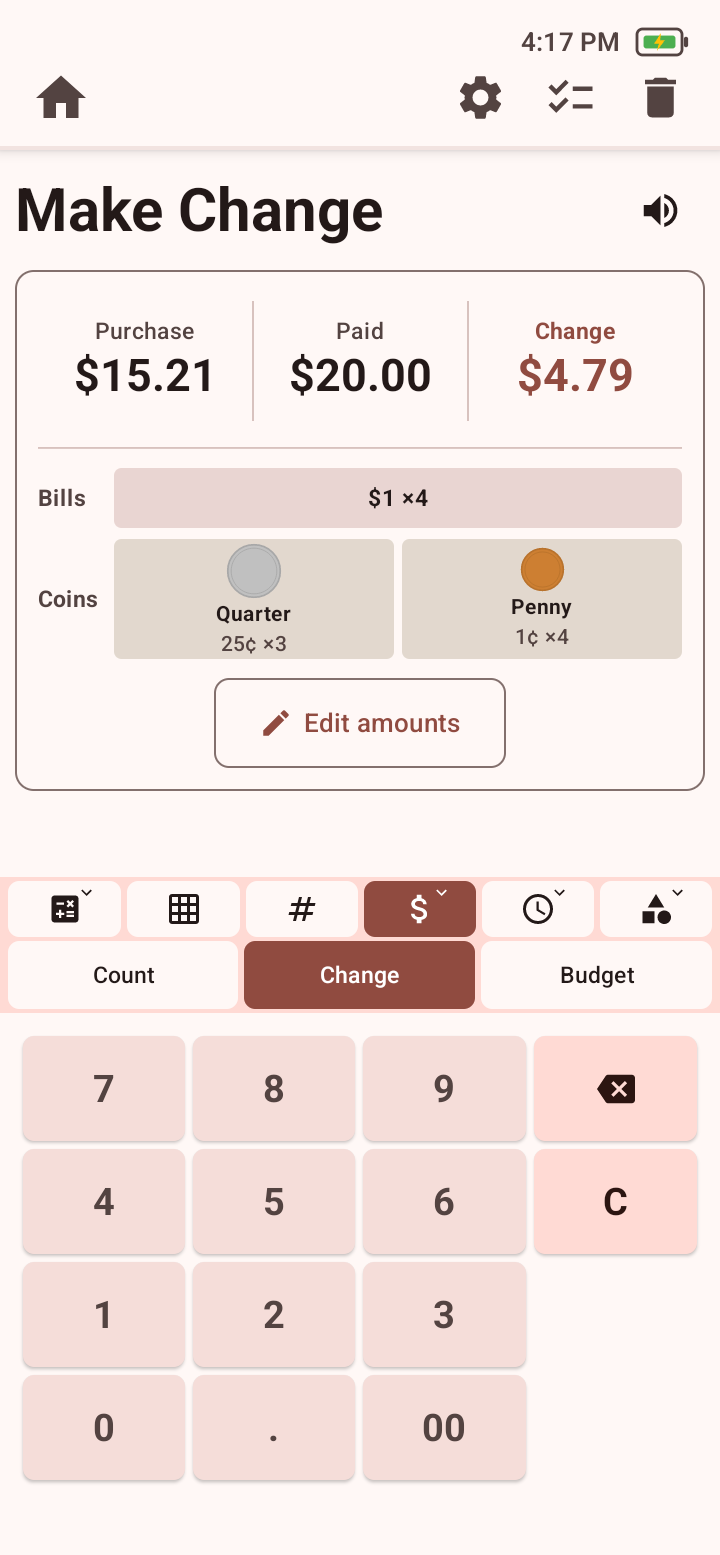
  2. Make Change result showing a fifteen-dollar and twenty-one-cent purchase, twenty dollars paid, and four dollars and seventy-nine cents in change as four one-dollar bills, three quarters, and four pennies.
    Example Make Change result: $20.00 paid for a $15.21 purchase produces $4.79 as four $1 bills, three quarters, and four pennies.
    Open full-size screenshot

Build a budget

Compare an entered amount with the total cost of entered shopping items.

Steps

  1. 1Choose Money, then Budget, and set Available Money.
  2. 2Add a shopping item, then enter its name, quantity, and unit cost.
  3. 3Repeat for each item and correct its details when needed.
  4. 4Compare Total Needed with Available Money and check whether Available Money covers Total Needed.
  5. 5Remove or correct an item when its quantity or cost is wrong; reset the entries to start a new budget.

What success looks like

Based on the quantities and unit costs entered, the budget shows whether Available Money covers Total Needed.

If it does not work

  • Check that unit cost and quantity were not reversed.
  • Remove duplicate items and compare the totals again.
Student-facing guidanceEnter the price for one item as Unit Cost and how many you want as Quantity. Compare Total Needed with Available Money before deciding what to change.
Screen sequence

These screens follow the procedure above in order. Open any screenshot at full size when you need to inspect a control.

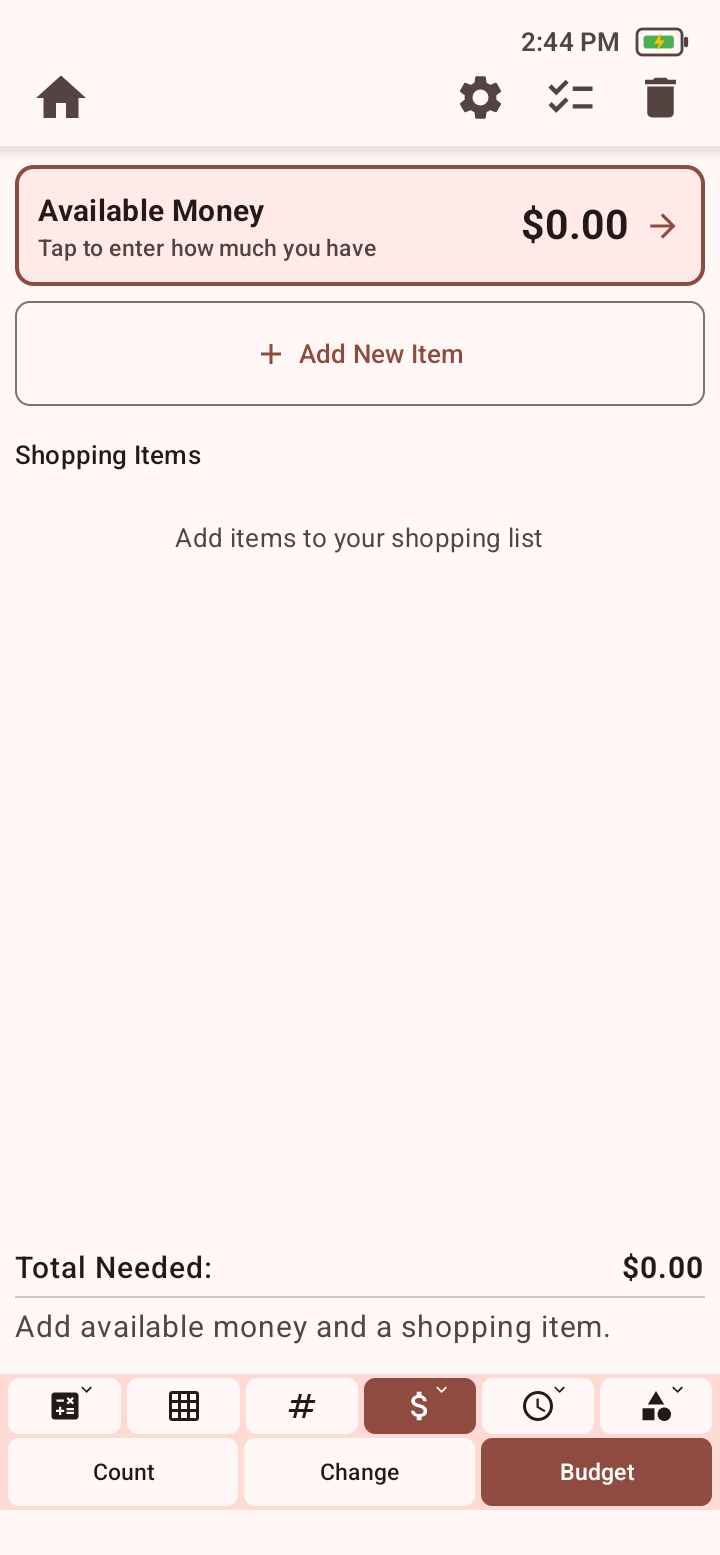
  1. Budget workspace with Available Money, Add New Item, Shopping Items, and Total Needed areas.
    Budget compares Available Money with the total quantity and unit cost of shopping items.
    Open full-size screenshot
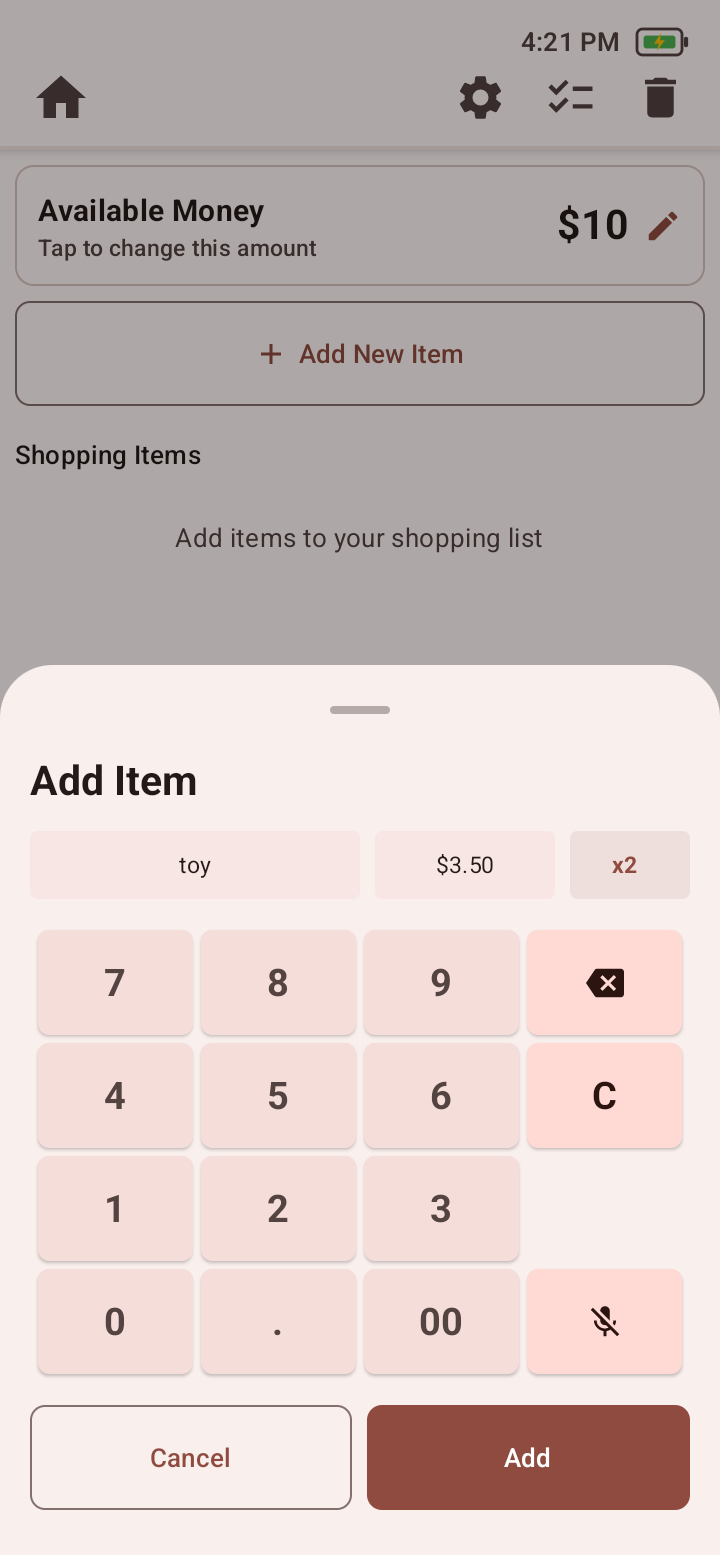
  2. Budget Add Item input sheet showing ten dollars available, an item named toy, a unit cost of three dollars and fifty cents, quantity two, numeric keypad, microphone, Cancel, and Add controls.
    Example Budget input: add two toys at $3.50 each to a budget with $10.00 available.
    Open full-size screenshot
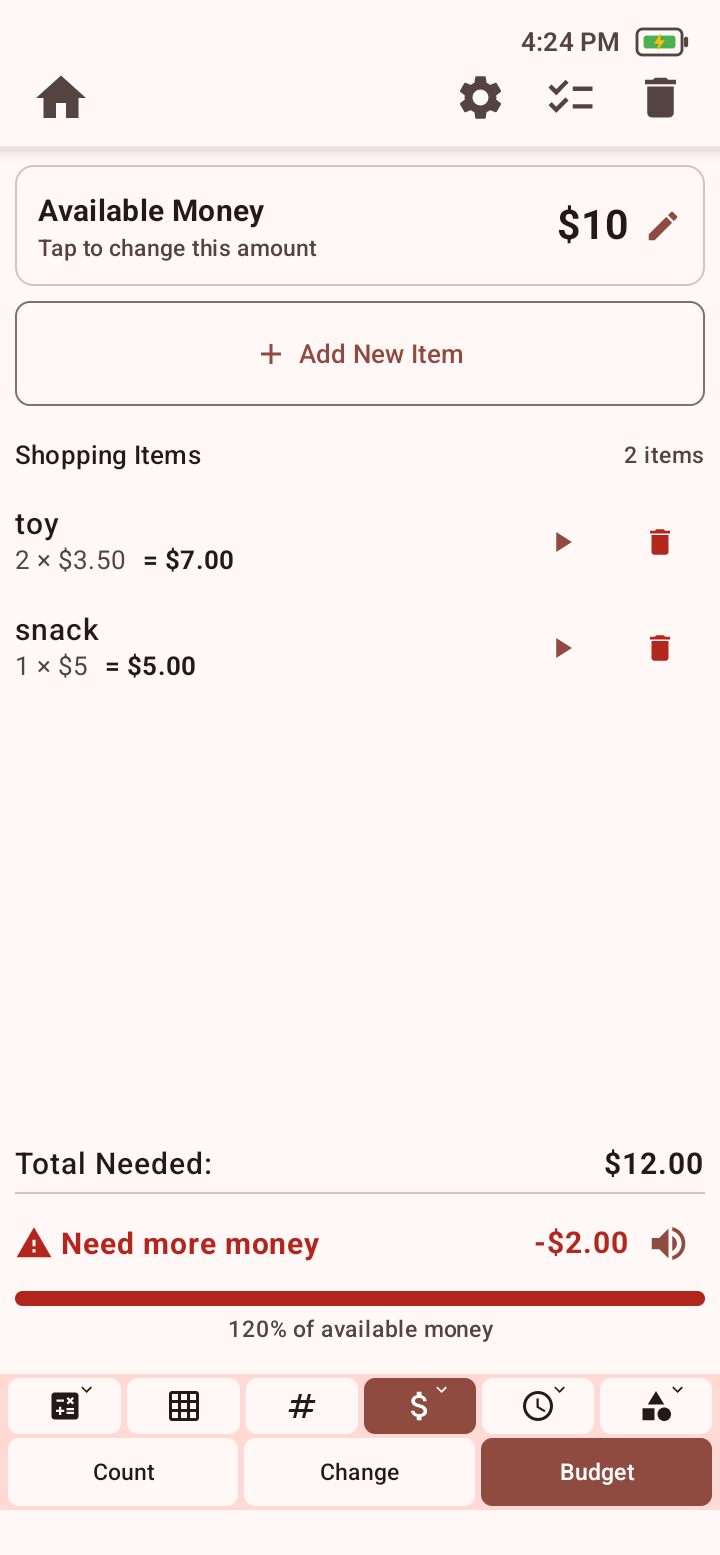
  3. Completed Budget example showing ten dollars available, two toys totaling seven dollars, one snack costing five dollars, twelve dollars needed, and a two-dollar shortfall.
    Example Budget result: $12.00 of items exceeds the $10.00 available by $2.00.
    Open full-size screenshot

Math tool

Time

Clock

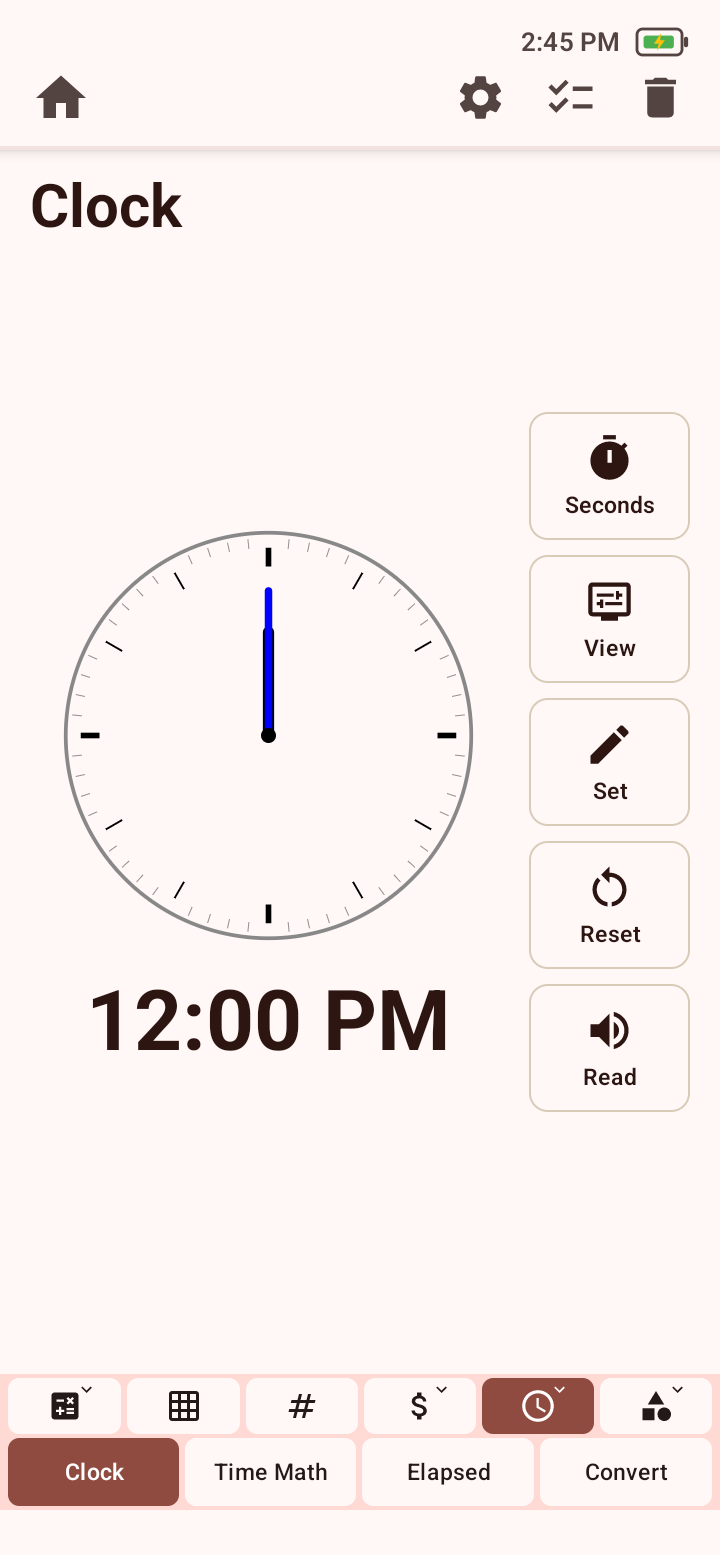
Practice reading and setting analog or digital time.

Steps

  1. 1Choose Time, then Clock.
  2. 2Choose View to show analog time, digital time, or both.
  3. 3Use Set to adjust the displayed time and Seconds to control whether seconds appear.
  4. 4Choose Read to hear the time or Reset to return to the starting value.

What success looks like

The clock shows the selected time in the chosen analog, digital, or combined view.

If it does not work

  • If the displayed time is unexpected, open Set and check the hour, minute, and AM/PM values.
Student-facing guidanceUse Both to compare the analog and digital clocks. Check the hour, minute, and AM or PM before using Read to hear the time.
Clock tool showing an analog clock, digital time, and Seconds, View, Set, Reset, and Read controls.
Clock can show analog time, digital time, or both, with optional seconds.
Open full-size screenshot

Time Math

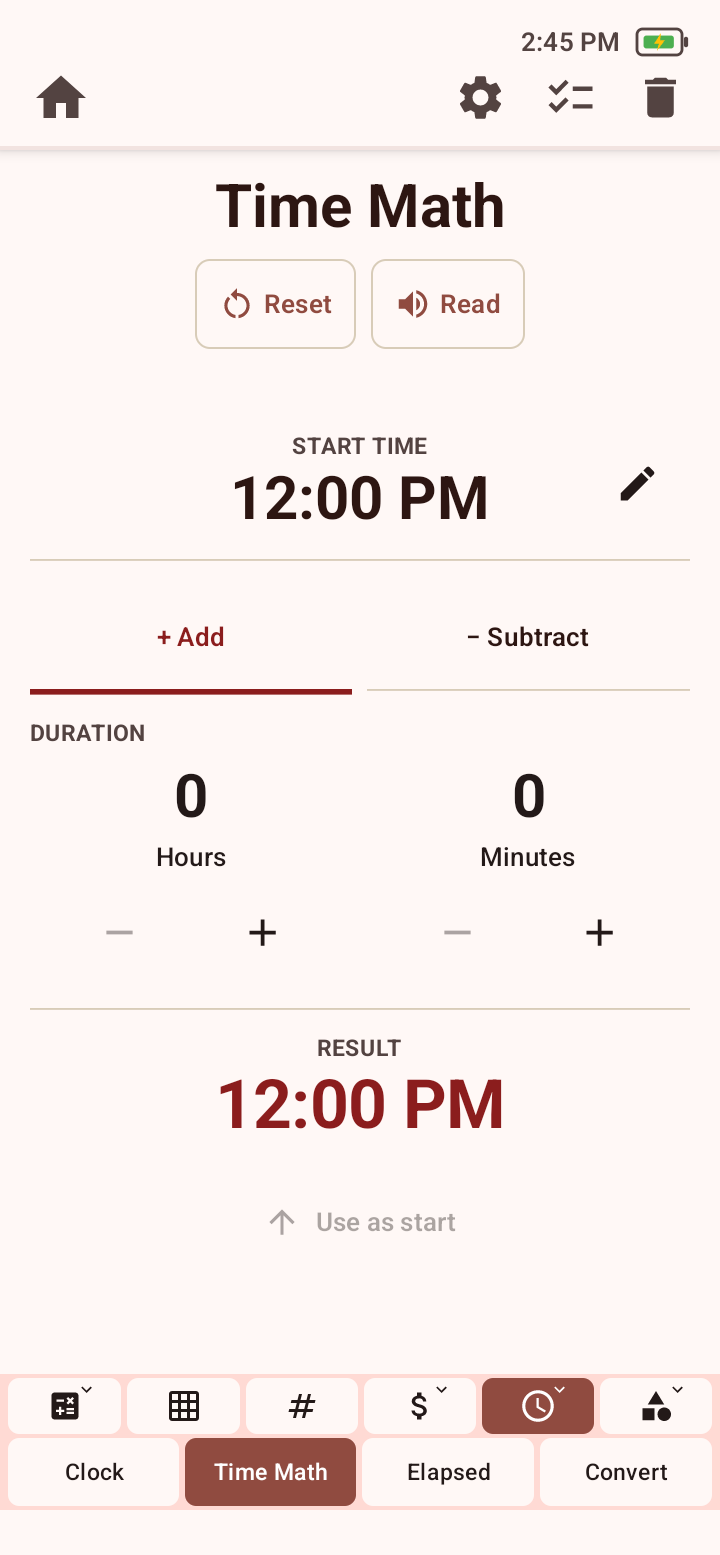
Add or subtract a duration from a starting time.

Steps

  1. 1Choose Time, then Time Math.
  2. 2Edit the Start Time and choose Add or Subtract.
  3. 3Set the duration in hours and minutes. The Result updates below.
  4. 4Choose Use as start to continue from the result, Read to hear it, or Reset before a new problem.

What success looks like

The tool displays the time produced by adding or subtracting the selected duration.

If it does not work

  • If the result is unexpected, check AM/PM, the Add or Subtract choice, and the entered hours and minutes.
Student-facing guidanceDecide whether time should move forward or backward before choosing Add or Subtract. Check whether the result crosses noon, midnight, or a new hour.
Time Math tool with start time, Add and Subtract choices, hours and minutes duration controls, result, Reset, Read, and Use as start.
Time Math adds or subtracts a duration from a start time.
Open full-size screenshot

Elapsed

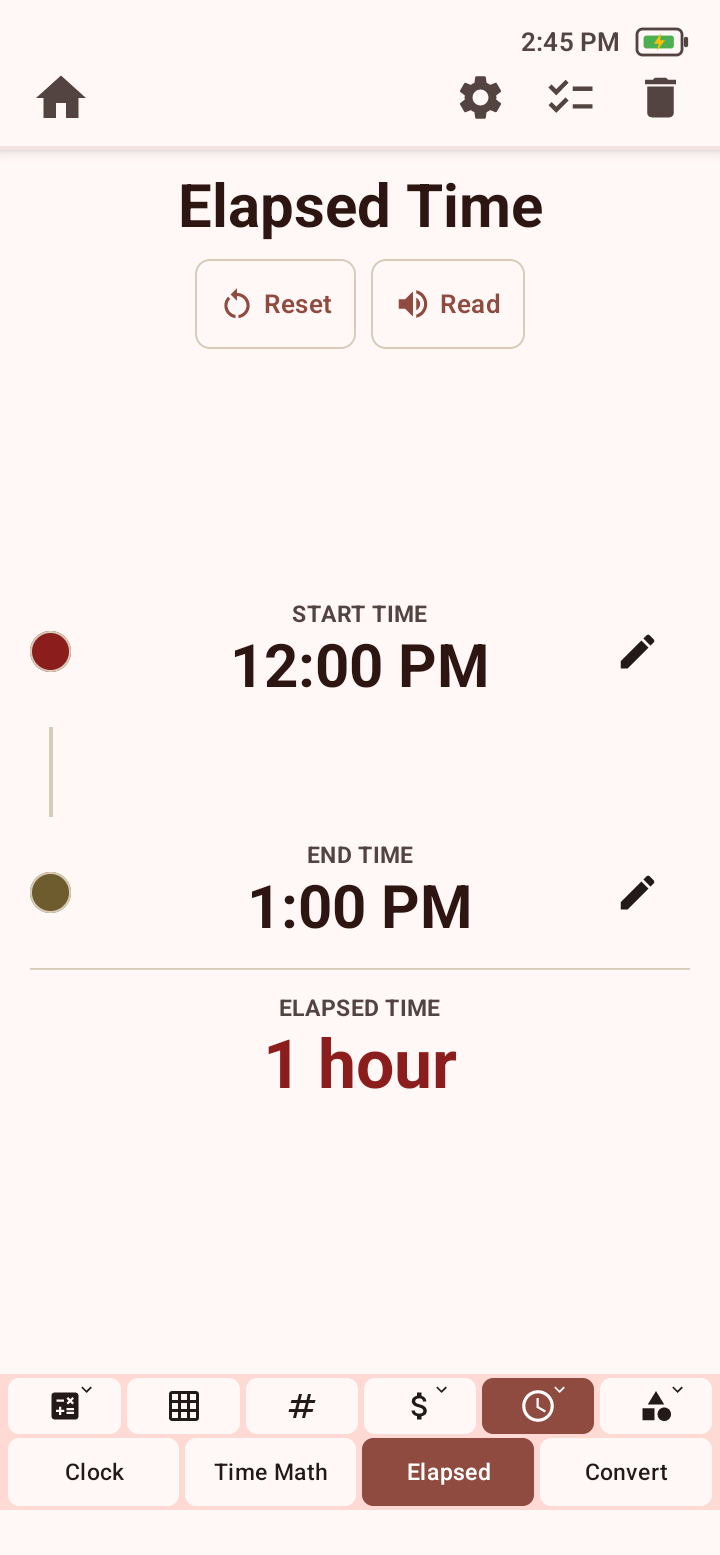
Find the duration between a start time and an end time.

Steps

  1. 1Choose Time, then Elapsed.
  2. 2Edit the Start Time and End Time.
  3. 3Read the Elapsed Time result that updates below the two times.
  4. 4Choose Read to hear the duration or Reset before a new problem.

What success looks like

The elapsed duration between the selected start and end times is displayed.

If it does not work

  • If the duration is unexpected, check AM/PM and confirm the Start and End times are in the intended order.
Student-facing guidanceMake sure Start is when the activity begins and End is when it finishes. Check AM and PM carefully before reading the elapsed time.
Elapsed Time tool with editable start and end times, an elapsed-time result, Reset, and Read controls.
Elapsed compares the editable start and end times and updates the duration directly.
Open full-size screenshot

Convert

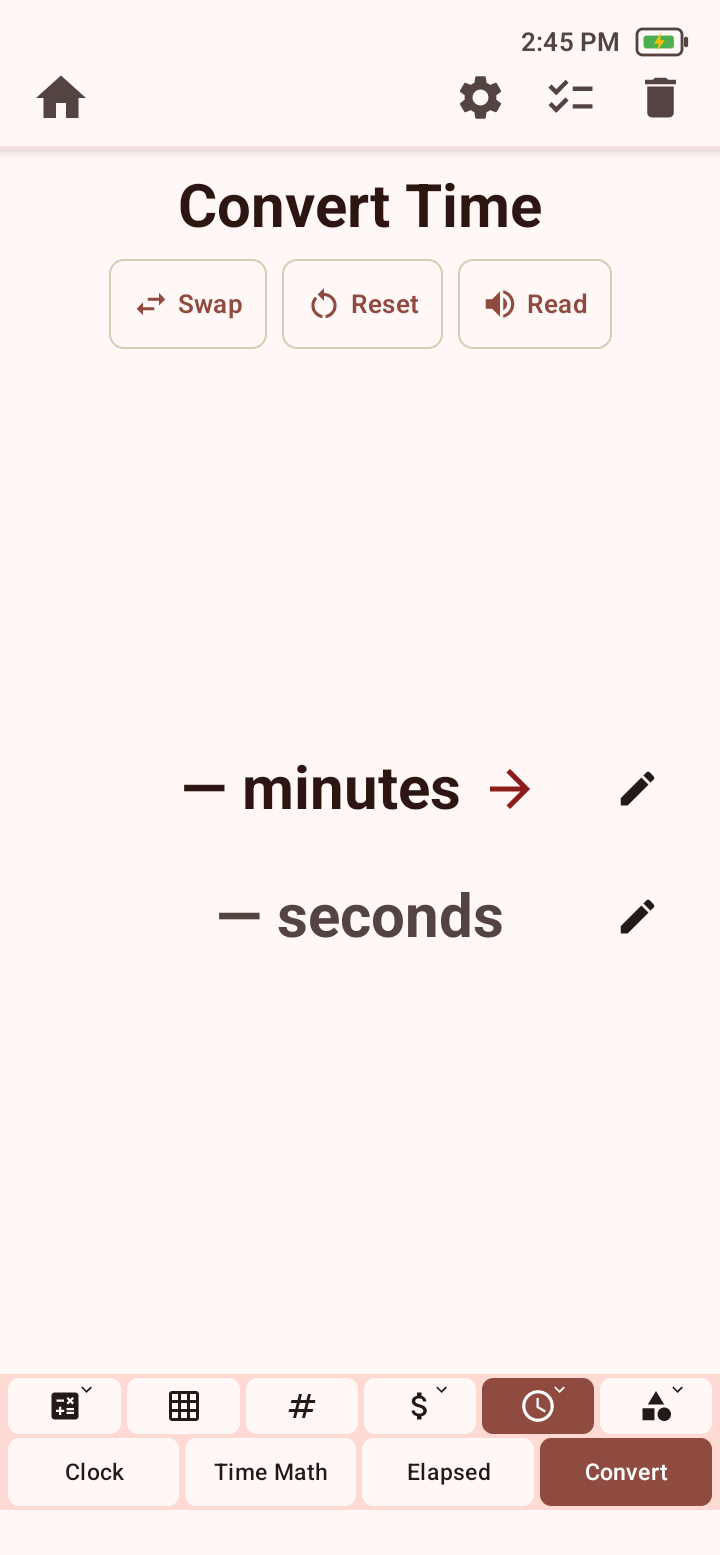
Convert a value between units of time.

Steps

  1. 1Choose Time, then Convert.
  2. 2Edit the source value and choose seconds, minutes, hours, or days.
  3. 3Choose the target unit and read the converted result.
  4. 4Use Swap to reverse the conversion direction, Read to hear the result, or Reset before a new problem.

What success looks like

The value is displayed in the selected target unit.

If it does not work

  • If the result is unexpected, check the source value, source unit, target unit, and conversion direction.
Student-facing guidanceRead the conversion as “this many source units equals this many target units.” Use Swap when you want to convert in the opposite direction.
Convert Time tool with editable source and target values, Swap, Reset, and Read controls.
Convert works between seconds, minutes, hours, and days; use Swap to reverse the direction.
Open full-size screenshot

Math tool

Geometry

Shapes

Identify, resize, turn, and flip common geometric shapes.

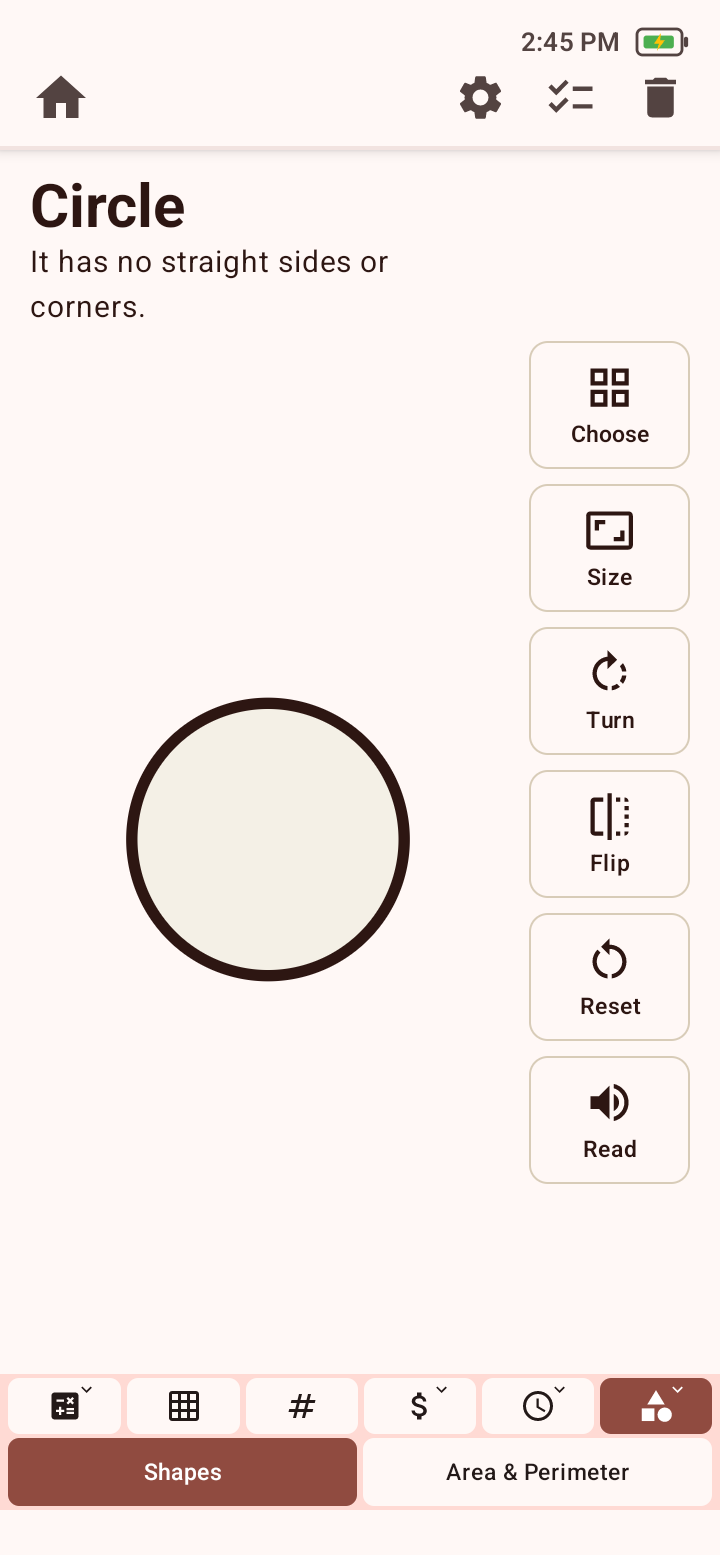
Steps

  1. 1Choose Geometry, then Shapes.
  2. 2Choose Choose to select a shape. The screen shows the selected shape and a short description of its sides or corners.
  3. 3Use Size to resize the shape, Turn to rotate it, and Flip to reflect it.
  4. 4Choose Reset to restore the starting view or Read to hear the description.

What success looks like

The selected shape appears with its description and chosen transformation.

If it does not work

  • Choose Reset to return the current shape to its starting size and orientation.
Student-facing guidanceName the shape and notice its sides and corners before changing it. Turn rotates the shape; Flip reflects it like a mirror.
Geometry Shapes tool showing a circle, its description, and Choose, Size, Turn, Flip, Reset, and Read controls.
Shapes presents one shape at a time for identification, resizing, turning, and flipping.
Open full-size screenshot

Area & Perimeter

Connect shape dimensions with area and perimeter formulas.

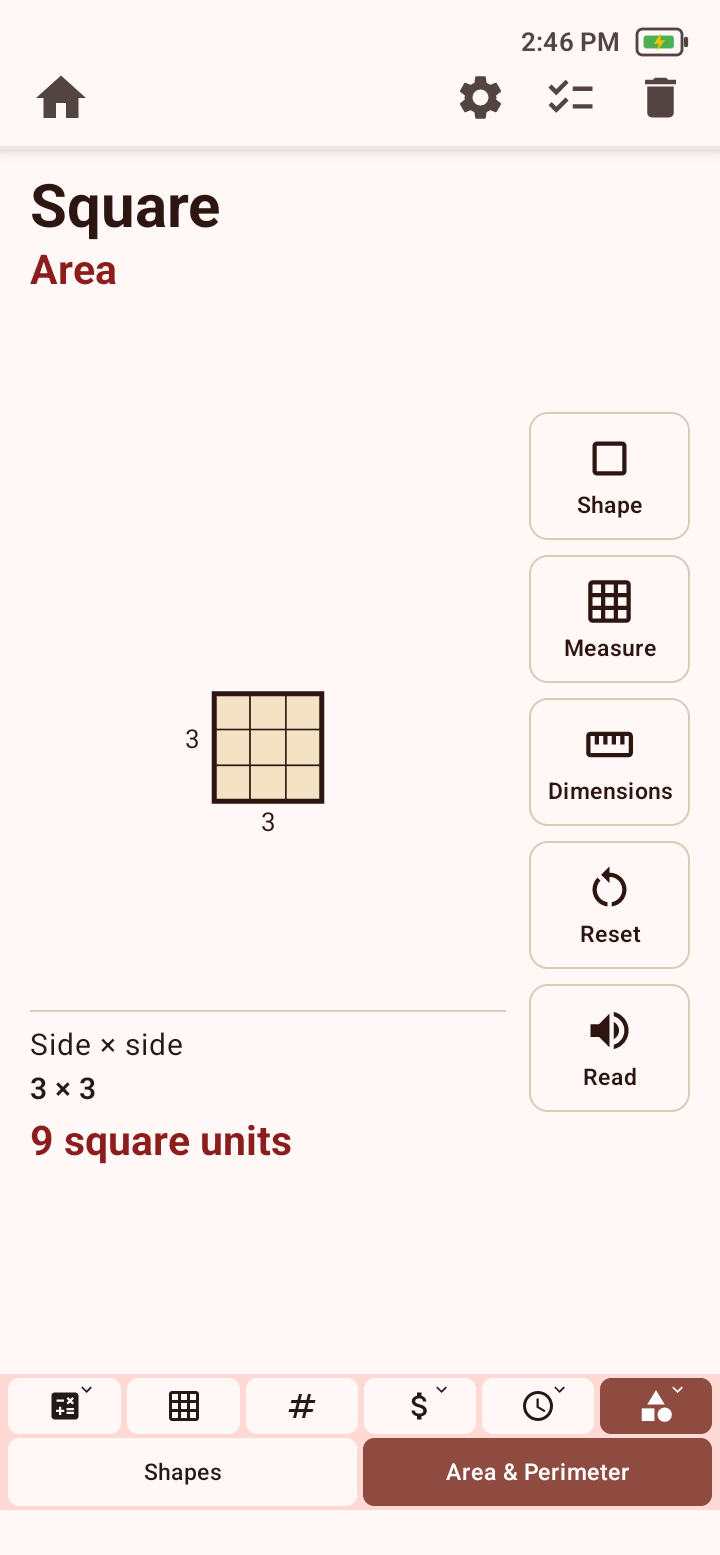
Steps

  1. 1Choose Geometry, then Area & Perimeter.
  2. 2Choose Shape to select the figure, then choose Measure to switch between Area and Perimeter.
  3. 3Choose Dimensions to adjust the measurements.
  4. 4Review the diagram, formula, substituted values, and result; choose Read to hear them.

What success looks like

The selected measurement appears with its diagram, formula, substituted dimensions, and result.

If it does not work

  • If the expected formula is missing, confirm Area or Perimeter under Measure.
  • Choose Reset to return the measurement to its starting state.
Student-facing guidanceChoose Area for the space inside a shape or Perimeter for the distance around it. Check the dimensions, then follow the formula and substituted numbers.
Geometry Area and Perimeter tool showing a square, its dimensions, formula, result, and Shape, Measure, Dimensions, Reset, and Read controls.
Area & Perimeter shows the selected measurement, formula, substituted dimensions, and result.
Open full-size screenshot

Plan · 6 of 10

Plan tasks, time, anchors, and alarms

Plan appears when Enable Schedule is on. The Focus tab also requires Enable Focus & Alarms. To add, edit, or delete Anchors and Alarms, Allow Editing must be on.

Add and complete tasks

Create a simple visual schedule and track progress.

Steps

  1. 1Open Plan and choose Tasks.
  2. 2Tap Task name and type a task, or choose the microphone and speak a short task name.
  3. 3Choose Add to place it in the schedule.
  4. 4Use the play action beside a task to hear it.
  5. 5Mark the task complete and watch progress update; delete a task that no longer belongs in the schedule.

What success looks like

The task list shows the tasks you added, and progress updates when you mark tasks complete.

If it does not work

  • If speech entry is wrong, edit with the keyboard before adding.
  • If Plan is missing from Home, turn on Enable Schedule in Tools.
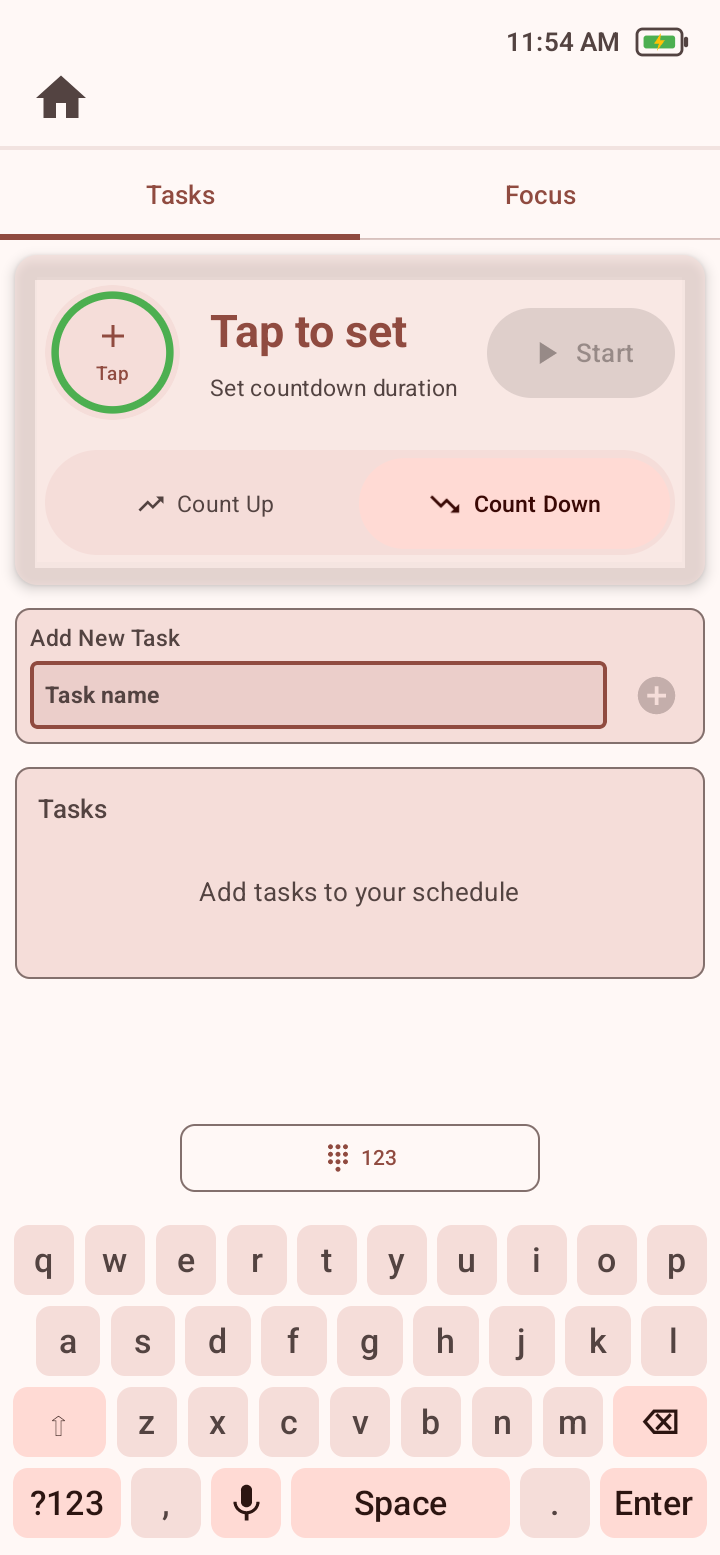
Plan Tasks tab with timer card, task name field, task list, microphone, and keyboard.
Tasks combines a timer summary, task entry, speech input, and progress list.
Open full-size screenshot

Use Count Up or Count Down

Track time spent or time remaining for a task.

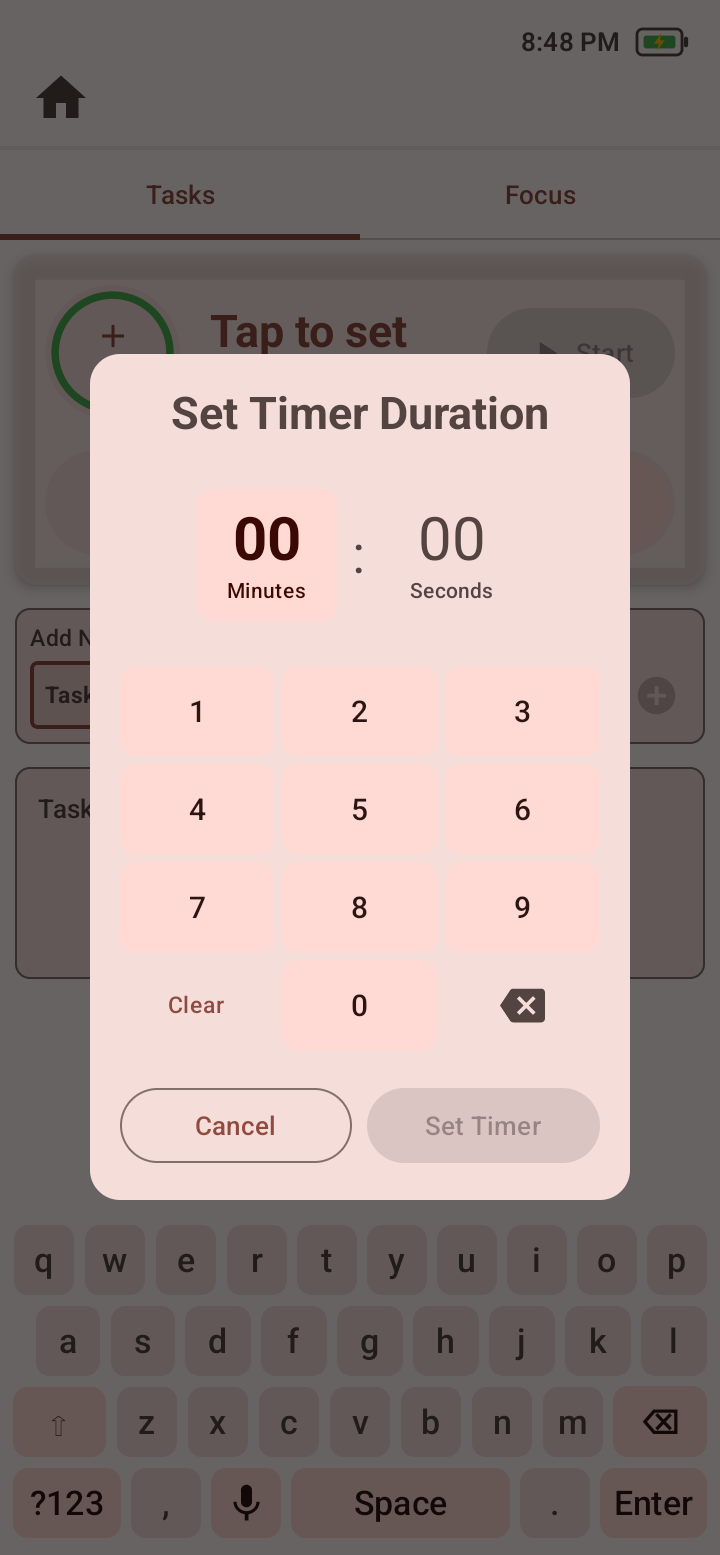
Steps

  1. 1Choose Count Up to begin at zero, or Count Down to set a duration.
  2. 2For Count Down, enter minutes and seconds and choose Set Timer.
  3. 3Choose Start, then Pause and resume when needed.
  4. 4Use Stop/Reset to end the current timing session and return to its starting state.
  5. 5Acknowledge the completion prompt when countdown reaches zero.

What success looks like

The timer displays elapsed or remaining time and shows a completion prompt when Count Down reaches zero.

If it does not work

  • If the duration is wrong, stop/reset and set it again before resuming the task.

Screen sequence

These screens follow the procedure above in order. Open any screenshot at full size when you need to inspect a control.

  1. Plan Tasks tab with timer card, task name field, task list, microphone, and keyboard.
    Tasks combines a timer summary, task entry, speech input, and progress list.
    Open full-size screenshot
  2. Plan timer duration dialog with minute and second entry and Set Timer action.
    Count Down asks for a duration before the timer begins.
    Open full-size screenshot

Create a recurring Focus Anchor

Schedule a brief prompt to recur during a selected time window.

Before you begin

  • Enable Focus & Alarms and Allow Editing in Settings > Tools Tab > Plan Features Section.

Steps

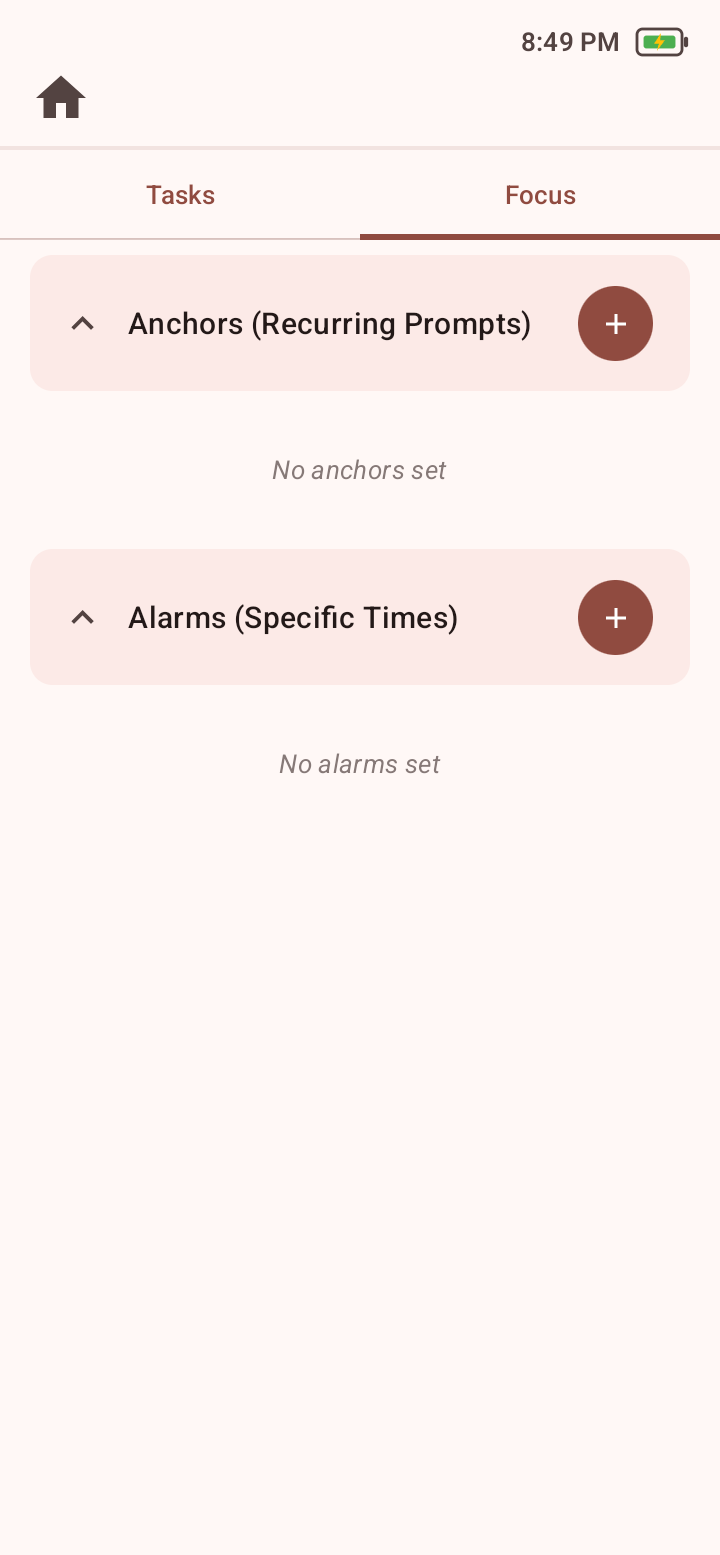
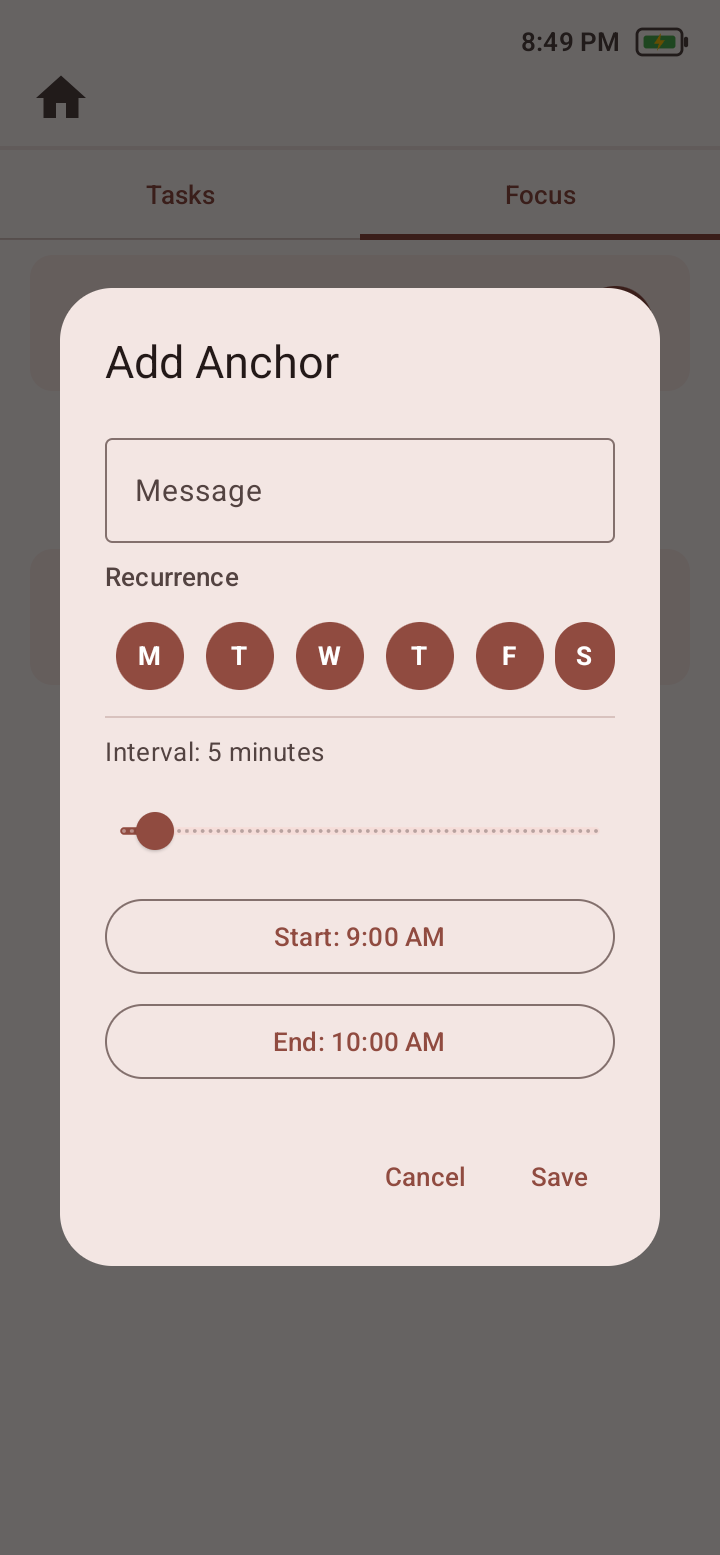
  1. 1Open Plan > Focus, expand Anchors, and choose Add.
  2. 2Enter the prompt message.
  3. 3Choose recurrence days and an interval from 1 to 60 minutes.
  4. 4Set the start and end times for the prompt window, then Save.
  5. 5Use the item switch to enable or disable it; open it to edit, or delete it when no longer needed.

What success looks like

The Anchor appears in the list with its saved schedule and enabled or disabled status.

If it does not work

  • If a prompt does not appear, verify the Anchor switch, recurrence day, time window, Enable Focus & Alarms, and device time and date.
  • If the prompt appears without a haptic cue, check Anchor Haptics.
  • If editing is unavailable, ask an authorized staff member to turn on Allow Editing.

Screen sequence

These screens follow the procedure above in order. Open any screenshot at full size when you need to inspect a control.

  1. Plan Focus tab with Anchors and Alarms lists and add buttons.
    Focus separates recurring Anchors from specific-time Alarms.
    Open full-size screenshot
  2. Add Anchor dialog with message, recurrence days, interval, start and end times.
    Use an Anchor to schedule a message at intervals on selected days within a time window.
    Open full-size screenshot

Create an Alarm

Schedule a prompt for a specific time on selected days.

Before you begin

  • Enable Focus & Alarms and Allow Editing in Settings > Tools Tab > Plan Features Section.

Steps

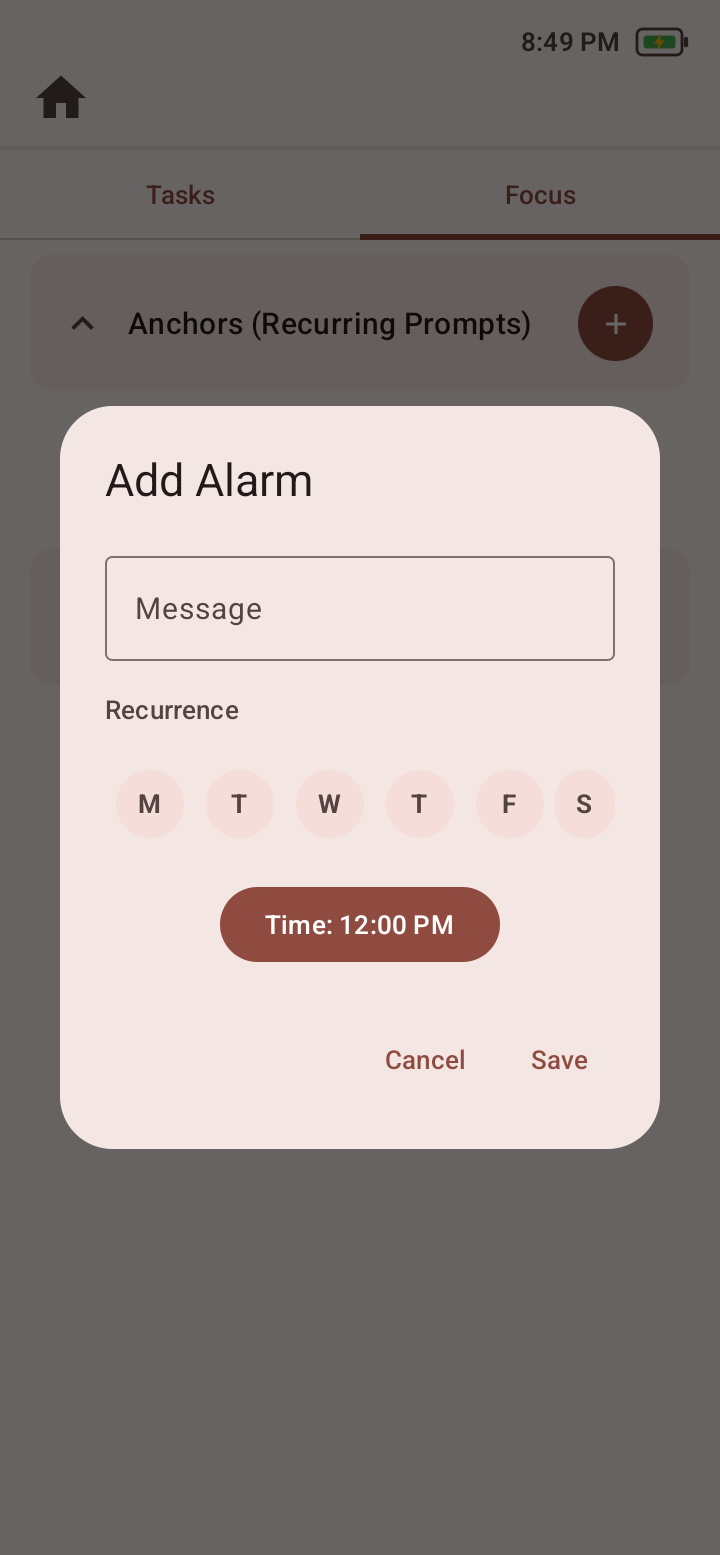
  1. 1Open Plan > Focus, expand Alarms, and choose Add.
  2. 2Enter the alarm message.
  3. 3Choose recurrence days and set the time, then Save.
  4. 4Use the item switch to enable or disable it; open it to edit, or delete it.
  5. 5Use Alarm haptic intensity and pattern to configure its haptic cue. An intensity of zero is shown as None.

What success looks like

The Alarm appears in the list with its saved time, recurrence days, and enabled or disabled status.

If it does not work

  • If an Alarm does not activate or activates at the wrong time, verify its switch, recurrence days, alarm time, Enable Focus & Alarms, and device time and date.
  • If the Alarm appears without a haptic cue, check Alarm Haptics.

Screen sequence

These screens follow the procedure above in order. Open any screenshot at full size when you need to inspect a control.

  1. Plan Focus tab with Anchors and Alarms lists and add buttons.
    Focus separates recurring Anchors from specific-time Alarms.
    Open full-size screenshot
  2. Add Alarm dialog with message, recurrence days, and time.
    Use an Alarm to schedule a message for a selected time on selected days.
    Open full-size screenshot

Practitioner reference · 7 of 10

Configure Settings with confidence

Settings are organized into four production tabs. Conditional controls follow their parent feature. A lock protects configuration from changes; it does not change the underlying classroom task until that setting is edited.

General

Bluetooth

Bluetooth Headphones / Manage Bluetooth

What it changes
Opens the managed Bluetooth screen and can reconnect paired audio devices.
Values
Auto-connect to paired devices: on/off
Lock behavior
Bluetooth subsection can be locked.
Use it when
Connect headphones through Manage Bluetooth, then confirm that audio uses the intended output and returns to the device after disconnection.
Student-facing guidanceIf sound comes from the wrong place or your headphones disconnect, tell a staff member. Do not change paired devices unless you have permission.

Navigation

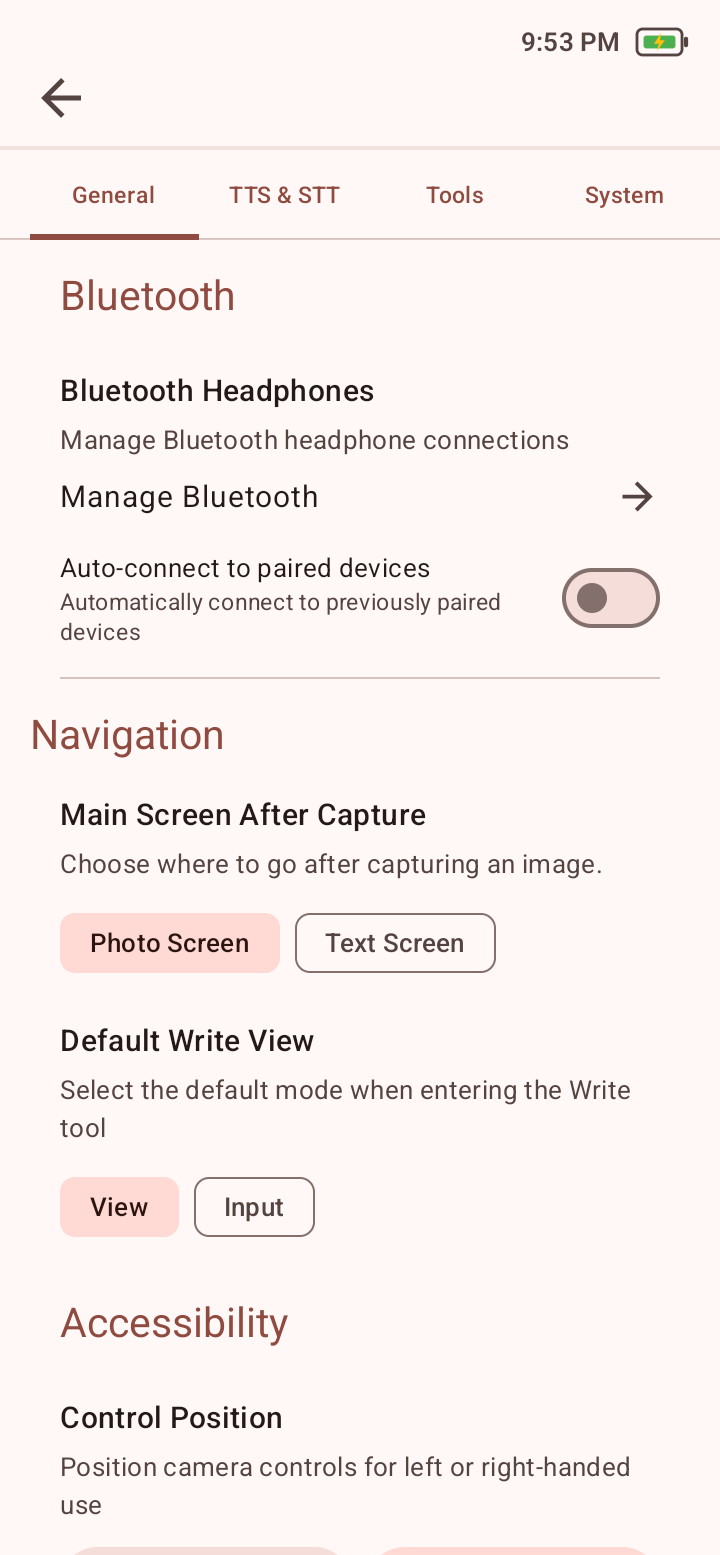
Main Screen After Capture

What it changes
Chooses whether Read opens the captured Photo Screen or recognized Text Screen after OCR.
Values
Photo Screen or Text Screen
Student view
Changes the Read handoff, not Home availability.
Lock behavior
Navigation subsection can be locked.
Use it when
Choose Photo Screen to review the captured image, or Text Screen to open the recognized text.
Student-facing guidanceChoose the Photo Screen when seeing the page image helps you follow along, or the Text Screen when you want to begin with recognized text.

Navigation

Default Write View

What it changes
Chooses whether the Write tool starts in View or Input mode.
Values
View or Input
Student view
Changes Write’s initial controls.
Lock behavior
Navigation subsection can be locked.
Use it when
Use View for listening-first sessions and Input for composition-first sessions.
Student-facing guidanceView is useful when you want to listen or review first. Input is useful when you are ready to type or dictate.
General settings showing Bluetooth controls, Main Screen After Capture, and Default Write View with View and Input choices.
General: manage Bluetooth audio, choose which screen opens after a Read capture, and choose whether Write starts in View or Input.
Open full-size screenshot

Accessibility

Control Position

What it changes
Moves supported controls for left- or right-handed reach.
Values
Left-handed or Right-handed
Lock behavior
Accessibility subsection can be locked.
Use it when
Choose the side that makes supported controls easier to reach from the user’s usual position.
Student-facing guidanceTry the controls on both sides and use the side that feels easier and more comfortable to reach.

Accessibility

System Brightness

What it changes
Adjusts the display brightness while LumaRead2 is in use.
Values
50%–100%; default 100%
Lock behavior
Accessibility subsection can be locked.
Use it when
Adjust the level with the user while keeping text and controls readable.
Student-facing guidanceChoose a brightness that feels comfortable while keeping words, pictures, and controls easy to see.

Text Settings

Font Family

What it changes
Changes the typeface used for readable text.
Values
Installed choices; default Lexend
Lock behavior
Text Settings can be locked.
Use it when
Try the available typefaces with the user in Read and Write.
Student-facing guidanceTry reading the same short passage in different fonts, then choose the one whose letters are easiest for you to recognize.

Text Settings

Font Size

What it changes
Scales recognized and editable text.
Values
80%–150%; default 100%
Lock behavior
Text Settings can be locked.
Use it when
Adjust the size with the user and check that needed context remains visible.
Student-facing guidanceChoose text that is large enough to read without making it hard to see the rest of the sentence or page.

Text Settings

Line Spacing

What it changes
Changes vertical space between lines.
Values
100%–200%; default 100%
Lock behavior
Text Settings can be locked.
Use it when
Try more spacing when the user has difficulty tracking lines.
Student-facing guidanceIncrease the spacing if lines feel crowded or you lose your place when moving to the next line.
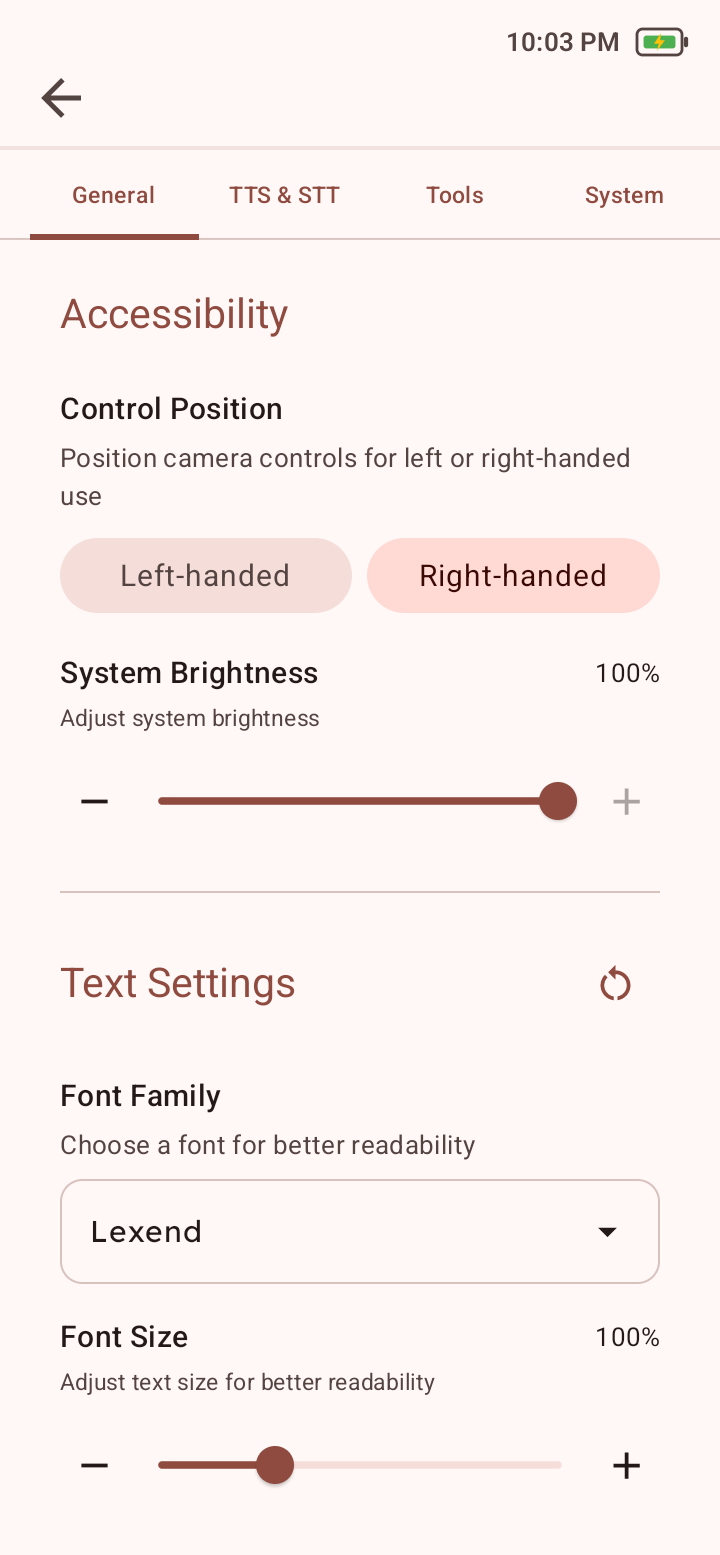
General settings showing control position, system brightness, font family, and font size.
General: control position, system brightness, and text presentation.
Open full-size screenshot

Text Settings

Container Background / Text Color

What it changes
Changes the reading surface and text colors.
Values
Default white background and black text
Lock behavior
Text Settings can be locked.
Use it when
Test the background, text, sentence-highlight, and word-highlight colors together, then choose a combination the user can distinguish.
Student-facing guidanceChoose colors that make the words comfortable to read and keep text, sentence highlights, and word highlights easy to tell apart.

Text Settings

Include Headers/Footers

What it changes
Includes or excludes text near page edges during reading.
Values
Off by default; zone size 1%–15%, default 5%
Depends on
Header/Footer Zone Size matters when inclusion is enabled.
Lock behavior
Text Settings can be locked.
Use it when
Turn this on when page titles or footnotes need to be read; leave it off when repeated headers or footers are not needed.
Student-facing guidanceTurn this on when you need titles, page numbers, or footnotes read. Leave it off when repeated page-edge text interrupts the main passage.
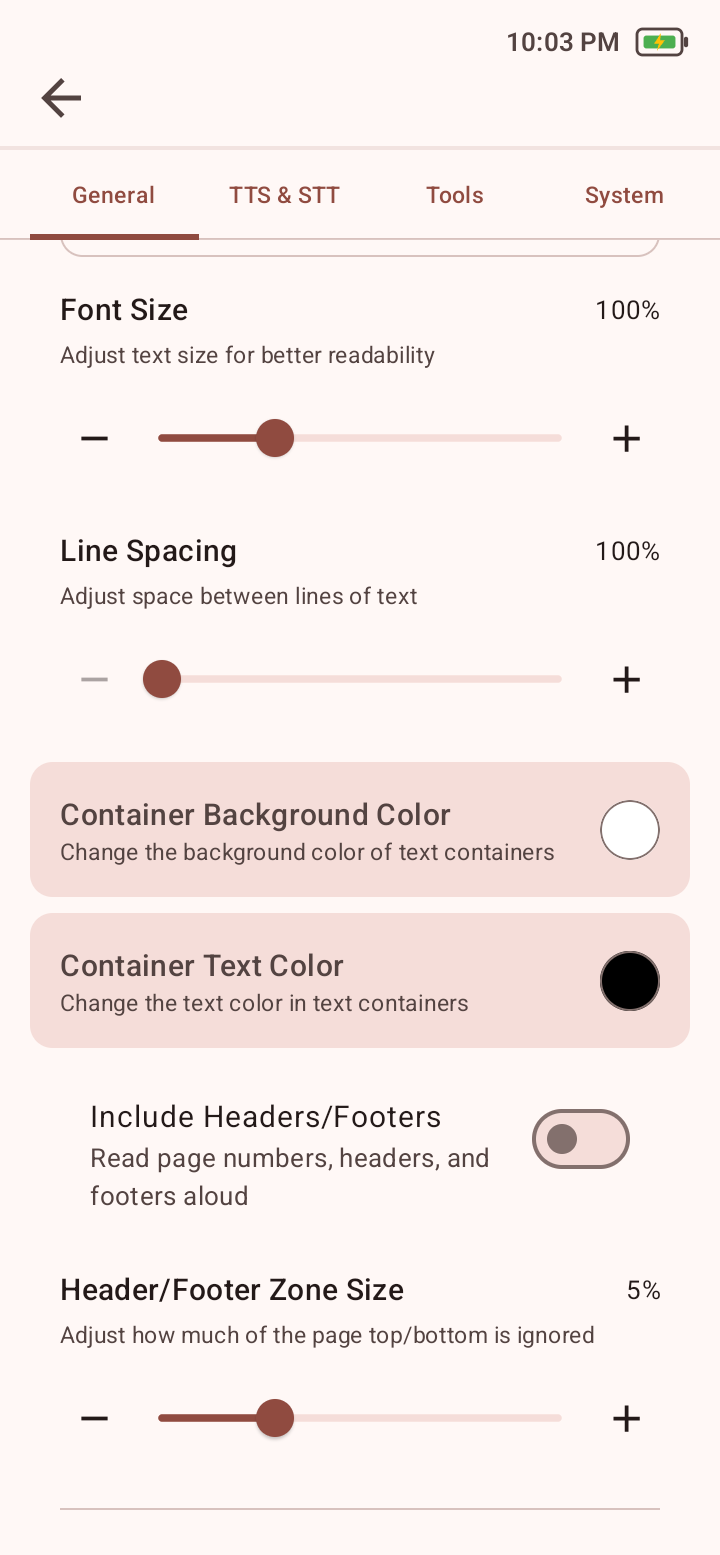
General settings showing text colors, header and footer inclusion, and zone size.
General: reading colors and whether OCR includes header and footer zones.
Open full-size screenshot

TTS & STT

Text-to-Speech

Text-to-Speech Engine

System TTS and Advanced TTS are completely different offline speech engines. Advanced TTS can provide a more natural, higher-quality voice, but it takes longer to begin and process speech. It supports sentence-by-sentence highlighting only, not word-by-word highlighting.

What it changes
Chooses the engine used to read text aloud and shows model or provisioning readiness for Advanced TTS.
Values
System or Advanced
Depends on
Advanced voices require the model to be available.
Lock behavior
TTS subsection can be locked.
Use it when
Compare voice quality, response speed, and highlighting needs before choosing an engine.
Student-facing guidanceChoose System when faster speech or word-by-word highlighting helps you. Choose Advanced when you prefer its voice and sentence highlighting is enough.

Text-to-Speech

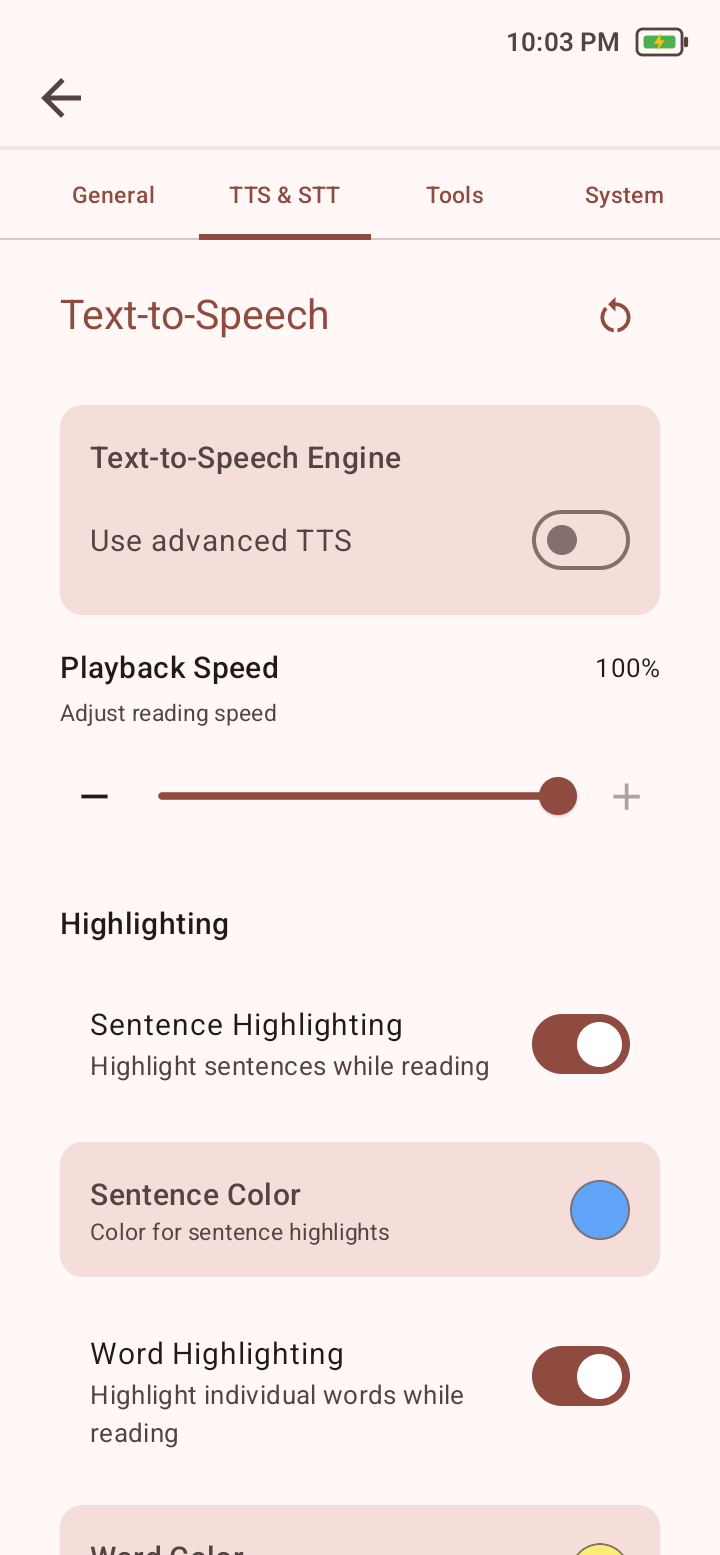
Voice / Playback Speed

What it changes
Chooses and previews a voice and controls speech rate.
Values
Playback speed 50%–100%; default 100%
Lock behavior
TTS subsection can be locked.
Use it when
Preview the voice at several speeds with the user, then choose a speed the user can follow.
Student-facing guidancePreview a short sentence and choose the fastest speed you can follow comfortably without missing words or meaning.

Highlighting

Sentence / Word Highlighting and Colors

What it changes
Shows the current sentence during playback and, with System TTS, the current word.
Values
Both enabled by default; sentence blue and word yellow by default
Depends on
Advanced TTS supports sentence-by-sentence highlighting only; word-by-word highlighting requires System TTS.
Lock behavior
TTS subsection can be locked.
Use it when
Use colors that remain distinct from the chosen background and text.
Student-facing guidanceUse highlights if they help you keep your place. If you need each spoken word highlighted, ask to use System TTS.

Screen sequence

These screens show the related configuration states and controls. Open any screenshot at full size to inspect a setting.

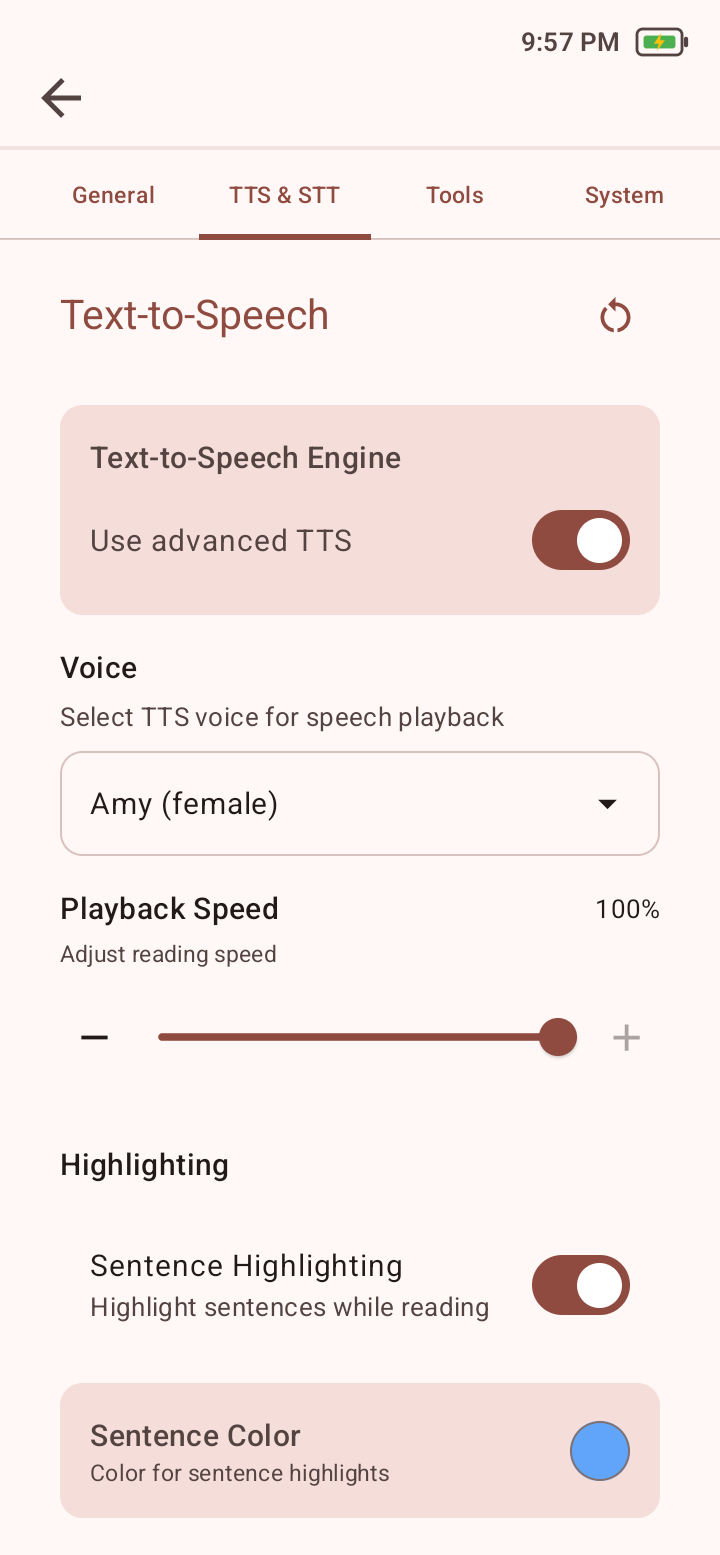
  1. TTS and STT settings showing the text-to-speech engine, playback speed, and sentence highlighting.
    TTS & STT: choose the text-to-speech engine and adjust playback speed and highlighting.
    Open full-size screenshot
  2. TTS and STT settings with Use advanced TTS enabled and the Voice selector showing Amy female.
    When Advanced TTS is on, a Voice selector appears. The available voices depend on the speech assets installed on the device.
    Open full-size screenshot
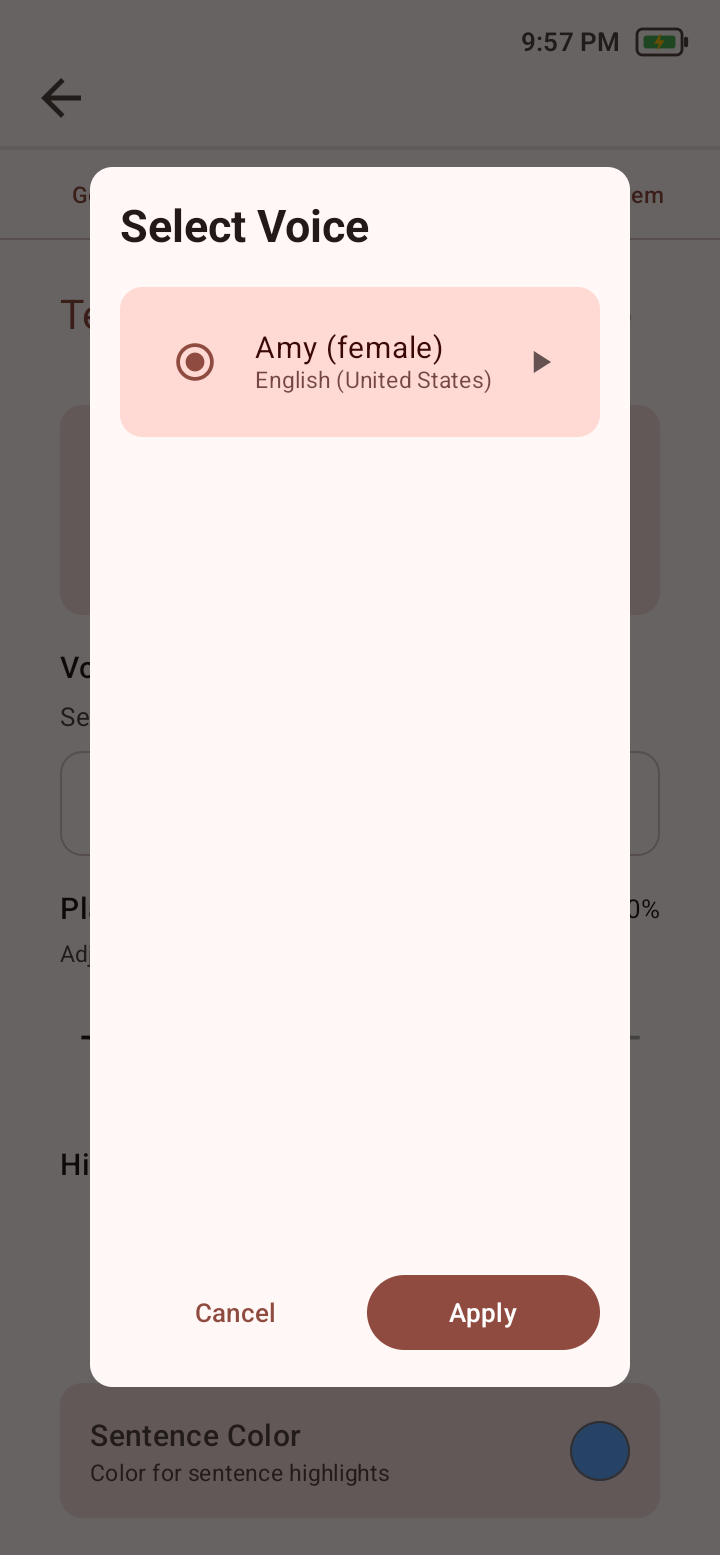
  3. Select Voice dialog showing Amy female selected, a preview control, and Cancel and Apply actions.
    Select Voice lists installed voices, identifies the locale, provides a preview, and applies the selected voice.
    Open full-size screenshot

Text Segmentation

Segmentation Mode / Max Segment Length

What it changes
Groups text for sentence navigation and playback.
Values
Auto, Sentence, Line, Fixed Window; 50–500 characters, default 250
Depends on
Max length is most relevant to Auto and Fixed Window behavior.
Lock behavior
TTS subsection can be locked.
Use it when
Use Auto for automatic grouping; choose Sentence, Line, or Fixed Window when that grouping better matches the material.
Student-facing guidanceIf Previous or Forward moves through too much or too little text, ask a staff member to try a different segmentation mode.
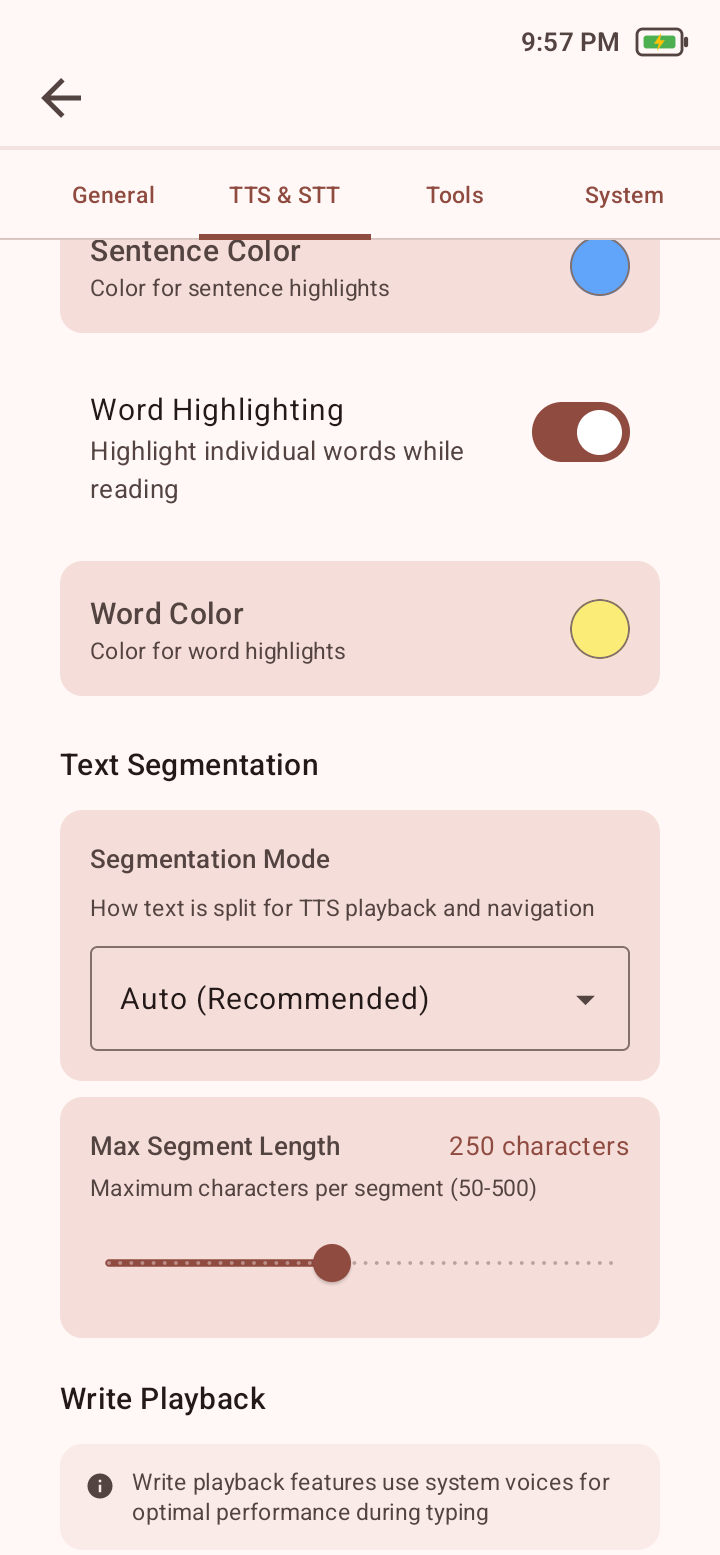
TTS and STT settings showing word highlighting, segmentation mode, maximum segment length, and the Write Playback heading.
TTS & STT: choose how text is grouped for navigation and playback; Write Playback follows the segmentation controls.
Open full-size screenshot

Write Playback

Play each word / Play each sentence

What it changes
Reads completed words or sentences while typing in Write.
Values
Both off by default
Lock behavior
TTS subsection can be locked.
Use it when
Enable only the feedback level that helps without interrupting composition.
Student-facing guidanceTurn on the feedback that helps you catch mistakes while typing. If it interrupts your ideas, use less feedback or turn it off.

Speech-to-Text

Speech-to-Text Engine / Model / Silence and Timeout

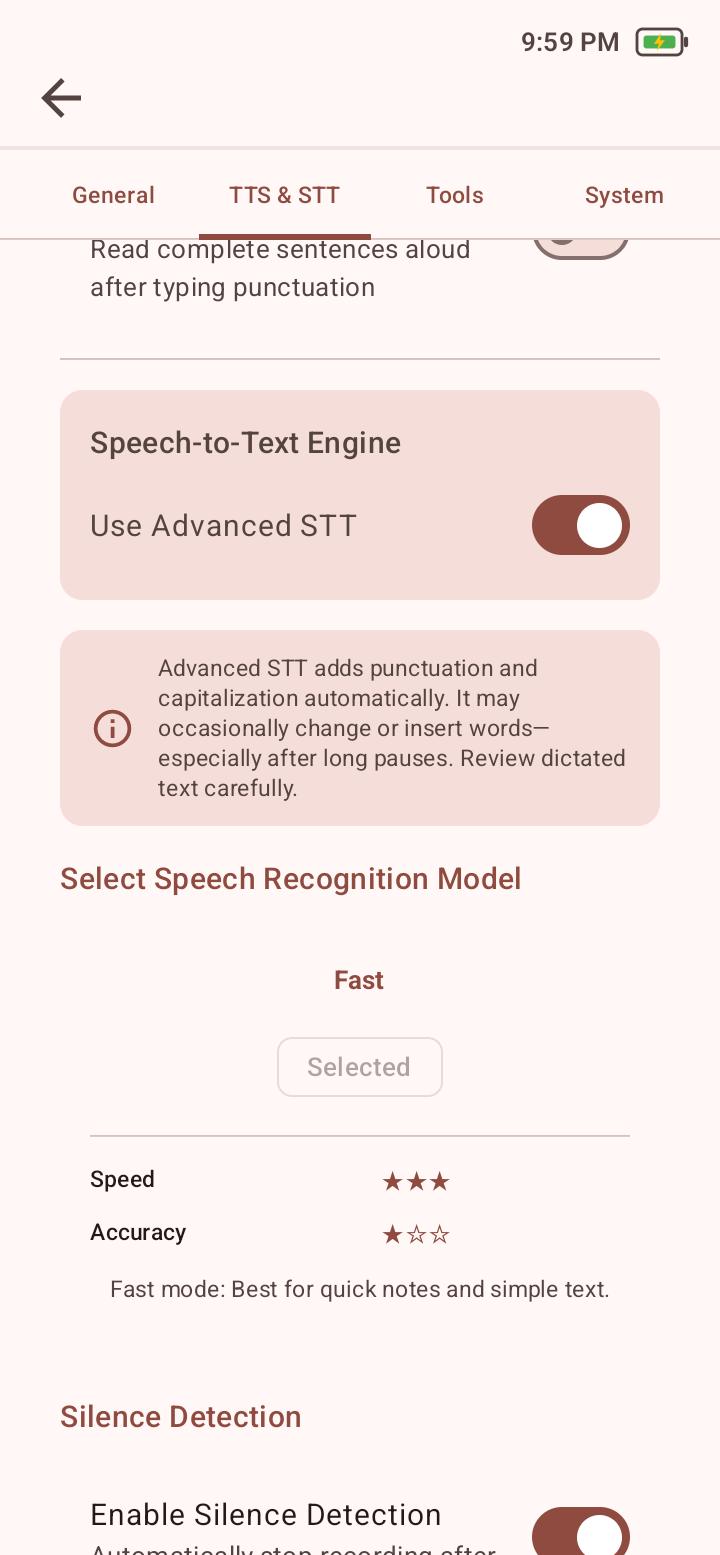
Native STT and Advanced STT are completely different offline speech-recognition engines. Advanced STT can provide better accuracy and automatic punctuation, but it may take longer to return text and can sometimes hallucinate by inserting words that were not spoken.

What it changes
Chooses the engine used for dictation and controls when listening stops.
Values
Native or Advanced; timeout defaults to 10 seconds in the software version covered by this manual
Depends on
Advanced recognition requires its model; punctuation and capitalization may be inserted automatically.
Lock behavior
STT subsection can be locked.
Use it when
Test both engines under expected noise conditions, then review every dictated result for omissions, substitutions, or inserted words.
Student-facing guidanceWait for Listening before speaking, then read the result before keeping it. With Advanced STT, check the automatic punctuation and remove any words you did not say.

Screen sequence

These screens show the related configuration states and controls. Open any screenshot at full size to inspect a setting.

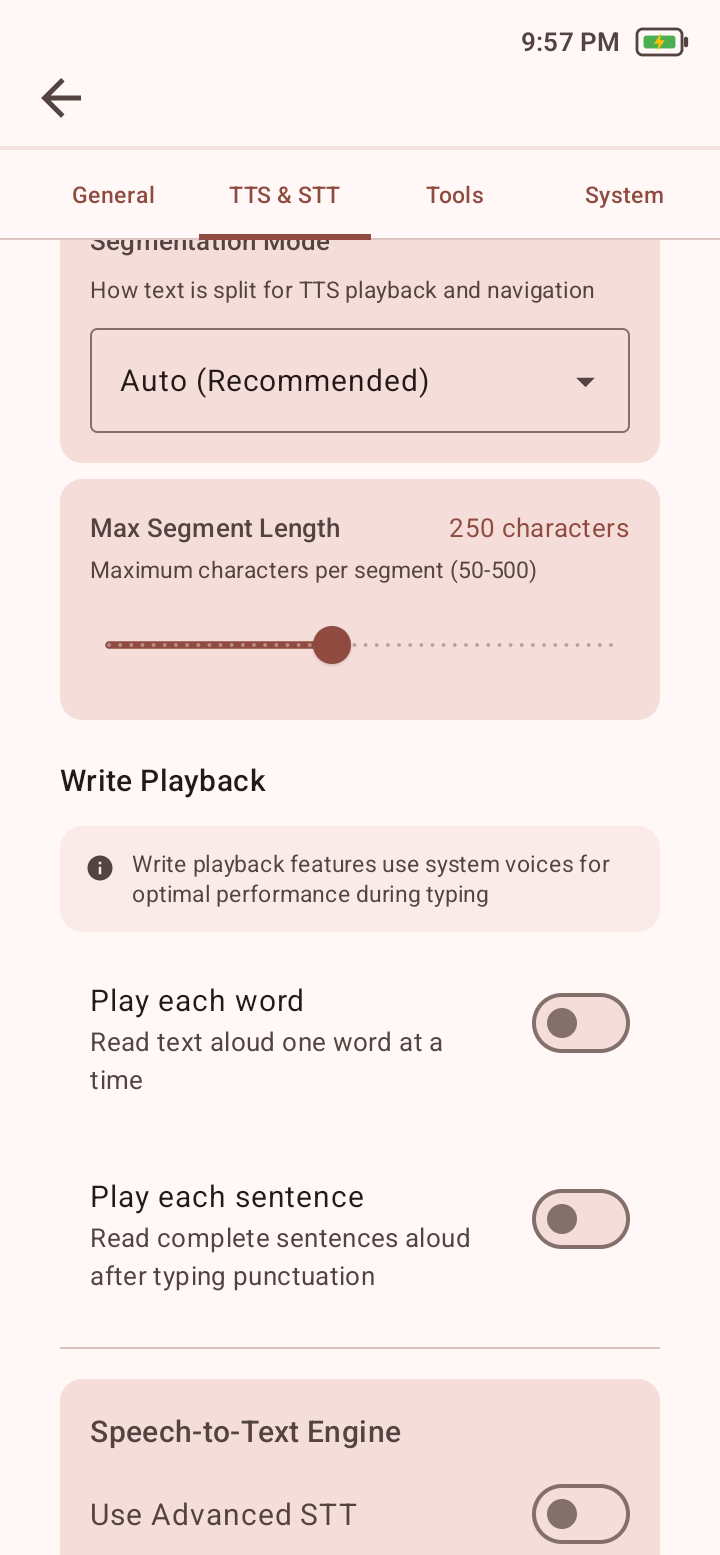
  1. TTS and STT settings showing Write Playback, play-each-word, play-each-sentence, and the speech-to-text engine.
    TTS & STT: configure Write typing feedback and the speech-recognition engine.
    Open full-size screenshot
  2. TTS and STT settings with Use Advanced STT enabled, its review warning, Fast speech recognition model selected, and Silence Detection controls.
    Advanced STT reveals its review warning, installed model choices, and silence controls. This example shows the Fast model.
    Open full-size screenshot

Tools

Camera Features

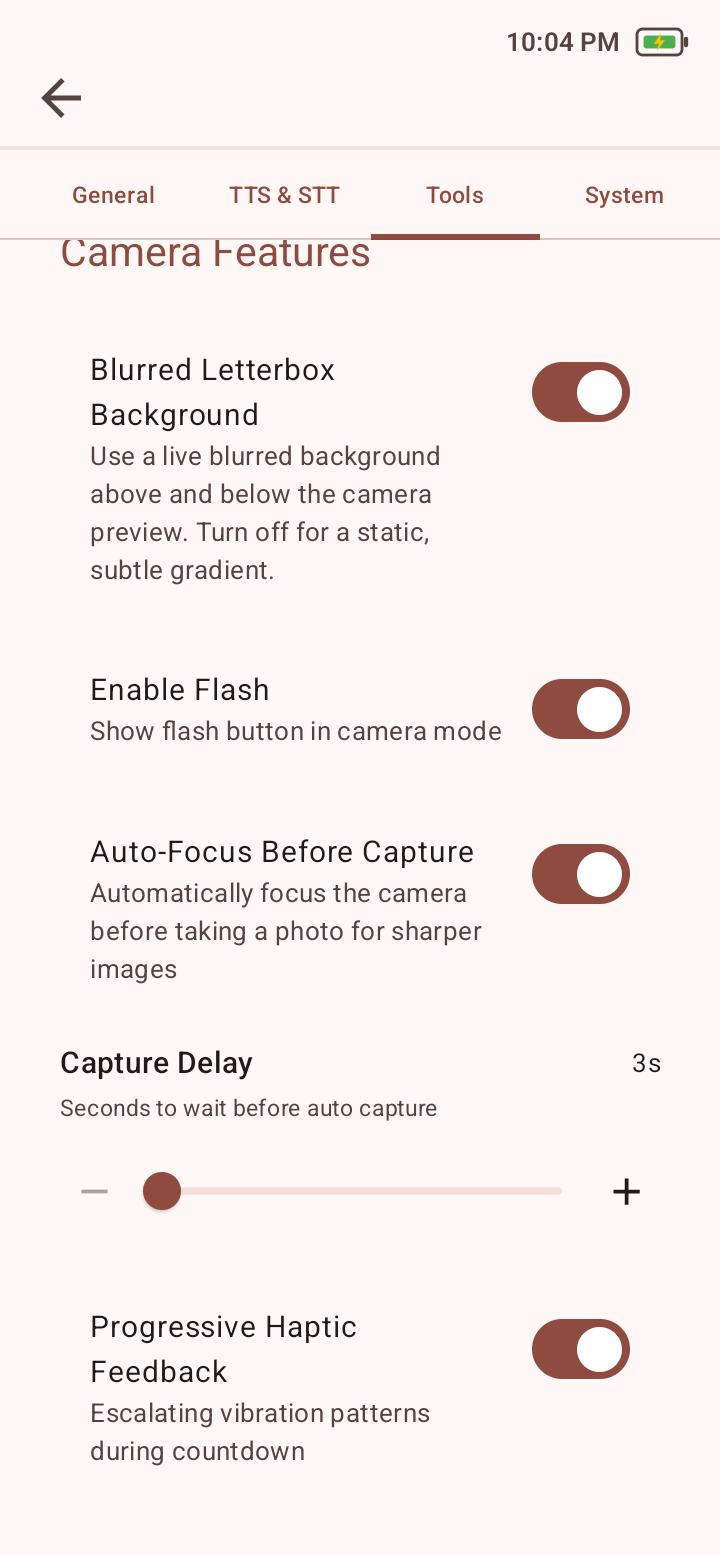
Letterbox, Flash, Autofocus, Capture Delay, Progressive Haptics, Manual Rotation

What it changes
Changes Read preview appearance, capture controls, coaching, timing, and optional rotation.
Values
Capture delay 3–7 seconds; autofocus enabled by default
Student view
Flash and rotation controls appear only when enabled.
Lock behavior
Camera Features can be locked.
Use it when
Test the delay with the user and choose a value that allows time to hold the page steady.
Student-facing guidanceUse the countdown and haptic cues to know when to hold still. Ask for a longer delay if you need more time to position the page.
Tools settings showing camera letterbox, flash, autofocus, capture delay, and haptic feedback.
Tools: camera behavior and the controls shown on the Read screen.
Open full-size screenshot

Plan Features

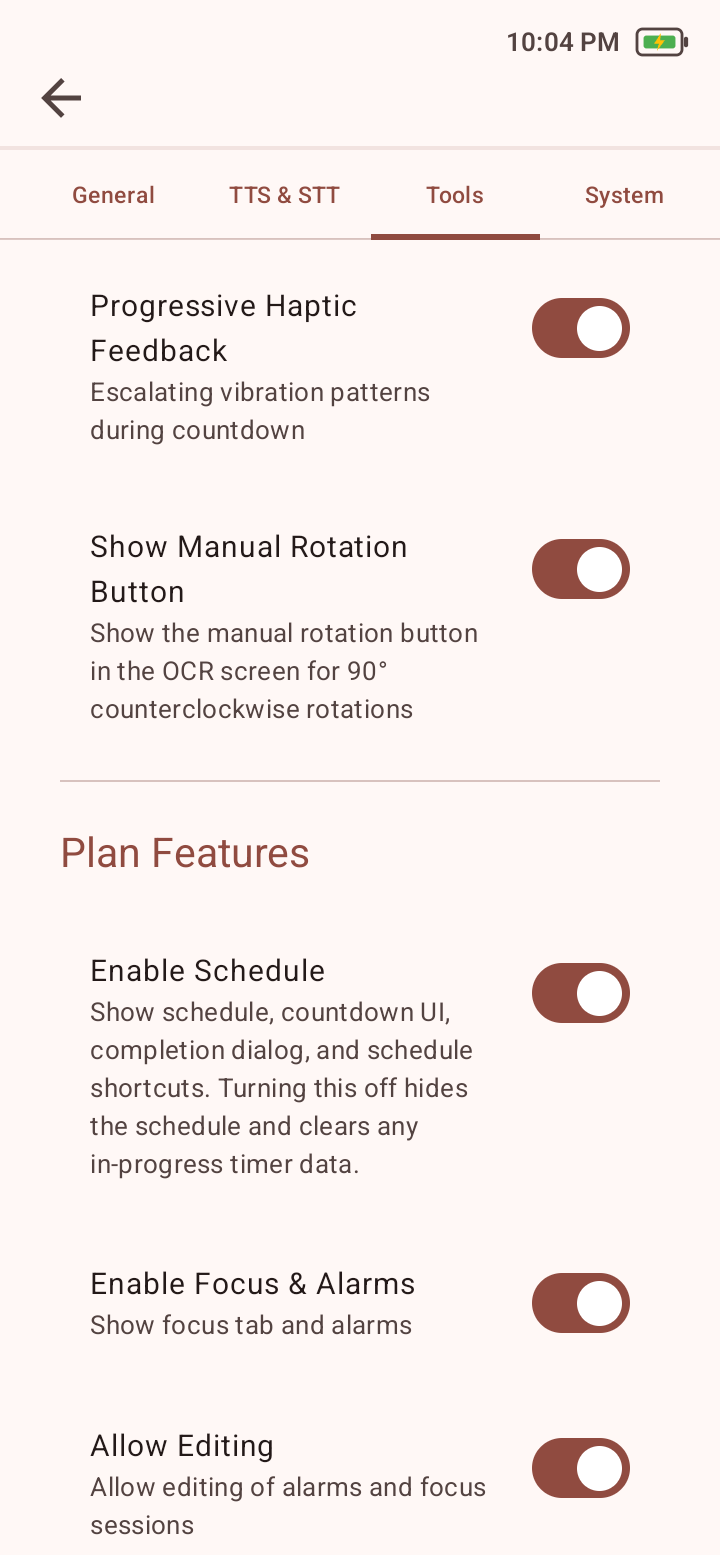
Enable Schedule

What it changes
Makes Plan available on Home and supported top bars. Turning it off clears any in-progress timer data.
Values
On/off
Student view
Off removes Plan and Schedule actions.
Lock behavior
Plan/session tools can be locked.
Use it when
Turn it on for task lists or timer support.
Student-facing guidanceWhen Plan is available, use it for task lists and classroom timers. Ask staff before turning it off because an in-progress timer can be cleared.
Tools settings showing rotation, Plan, Focus and Alarms, editing permission, and haptics.
Tools: optional rotation, Plan visibility, and Focus and Alarm editing.
Open full-size screenshot

Focus & Alarms

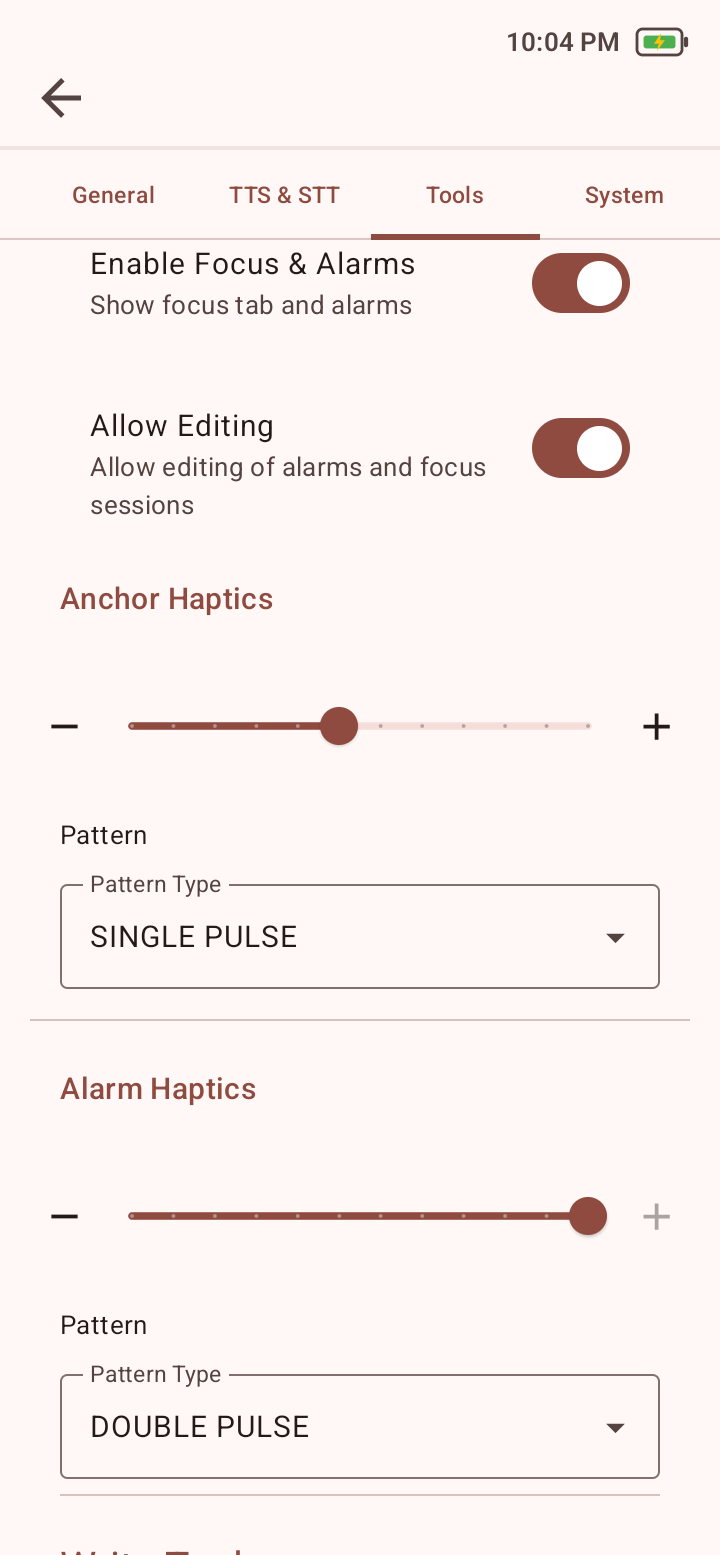
Enable Focus & Alarms / Allow Editing / Haptics

What it changes
Shows the Focus tab, controls whether Anchors and Alarms can be added, changed, or deleted, and configures their separate haptic cues.
Values
Intensity zero is None; selectable patterns
Depends on
Enable Schedule must be on; Allow Editing controls schedule changes.
Student view
Focus is hidden when disabled.
Lock behavior
Focus & Alarms can be locked.
Use it when
Keep editing off when students should receive prompts but not change schedules.
Student-facing guidanceUse Anchors and Alarms as classroom reminders. If editing is unavailable, ask the staff member who manages your schedule instead of trying to bypass the lock.
Tools settings showing Focus and Alarms editing plus Anchor and Alarm haptic controls.
Tools: configure whether Focus items can be edited and how Anchor and Alarm haptic cues behave.
Open full-size screenshot

Write Tools

Enable Sound Boxes

What it changes
Adds Sound Boxes to the Write mode bar.
Values
On/off
Student view
Off removes Sound Boxes.
Lock behavior
Write Tools is not listed among the current Settings Lock section controls.
Use it when
Enable for phoneme or sound-mapping activities.
Student-facing guidanceWhen Sound Boxes is available, move one token for each sound you hear in the word. Ask staff to enable it when it is part of your activity.

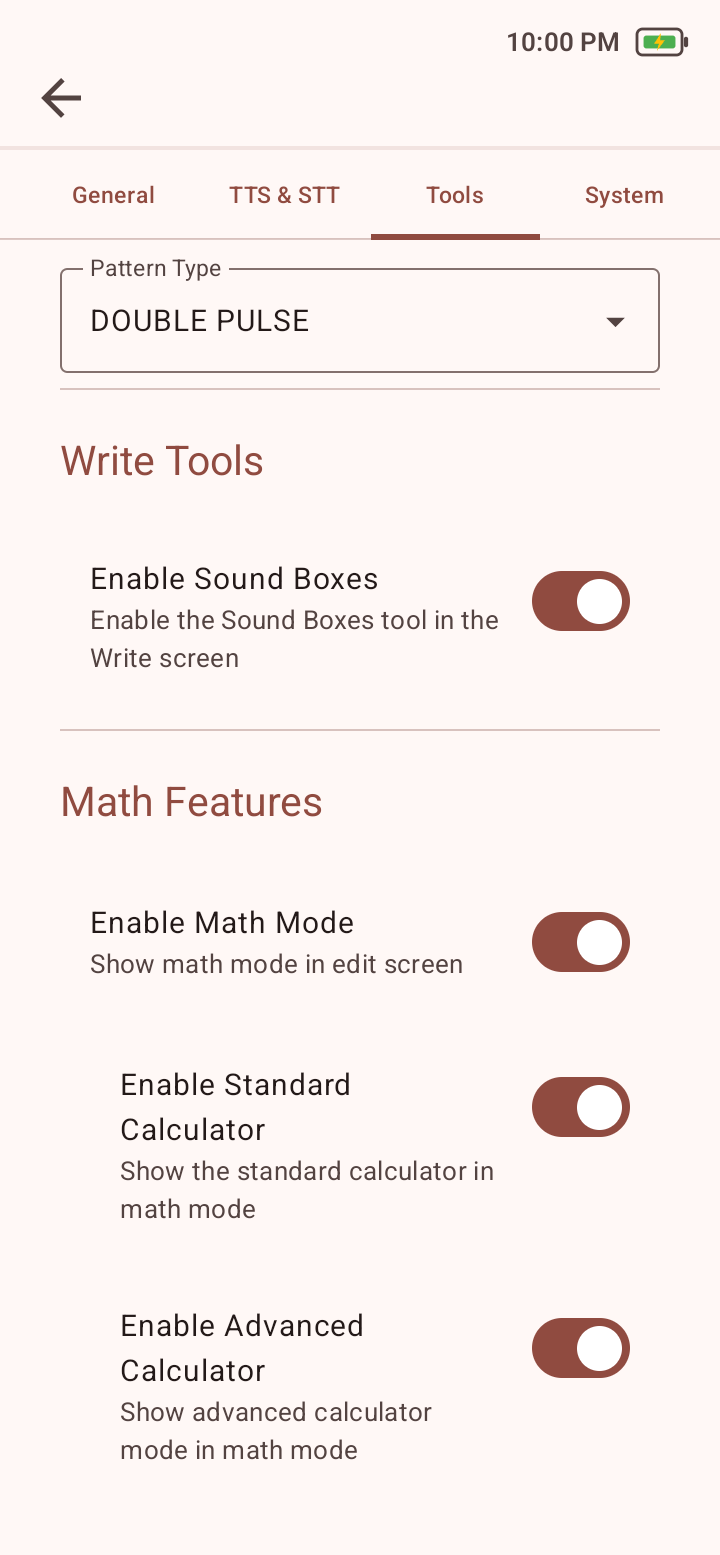
Math Features

Enable Math Mode / Individual Tools

What it changes
Controls Home visibility and whether Standard Calculator, Advanced Calculator, Math Paper, 10-Frame, Money, Time, and Geometry are available.
Values
Master and individual on/off switches
Depends on
At least one individual tool and Math Mode must be on.
Student view
Math disappears from Home when no Math tool is available.
Lock behavior
Math Features can be locked.
Use it when
Enable the tools selected for the current activity.
Student-facing guidanceOnly the Math tools chosen for your activity may appear. If the tool you need is missing, ask the staff member who manages Settings.

Screen sequence

These screens show the related configuration states and controls. Open any screenshot at full size to inspect a setting.

  1. Tools settings showing Write Tools with Enable Sound Boxes and the beginning of Math Features with Math Mode and calculator controls.
    Tools: enable Sound Boxes for Write and begin configuring the Math tools available from Home.
    Open full-size screenshot
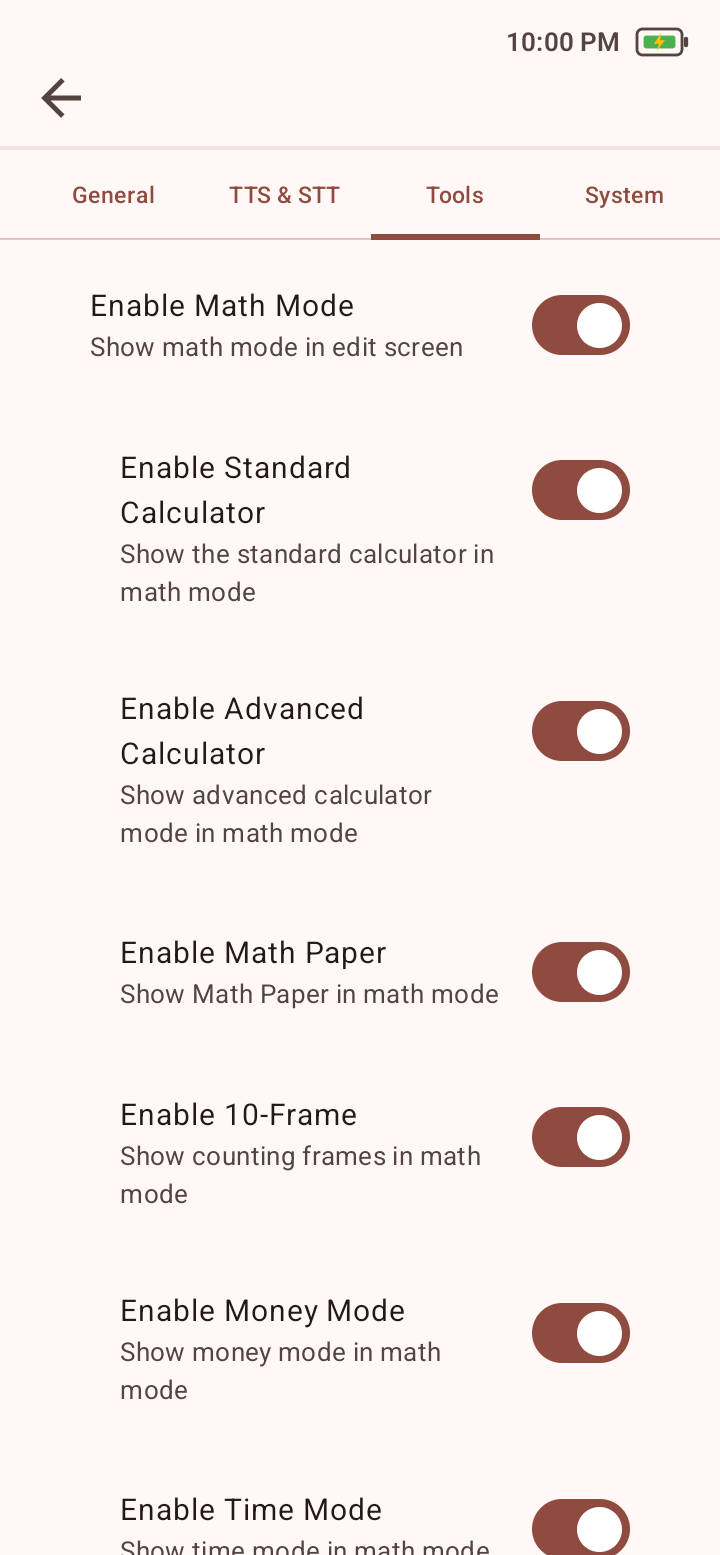
  2. Math Features settings showing Math Mode, Standard Calculator, Advanced Calculator, Math Paper, 10-Frame, Money, and the start of Time controls.
    Math Features: the master Math Mode switch is followed by individual tool switches.
    Open full-size screenshot
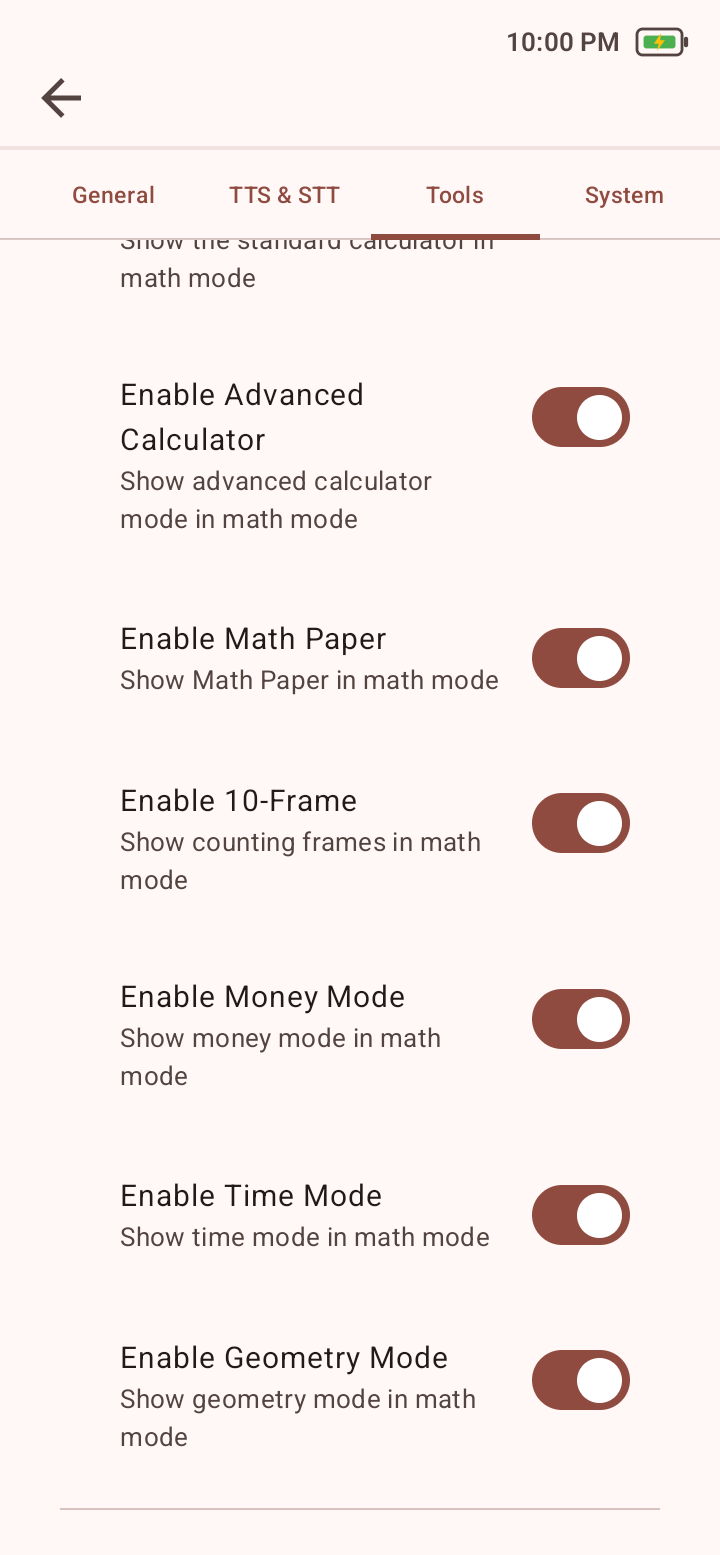
  3. Math Features settings showing Advanced Calculator, Math Paper, 10-Frame, Money, Time, and Geometry switches.
    Math Features: the complete lower tool list includes Math Paper, 10-Frame, Money, Time, and Geometry.
    Open full-size screenshot

System

Time & Date

Set Current Time / Set Current Date

What it changes
Adjusts the app’s displayed time and date used by timers, Anchors, and Alarms.
Lock behavior
System can be locked.
Use it when
Verify the displayed time and date before using scheduled prompts.
Student-facing guidanceIf a timer, Anchor, or Alarm appears at the wrong time, tell a staff member that the device time or date may need checking.

Network

Manage Wi-Fi

What it changes
Opens the managed network screen used for software and model update tasks.
Lock behavior
System can be locked.
Use it when
Follow your school or organization’s device-management policy when connecting to Wi-Fi. Read, Write, Math, and Plan normally work without an active internet connection.
Student-facing guidanceYou normally do not need Wi-Fi for Read, Write, Math, or Plan. Ask authorized staff for help with network or update tasks, and never share a network password.
Software Updates

Automatic Checks / Check / Download / Install

What it changes
Checks for LumaRead2, system, and model updates and reports download or install progress, restart needs, or errors.
Depends on
Requires a network connection.
Lock behavior
System can be locked.
Use it when
Before downloading or installing, make sure the device has sufficient charge or is connected to power. Follow on-screen progress and restart prompts, and avoid powering off during installation.
Student-facing guidanceLet an update finish and follow any restart message. Do not power off the device during installation; ask staff if you see an error.
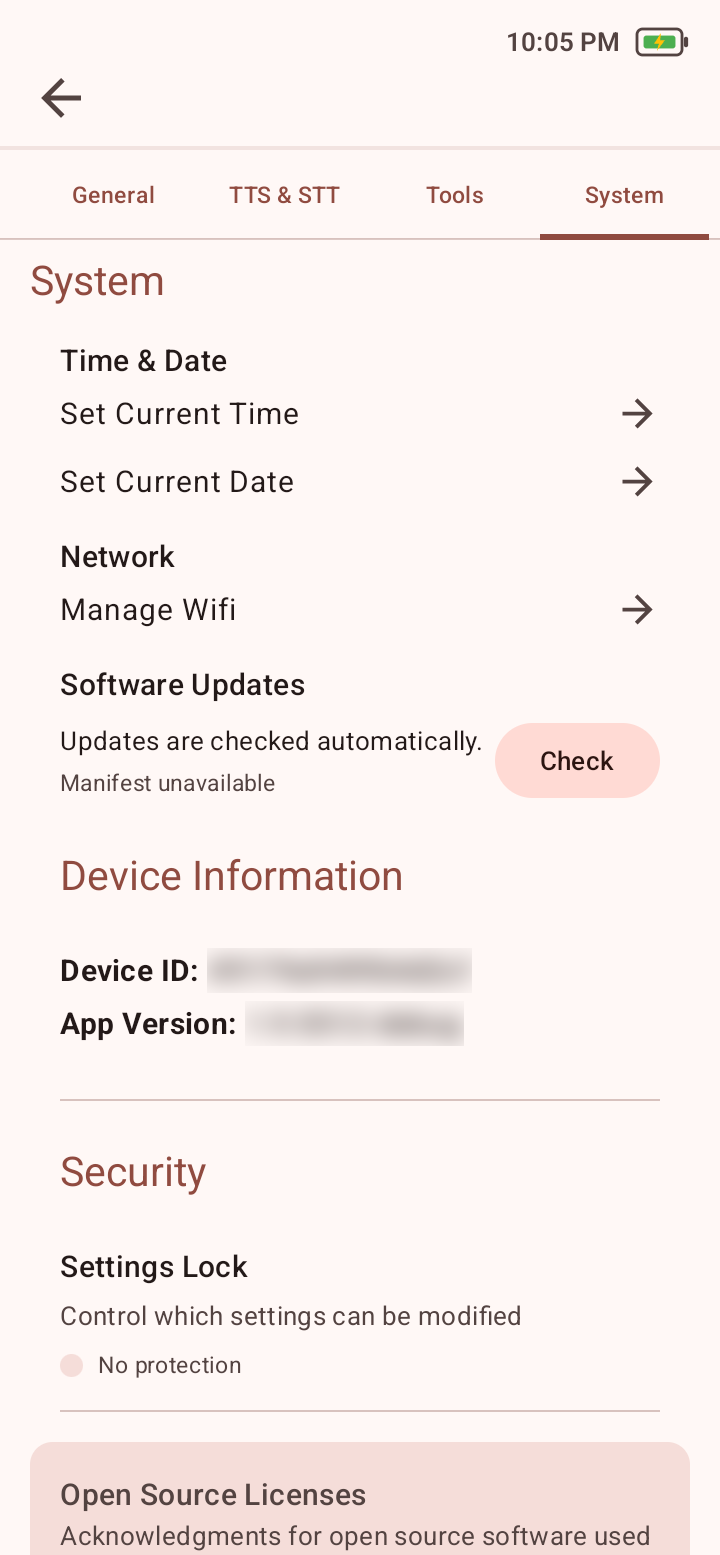
System settings showing time, date, Wi-Fi, software updates, device information, and security.
System: set time and date, manage Wi-Fi and updates, find Device ID and App Version, and protect Settings.
Open full-size screenshot

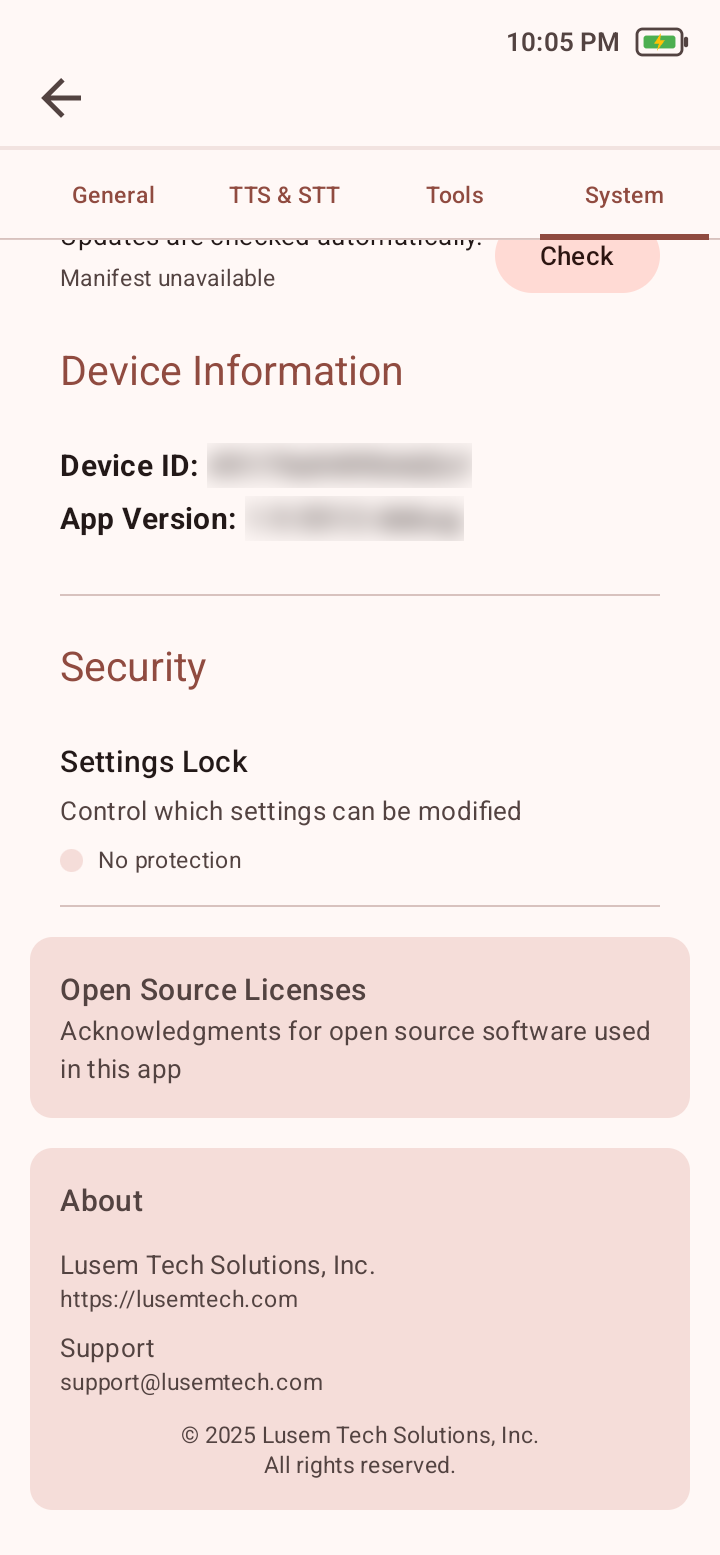
Device Information

Device ID / App Version

What it changes
Shows the Device ID and App Version, which help Support identify the device and software build.
Lock behavior
System can be locked.
Use it when
Include both in a direct Support message when they are relevant to the issue.
Student-facing guidanceA staff member may ask you to open this screen when getting help. Share the Device ID and App Version only through your school’s approved support process.

Security

Settings Lock

What it changes
Sets or updates the Settings password and locks General subsections, TTS/STT, Camera, Math, Focus & Alarms, Plan, and System.
Values
Lock all or make all available, plus subsection controls
Lock behavior
Unlock requires the configured Settings password.
Use it when
Keep the password with authorized staff; never include it in a support email.
Student-facing guidanceA lock means an authorized staff member manages that setting. Ask for help when a change is needed, and never request, guess, or share the Settings password.

About

Open Source Licenses / About

What it changes
Shows open-source acknowledgments, company information, the website, and the Support email address.
Lock behavior
System can be locked.
Use it when
Review software notices or find the product website and Support contact.
Student-facing guidanceUse About when a staff member asks you to find the product website or Support address.

Screen sequence

These screens show the related configuration states and controls. Open any screenshot at full size to inspect a setting.

  1. System settings showing Device Information, Settings Lock, Open Source Licenses, and About.
    System: find Device ID and App Version, review lock status, and open license or product information.
    Open full-size screenshot
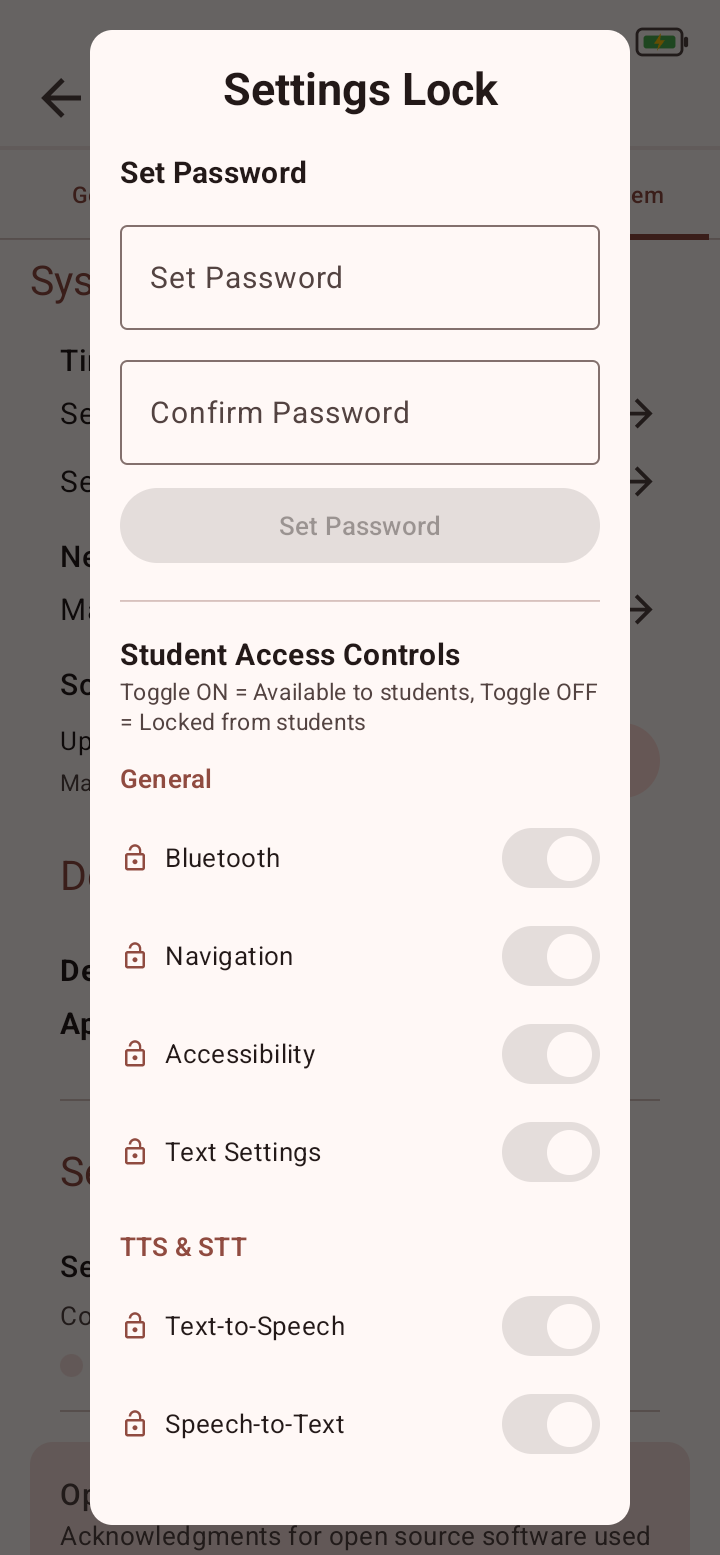
  2. Settings Lock dialog showing Set Password and Confirm Password fields plus disabled Student Access Controls before a password is configured.
    Settings Lock begins with password setup. Access controls remain unavailable until a password is configured.
    Open full-size screenshot
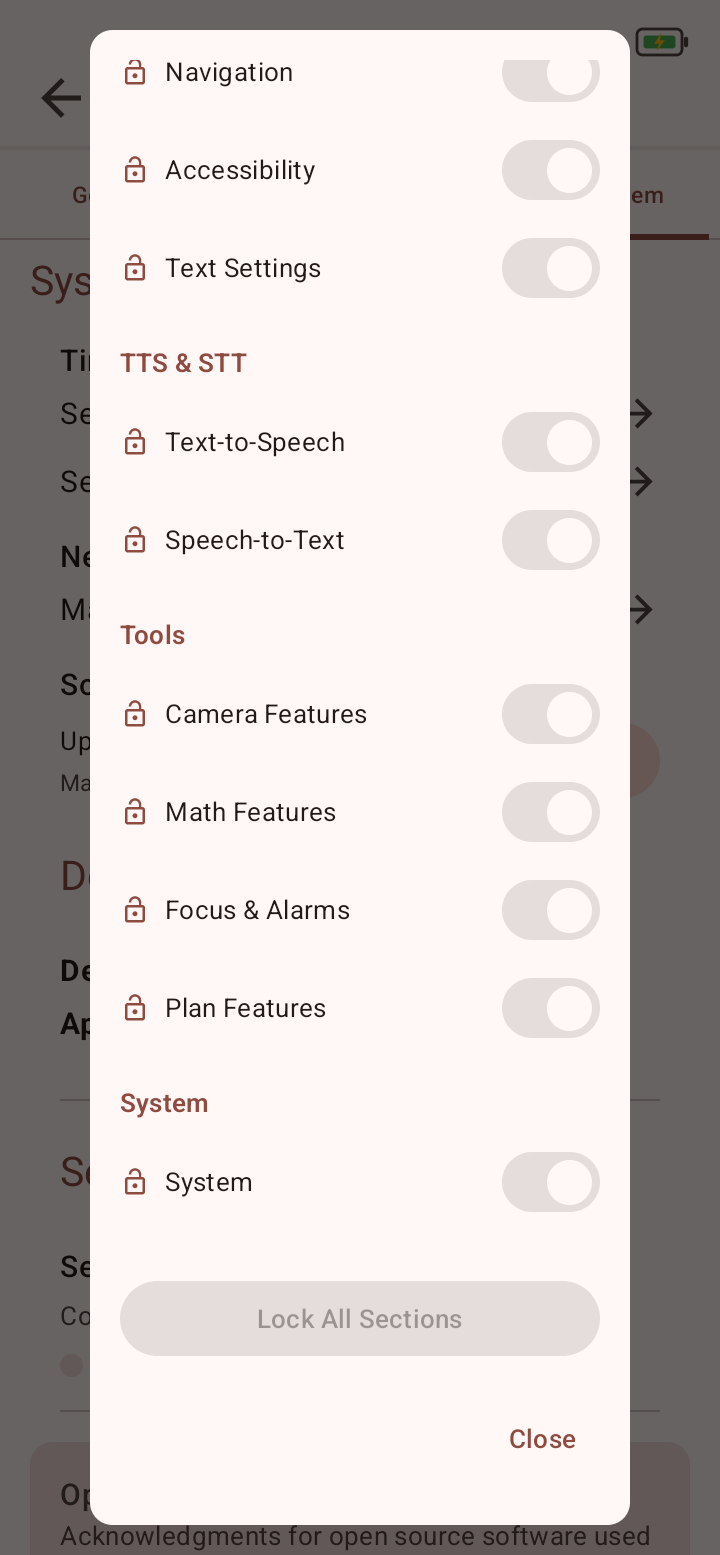
  3. Settings Lock dialog showing General, TTS and STT, Tools, and System access switches, Lock All Sections, and Close.
    Student Access Controls cover General, TTS & STT, Tools, and System. On means available to students; off means locked.
    Open full-size screenshot

First-line troubleshooting · 8 of 10

Try safe checks, then gather useful details

These checks do not require opening the device, entering hidden screens, or bypassing school controls.

The device will not start or charge

  1. 1.If the device is unusually hot, smells unusual, is swollen, has liquid exposure, or shows visible damage, stop and follow the safety guidance under Device setup.
  2. 2.Inspect the supplied charger, cable, and connections for visible damage.
  3. 3.Connect the supplied charging equipment, wait several minutes, and try the power-on step again.

If it still fails: Email Support with the product/model, relevant order details, and symptoms. Attach a photo only if it can be taken without handling an unsafe device and does not show student information, credentials, or unrelated personal details. Do not open the device.

Read reports No Text Detected or OCR is poor

  1. 1.Flatten the page and fill the preview with text.
  2. 2.Improve even lighting; reduce glare and shadow.
  3. 3.Hold the device parallel and steady; use autofocus and an appropriate capture delay.
  4. 4.Crop to the useful text or recapture.

If it still fails: If school policy allows an image, send a non-sensitive sample page. Include the expected text, actual result, Device ID, and App Version.

Speech or highlighting does not behave as expected

  1. 1.Stop playback and start from a known word or sentence.
  2. 2.Check volume or paired headphones.
  3. 3.Preview the selected voice and check speed, highlighting, colors, segmentation, and max length.

If it still fails: Report a non-sensitive text example, the selected playback unit, relevant settings, and whether voice preview works.

Dictation misses or changes words

  1. 1.Reduce background noise and speak a shorter phrase.
  2. 2.Wait for Listening before speaking and Processing before editing.
  3. 3.Check the selected STT engine/model and timeout.
  4. 4.Correct the result with keyboard or predictions.

If it still fails: Include a non-sensitive example phrase, expected/actual text, engine choice, and reproduction steps.

Math, Plan, Focus, Sound Boxes, or a control is missing

  1. 1.Check the related main feature in Tools.
  2. 2.For Math, confirm Math Mode and at least one individual tool.
  3. 3.For Focus, confirm Enable Schedule and Enable Focus & Alarms.
  4. 4.For rotation or flash, confirm the specific Camera Feature.

If it still fails: Record which Home tile or control is absent and the relevant Tools screen state.

Settings or editing is locked

  1. 1.Ask the authorized device administrator for access.
  2. 2.Confirm whether the subsection is intentionally locked.
  3. 3.For Anchors/Alarms, check Allow Editing.

If it still fails: Email Support only if authorized staff cannot unlock with the known password. Never send the password.

A timer, Anchor, or Alarm is late or absent

  1. 1.Check the device time and date, item switch, recurrence day, and time window.
  2. 2.Confirm Enable Schedule and Enable Focus & Alarms are on.
  3. 3.If the prompt appears without a haptic cue, check the separate Anchor or Alarm intensity and pattern; zero is None.

If it still fails: Include the item’s non-sensitive schedule, expected time, actual behavior, Device ID, and App Version.

Wi-Fi or an update does not complete

  1. 1.Open Settings > System > Manage Wi-Fi and follow your organization’s network policy.
  2. 2.Before an update, make sure the device has sufficient charge or is connected to power.
  3. 3.Let each on-screen stage finish, follow any restart prompt, and read the visible error before retrying.

If it still fails: Provide the update name, visible status or error, general connectivity state, Device ID, and App Version. Do not include network names, passwords, or other credentials.

Touch or display response is unreliable

  1. 1.Clean and dry the screen with a soft cloth.
  2. 2.Remove pressure from the screen and retry a known large control.
  3. 3.Power off normally and restart if safe.

If it still fails: Report the affected area and whether physical damage is visible. Attach a photo or video only if it does not show people, student information, credentials, or unrelated personal details.

An item is damaged or appears missing

  1. 1.Keep the packaging and compare it with the package documentation supplied with the order.
  2. 2.Do not test the device with charging equipment from another product. Contact Support if the supplied charger or cable is missing.

If it still fails: Email the organization, relevant order details, product/model, and what was received. If you attach packaging photos, crop or cover shipping labels and unrelated personal information.

Support contact path · 9 of 10

Before contacting Support

Gather the device and behavior details that help Support reproduce and triage the issue without exposing passwords or student information.

Prepare these details

  • Product and model
  • Device ID
  • App Version
  • School or organization
  • Order context, if relevant
  • Expected behavior
  • Actual behavior
  • Steps to reproduce
  • Safe photos or screenshots

Find Device ID and App Version in Settings > System > Device Information. Do not include the Settings password, network credentials, recovery information, or student records.

Quick reference · 10 of 10

Frequently asked questions

Use these short answers to find the right manual section or support path quickly.

Why is Math or Plan missing from Home?

Math requires Math Mode plus at least one enabled Math tool. Plan requires Enable Schedule. A device administrator can review both in Tools settings.

Does Luma R1 need the internet for classroom tools?

Read, Write, Math, and Plan normally work without an active internet connection. A connection may be needed for software or model updates and device-management tasks.

How do I start a completely new Read capture?

Return to the Camera screen. Opening Camera clears the current Read session and starts a new capture.

What should I include in a support email?

Include the product/model, Device ID, App Version, organization and relevant order details, expected and actual behavior, and exact steps. Attach photos or screenshots only when needed, and exclude students, credentials, student records, and unrelated personal information.

Should I send the Settings password?

No. Keep passwords, recovery information, and school credentials out of support messages.

Back to top